Demon Alliance Invasion
Demon Alliance Invasion is an event type where players work together to stack buffs and fight extremely-bulky bosses.
Contents
Getting Boss Spawns
Bosses may spawn from most mission types.
- Brands of Sin, Strange Signal and Leveling quests are the most convenient, since they are commonly farmed for other stuff, letting you make the most of your stamina.
- Hell's Park can also spawn bosses, convenient if you've not completed it yet for the month.
Bosses will NOT spawn from the following:
- Story quests that play cutscenes after the fight. Seemingly, ones that play the cutscene before the fight will spawn the bosses normally.
- Alter-World quests.
Once a boss appears, it will be available to fight for 8 hours, or until it is defeated - whichever happens first.
Up to 10 bosses discovered by the player can be stored in the battle menu at a time. Bosses discovered by other players are not subject to this limit.
Boss tiers
There are three tiers of bosses that can spawn:
- Normal Boss (tier 1)
- Superior Boss (tier 2)
- Ultimate Boss (tier 3)
When a boss spawns from completing quests, it can be any of the three tiers.
When a boss spawns from defeating another boss, it will be a Superior or Ultimate Boss (never a Normal Boss).
Higher-tier bosses have much more HP per level, and will give much more event points.
Battle Basics
These boss fights will allow you to field two parties, similarly to Leveling Quests or Aura Gate exploration parties. Important to note that the party configurations are saved independently from Dx2 selected, so you may form a party, decide that a different Dx2 would be a better match, and change them without needing to re-select your demons once again.
- Both fights have a 2-turn limit
- If your first team can't defeat the boss in time, the battle will progress to its second phase, with your second team.
- If your first team dies to the boss, the battle will simply move to the next phase.
- If the second team also can't beat the boss within the turn limit, the battle will end inconclusively, and you will request an S.O.S. from a group of random players.
- This SOS will target 10 players who have played within the last 3 days, divided into: 4 friends, 4 faction users, and 2 random players. You can also send friend requests if the player in question isn't already a friend.
- If the boss's HP reaches 0, the battle will end immediately, regardless of which team is currently fighting.
If a boss that you found dies (whether you killed it or someone else did), that boss's level will go up by +1 the next time you encounter one. (Example: You discover a level 2 Anat and it dies. The next Anat that you discover will be level 3.) At higher levels, bosses will gain higher stats and especially HP. Their skills will stay the same, though.
- However, if a boss someone else found dies, that does NOT affect your own boss levels.
- Bosses that escape due to a time-out will not count as killed, and therefore will not increase level.
All players' boss levels will reset once the second half of the event starts.
Buff Stacking
One player's buffs will carry over to other players' fights, stacking to high numbers, allowing the participants to deal increasing amounts of damage to high level bosses. This is necessary to even be able to survive high level boss attacks.
- Buffs you cast during a run will be added to your total buffs immediately.
- Buffs cast by other players will be applied to your total buffs only after the other player finishes their run.
Buffs have the following stacking caps:
| Stat | Stack cap |
|---|---|
| +100% | |
| +10,000% | |
| +10,000% |
(EV/AC's low cap is likely meant to prevent the boss from missing)
Liberator effects (such as ![]() Chalk Eater) also count for buff stacking.
Chalk Eater) also count for buff stacking.
However, debuffs will NOT stack. Only buffs will stack!
- Also, Devil Connector buffs do NOT count!
BP and Attack Modes
With this new event comes a new form of Stamina, called BP. These are used exclusively on this kind of battle, and recovers independently from normal Stamina, Duel Stamina, or Aura Gate Steps. 1 BP recovers every 10 minutes.
BP has its own refill drinks as well, called ![]() Rader Pepper and
Rader Pepper and ![]() Time-Limited Rader Pepper.
Time-Limited Rader Pepper.
When selecting a fight, three options are available, each with a different cost and different boost to the team's damage output:
| Option | Cost | ATK boost |
|---|---|---|
| Attack | 1 BP | 1x |
| Strong Attack | 2 BP | 3x |
| Full Power | 3 BP | 5x |
Additionally, the boost will multiply the amount of buffs received per cast.
- For example: Casting a
 DEF buff normally adds +20% to your buff totals. During a Full Power run (x5 multiplier), casting a
  DEF buff will add +100% to your buff total instead.
When responding to another player's SOS call, the first run against that boss will have all BP options discounted by 1 BP.
Point Calculation
After each run you are awarded points depending on your performance. There are two types of scores awarded:
- If you did not kill the boss, and nobody killed the boss while you were running your attempt, you will just get points based on your current run.
- Else if the boss did die, you will also get an additional set of points for your total performance in that boss fight.
The general formula for score calculation is the following:
BATTLE POINTS * DISCOVERY BONUS * LAST ATTACK BONUS * BUFF BONUS * DAMAGE BONUS
LAST ATTACK BONUS = 1.5 if boss is killed during run, 1 otherwise
DISCOVERY BONUS = 1.2 if boss is discovered by you, 1 otherwise
BUFF BONUS = 1 + (0.30 * A) + (0.20 * B) + (0.10 * C), where A is buffs 1 to 10, B is buffs 11 to 20, and C is buffs 21 to 30 (at 30 buffs, you hit the max bonus of 7)
DAMAGE BONUS = (max value of 6 if you dealt 100% of the boss's health in damage. exact scaling needs testing)
Further explanations:
- Battle Points varies depending on the boss, in general the rarer the boss the higher the Battle Points you receive. Increases with Bonus SP demons
- Buff Bonus - This counts up the amount of times you cast a buff, maxing out at a count of 30. The amount of bonus you get works on a tiered system: buffs 1 to 10 increase bonus by +0.30 each, buffs 11-20 apply +0.20 each, and buffs 21-30 apply +0.10 each.
- The count increases once per skill effect, not once per individual buff. For example: if Barong Dance is cast then that increases count by 1, even though it buffed ATK, DEF, and EV/AC all at once. This means you want as many different chain effects/separate skills that apply buffs as possible.
- If you spend 2 BP to 3x your buffs, then each skill effect increases the count by +3 instead of +1. Similarly, if you spend 3 BP to 5x your buffs, then each buff increases the count by +5 instead of +1. This means it is much easier to max the buff bonus on high-BP runs. On a 3BP run (5x buffs), you only need 6 casts (effectively 30 count) to get the max bonus.
- Devil Connector buffs do not increment the count.
- Total Score when the boss is killed is calculated using the same formula, only using the total amount of damage you did across all runs of the boss for the Damage Bonus and the total amount of times you triggered the Buff Bonus
General Pointers
When looking at the formula, the following guidelines appear for maximizing your own points:
- Having a team that can apply buffs while also still dealing damage is optimal. This saves BP, and also lets you still benefit from the buff bonus multiplier on a boss-kill run.
- The buff bonus caps out once you've used 30 buffing effects (decreases to 10 on 2 BP runs, or 6 on 3 BP runs), meaning that at some point you will get no more score increases from buffs during your run. It's still worth increasing buffs anyway though, as higher attack translates into more damage and therefore more points.
- You want to deal most of the damage in the same run that you finish off the boss, to combine the final blow multiplier with the damage multiplier. Finishing off a boss with just a sliver of health will generally give very little points.
- Multiple people can get the kill bonus - all that matters is whether you killed the boss on your run.
- If someone else kills the boss during your run, their buffs will then be added to yours, making it easier for you to get the kill bonus too - stalling until you get this is a viable strategy, if the boss has enough time left on their escape timer.
- Use

 Bonus SP demons whenever possible. However, you're unlikely to have a full set of 8 that are actually functional. Aim for a balance between bonus demons, and demons that are good by their own merits.
| Icon | Bonus |
|---|---|
| |
|
Rewards
The primary rewards from Invasion events are ![]() Demon Subjugation Medals.
Demon Subjugation Medals.
50 medals can be exchanged for one demon of choice from this list:
| Demon | Race | Grade | Rarity | Awaken Skill | Notes |
|---|---|---|---|---|---|
| Tenma | 95 | 5★ | - | ||
| Tenma | 92 | 5★ | Armaments are available. | ||
| Herald | 88 | 5★ | - | ||
| Tenma | 88 | 5★ | Armaments are available. | ||
| Herald | 87 | 5★ | Mediarama | - | |
| Herald | 86 | 5★ | - | ||
| Herald | 85 | 5★ | - | ||
| Femme | 84 | 5★ | - | ||
| Fiend | 84 | 5★ | Available in the general summon pool. | ||
| Tenma | 84 | 5★ | - | ||
| Femme | 82 | 5★ | - | ||
| Fiend | 82 | 5★ | Available in the general summon pool. | ||
| Femme | 80 | 5★ | - | ||
| Fiend | 80 | 5★ | Available in the general summon pool. | ||
| Tenma | 80 | 5★ | Armaments are available. |
Notes:
 Clear is not the best archetype for any of the demons here. However, it's okay to pick a demon as a placeholder until you have a colored version - just try not to invest too heavily into the Clear one (so avoid paneling, using red magatamas, etc. Leveling and Awakening is fine. Evolving is iffy.)
- Spiritizing Clears to help panel your colored copy is also a good strategy - but try to hold off until you can claim enough spirits to complete a panel.
- If the armaments interest you, this is the best way to obtain them, as
 Clear demons would normally spiritize to only 60 spirits. You can then spiritize colored copies from the gacha for 100 spirits to panel the armaments.
 - Among the options, you will probably want to pick a Tenma.
- Demons NOT worth picking: Riders (they're in the general summoning pool, so they're easy to get), Sisters (irrelevant in PvE and PvP currently). Archangels are not awful picks, but they are only really helpful for Democalypse.
Recommended demons:
 Indrajit - Strong
  Elec mage. Can also counter
  Almighty users, especially
  The 10th Angel in PvP. Replace with a
  Purple one later.
 Asura Lord - Buff/debuff control for
  Phys Democalypse prelim, and is helpful for
  Almighty damage in Hell's Park 100. Replace with a
  Red or
  Purple one when you can.
 Mahakala - Strong
  Fire mage, especially for Democalypse boss since he also debuffs the enemy. Replace with a
  Purple one later.
 Asura - Helpful in Brands of Sin: Deceit 10, but stages 11-13 may need his panel 2 (and you should NOT panel the Clear one). In Deceit 14, he strongly prefers
  Teal to deal with the first wave.
 Yama -
  Evade Mortal and buff control for the team. Works as a generalist for magic-based Democalypse prelims, especially
  Dark, but he can work in any of them. Replace with a
  Purple one later.
Recommended armaments:


 Asura sword or shield
 Indrajit shield - counters
  Almighty, especially
  The 10th Angel in PvP.
Tips
BP management:
- Once you start fighting higher-level bosses, the damage you can deal during your first battle will be very low compared to their scaling HP stat. It's best to do one or two battles using the standard 1 BP attack option to build your buff stock, then use the 3 BP option to attack for massive damage.
- Normal-tier bosses have very low drops, so they're only worth fighting to spawn a Superior or Ultimate boss, if your SOS list has none at the moment. Be careful not to spend too much BP on Normal bosses.
- As boss levels increase, farming the event becomes more difficult. The discovery bonus multiplier also isn't very high. Therefore, you should prioritize fighting SOS bosses over your own bosses, especially Ultimate (tier 3) bosses for points.
- For SOS Ultimate bosses, do a couple 1 BP runs to set up buffs, then a bunch of 3 BP runs to grind out as much points as possible (getting a kill is great for the multiplier, but it's difficult as you're competing with other players to get it). Use

 Rader Peppers if you have any, as spending 3 BP on Ultimate boss runs in this way is the most-efficient use of BP.
- For SOS Ultimate bosses, do a couple 1 BP runs to set up buffs, then a bunch of 3 BP runs to grind out as much points as possible (getting a kill is great for the multiplier, but it's difficult as you're competing with other players to get it). Use
Team/in-battle:
- You may be able to kill the first or second boss quickly enough to not worry about their damage, but in time you will have to bring healer/tank units to keep your team alive.
- Do not neglect
 Sukukaja buffs. They may not increase your damage, but a lucky dodge may well save your team from death to let them fight another turn.
 - Remember that each team only gets to fight for 2 turns. Whether your team has the speed to go first or second, affects how much survivability you need to have:
- If you go first, then you need to tank 1 turn of the boss's attacks - if the boss kills someone on its second turn, it won't matter, as you'll automatically switch to the next team or finish the run anyway.
- If you go second, then you need to tank 2 turns of the boss's attacks.
- Try to avoid using demons that attack your own party, such as
 Narcissus. The event's stacked buffs can get very high, so you would risk killing your own party members.
Useful Liberators
Utility
 Chalk Eater is the man to use if you find yourself fighting a boss with an exploitable weakness. He will repeatedly provide you with buffs of all 3 types, MP recovery, and occasionally extra press turns. If no weaknesses are present, he can still give your demons +7 MAG.
 Eileen will make
  Random Targets attacks have higher minimum hits, and will occasionally not use up any press turns when Passing. This is especially helpful as the fight drags on, as your demons might eventually not have enough MP to attack, making you Pass their turns. Getting that Pass for free could let you squeeze in a couple more skill uses.
Offensive
 Kangaroo Boxer boosts your physical attacks (+7 STR, +7 AGI), and casts
  Sukukaja and
  Sukunda to help with accuracy.
 Vince boosts physical attacks as well (+12 STR), while also boosting critical hit damage and casting
  Sukukaja and
  Sukunda when you land them. If you have demons that can cast
  Rebellion automatically through passives, Vince can also cast
  Rakunda.
 Templar Dragon will boost
  Concentrate and
  Charge effects, like those provided by
  Mahakala or Panel 2
  Cu Chulainn A. She also gives +5 STR/MAG, and improves healing.
 Shionyan grants +12 MAG to the party, improving magic damage. Good choice if you can't meet the conditions of other Liberators. If paired with
  Idun, you can try for extra MP regen, since Poison/Charm/Mute each have a 7% chance to give 1 MP to the party.
Defensive
 Meat Balloon fits more defensive parties (+12 VIT), and will cast
  Rakukaja when hit by magic or
  Tarunda when hit by a critical attack. Counter effects will have a higher chance to activate, and will deal more damage.
 Megakin supports NDR tanking by having a chance to cast
  Rakukaja when Nulling,
  Tarukaja when Repelling, or
  Sukukaja when Draining a boss's attack. Repels will deal more damage, while Drains will heal more. He also provides +5 VIT/AGI/LUK to slightly improve bulk and accuracy/evasion.
Useful Demons
These demons should work well against almost any boss, whereas other demons might be punished by the current boss's gimmick (for example, heavily reduced damage from certain elements)
 Erlkonig will consistently heal your party every turn, and cast
  Tarunda at the start of the enemy's turn (plus
  Rakukaja if panel 3) to lessen the boss's onslaught.
 Barong can cast Luster Candy in addition to healing, increasing your offensive power. If he's panel 4, he can also generate Bulwarks.
 Demeter can keep your party's Bulwarks topped off consistently, trivializing damage taken, as well as casting Luster Candy whenever any other party member receives an attack. My Harvest! additionally grants 2 MP to party members, helping them to keep casting skills.
 Idun increases team bulk with Fortify and
  ATK debuffs on the boss, automatically revives one demon per turn if they die (including herself), and also increases team MP regen by 2 to allow firing off expensive skills. Her skill Goddess's Prank also deals a variety of ailments at once - even though the boss will recover from these when their turn starts, during your turn you can exploit this with Shionyan for chances at MP recovery.
 Demiurge, if paired with "Drain <element> " party members corresponding to the boss, can both automatically heal and generate MP for the party - on top of making the boss lose turns, of course.
 Kalki casts Luster Candy and a team heal when using Ratnamaru, which itself uses only half a press turn due to Remnants. This skill can also revive a fallen ally, and give them a Bulwark. To top it all off, Kalki also grants +1 MP recovery to the team, and Repel Pierce + Drain Pierce.
 Orcus reduces damage taken from AoE attacks for the party. If panel 2, he will also cast
  Tarukaja when a party member's weakness is exploited. This can let you stack attack buffs quickly.
 Ananta will cast Luster Candy automatically every player and enemy turn (effectively twice per turn), making him a good budget option for stacking buffs. If panel 4, he will also cast Debilitate at the start of the boss's turn, or whenever you use a skill or chain effect that heals (but it does NOT count
  Lydia, Dx2 skills, or Devil Connector).
 Elohim follows up every Solar Flare with an automatic Offensive Cry to stack up the
  ATK buffs, in addition to his massive damage.
 Uriel,
  Gabriel, &
  Raphael will cast each of the three buffs as part of their beginning-of-turn chain when 3 or more Divine/Herald demons are in the party.
 Ame no Uzume will cast
  Tarukaja after any skill heals the party - this includes not just healing skills, but also steal HP effects such as Ouas, Eat Whole, or Deathtouch, and chain effects such as Blossoming Cyclone or Supreme Creator (but it does NOT count
  Lydia, Dx2 skills, or Devil Connector). If panel 2, she also casts
  Rakukaja.
"Tale of the Primordial Goddess" event
Normal: Scathach 
Battle 1
| Scathach | - | - | - | Wk | Nu | Rs | - |
Battle 2
| Scathach | - | - | - | Wk | Nu | Rs | - |
Notes
- Trivial fight, just bring your SP units to squeeze as many points from it as possible.
Superior: Pallas Athena 
Battle 1
| Pallas Athena | Rs | - | - | Wk | - | Nu | Rs |
Battle 2
| Pallas Athena | Rs | - | - | Wk | - | Nu | Rs |
Notes
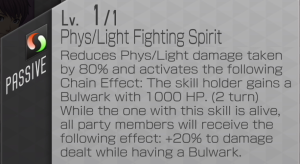
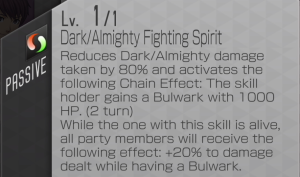
- Another simple fight, the main concern is 80% damage reduction + a 1000 HP Bulwark if you use certain elements, depending on the phase:
- Phase 1 penalizes
 Phys or
  Light damage.
 - Phase 2 penalizes
 Dark or
  Almighty damage.
  Elec damage is safe on either phase.
- The Bulwark is actually a non-issue, as 1,000 HP is practically nothing for the boss in this mode. As long as your main damage dealers aren't getting 80% reduced, you should be able to punch through the Bulwarks no problem.
- Phase 1 penalizes
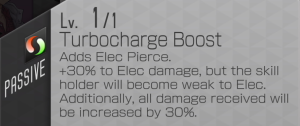
- Athena is weak to Elec the whole time, as opposed to Inanna, who needs setup. This means you can earn extra turns with cheap non-piercing
 Zio transfers on supports, if needed.
Recommended demons:
In addition to the units detailed in the Useful Demons section of this guide:
Support:
Damage:
Ultimate: Inanna 
Battle 1
| Inanna | - | Nu | Nu | Nu | Nu | - | Rs |
Battle 2
| Inanna | - | Nu | Nu | Nu | Nu | - | Rs |
Notes:
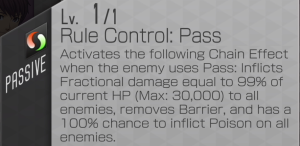
- Avoid having your demons pass, as that'll trigger Rule Control, which will most likely KO your party.
- This shouldn't happen on auto, since the boss does not have Nu/Dr/Rp Phys, and your demons will try to use their standard attack when at low MP.
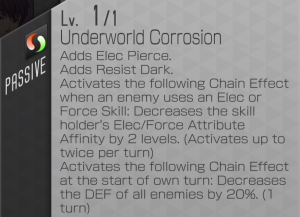
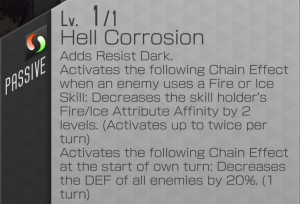
- Underworld Corrosion reduces the boss's
 Elec and
  Force resistance by 2 levels, up to twice. She starts at Null, so attack with piercing Elec/Force damage twice to get her down to Weak. This can then get you more damage, more turns, and Chalk Eater synergy for buffs + more turns.
- Alternatively, someone with Attribute affinity down can work as a more-direct solution that doesn't need as much setup.
- Note that both resistances go down regardless of which one you used, so you can use a piercing Elec attacker to open the way for a Force attacker.
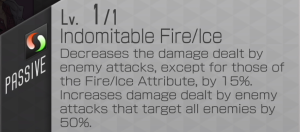
- The damage of skills that aren't Elec/Force are reduced by 15%. This is only a minor annoyance, but really pushes you to use the correct elements if you can.
- Devil Connector skills unfortunately do not count for triggering Corrosion.
- In phase 2, she swaps Underworld Corrosion for Hell Corrosion, which does the same thing but for
 Fire and
  Ice.
Ice. - The boss gives your team a 50% damage boost when using an
 All Targets attack, meaning those can be viable.
 - The boss triggers a lot of
 DEF Debuffs on her turn, so having a demon that can trigger
  DEF Buffs during the enemy turn can help combat this. For example:
  Demeter.
- Liberators:
 Chalk Eater - Grants buffs or more press turns when hitting weaknesses.
 Shionyan - Grants +12 Mag for magic teams. If paired with Idun, can offer extra MP occasionally.
 Carbon Black - Crit damage and +12 Str for physical teams.
 Templar Dragon - Boost damage of demons that use
  Charge or
  Concentrate.
Recommended demons:
In addition to the units detailed in the Useful Demons section of this guide:
Support:
 Demeter: counteracts the boss's
  DEF Debuff spam during the enemy turn, as well as providing plenty of Luster Candy buffs overall.
 Ame no Uzume: pairs well with
  Seth or
  Mahamayuri, since they deal Force damage and heal, triggering Ame's
  ATK Buff.
 Barong: Luster Candy buffs from Barong Dance.
Damage for phase 1 (![]() Elec and
Elec and ![]() Force)
Force)

 Loup-Garou: Elec affinity down, Elec damage aura for the party, and reduces party's Elec skill MP costs.
 Zeus: Elec affinity down, grants an extra press turn.
 Odin A: Sets up
  Zenith and
  Gloom, grants Phys/Elec damage and crit rate aura to the party, and doesn't consume press turns when he hits weakness.
 Indrajit: Damage and
  ATK Buff from Lightning Shower.
 Queen Mab: Automatic Fire/Elec attack every time an ally acts, an Elec/Fire damage aura for the party, and an
  ATK Buff every player turn.
 Botis: Automatic follow-up when an ally uses Elec, and applies Elec anti-damage reduction to the boss. If panel 2, then Accursed Lightning also grants an
  ATK Buff with every cast.
 Izanami: Elec damage aura for the party, and reduces party's Elec skill MP costs.
 Morrighan: Force affinity down,
  Spirit Chains of Corrosion, and Luster Candy buff from Ruthless Death Gale.
 Lugh: Force (and Light) affinity down, grants weakness damage aura to the party, gives himself
  Charge, and has high crit rate.
 Kumbhanda: Force affinity down (first turn only, does not refresh),
  Spirit Chains of Corrosion, and generates a press turn.
 Susano-o: Damage and
  ATK Buff from Kusanagi. Note that he uses PATK but his skill outputs magic damage, so this may make synergies awkward. Also be careful that he does not have pierce until panel 4.
 Nyarlathotep: Sets up
  Gloom and makes the enemy take more magic damage while Gloomed.
 Seth: Damage and self-heal from Ouas to trigger Ame no Uzume's buffs.
 Pendragon: Deals a Force (or Ice) follow-up every time an ally hits a weakness.
 Krishna: Generates a press turn.
 Sabaoth: Potentially grants an extra press turn, if he uses Sanction while in the second half of a press turn.
 Mahamayuri: Damage and party heal from Blossoming Cyclone to trigger Ame no Uzume's buffs.
Damage (![]() Fire and
Fire and ![]() Ice)
Ice)

 Adramelech: Fire affinity down, and an
  ATK Buff every time he uses Sacrificial Inferno.
 Lost Name:
  ATK Buff every time he acts, grants an extra press turn, gives himself
  Charge, and has high crit rate.
 Elohim: Damage and
  ATK Buff from Solar Flare.
 Queen Mab: Automatic Fire/Elec attack every time an ally acts, an Elec/Fire damage aura for the party, and an
  ATK Buff every player turn.
 Mahakala:
  ATK Debuff and
  DEF Debuff from Wrathful Flame, as well as automatic
  Concentrate for himself. If panel 3, Wrathful Flame also applies
  ATK Buff and
  DEF Buff.
 Mithras: Automatic follow-up when an ally uses Fire (or Light), and applies Fire/Light anti-damage reduction to the boss.
 Moloch: Fire damage aura for the team.
 Mada: Damage and Bulwarks for the team, if needed.
 Sukuna-Hikona A: Ice affinity down,
  ATK Buff +
  DEF Debuff + MP regen when an ally hits a weakness.
 Vivian:
  ATK Buff every time she casts Teardrop, and applies anti-damage reduction to the boss.
 Anahita: Damage and
  ATK Buff from Hell Stream, as well as Bulwarks if needed. If panel 2, also has a magic damage aura for the party.
 Rahab:
  ATK Buff when an ally or the enemy hits a weakness. Also gives himself
  Might alongside this effect.
 Kuzuryu: Luster Candy +
  DEF Debuff +
  Concentrate for himself every time he casts Roaring Torrent.
 Kumbhanda:
  Spirit Chains of Corrosion, and generates a press turn.
 Frost Ace: Ice damage aura for the party (especially if panel 2) and party-wide
  Might every time he uses Vengeful Frost Fist.
 Pendragon: Deals a Force (or Ice) follow-up every time an ally hits a weakness.
Archive
- For older events, see Demon Alliance Invasion/History
| Quest Areas | |
|---|---|
| Permanent Content | Story • Dx2 Quests • Alter-World • Aura Gate (1, 2, SP) |
| Farming Quests | Strange Signal • Brands of Sin • Wanted |
| Recurring Events | Eclipse • Hell's Park • Advent • Kiwami • Tokyo Abyss • Take Back Tokyo • Demon Alliance Invasion |
| Competitive | Democalypse • D2 Duel • Battle Tower |

