WIP
Basics
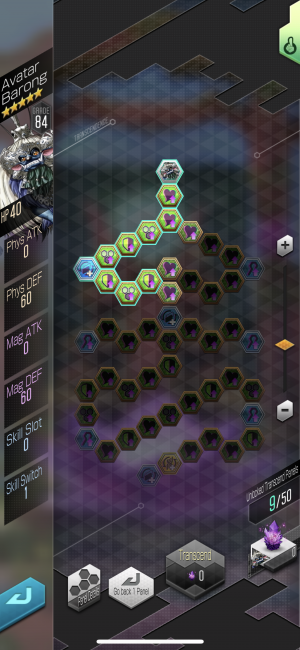
Example of a Transcend grid
- Transcend is a method for upgrading demons' stats, as well as adding an additional skill slot and "skill switch" slots. It is unlocked by clearing the Chapter 3 Epilogue.
- Transcend requires
 "Transcend Stones". You can obtain these from:
- Event rewards (usually 20 Stones total for a fusible 5★ demon).
- Exchanging
 "Transcend Motes" for Stones in the shop (see exchange rates below).
- Certain demons have stones available in the
 Karma shop, at a rate of 1,500 Karma per Stone.
 Seraph and
  Norn Stones can be obtained with
  Democalypse Coins in the Democalypse shop.
- Transcend Motes are obtained by summoning on certain banners.
- Pulling a 3★ gives 1 Mote
- 4★ gives 5 Motes
- 5★ gives 35 Motes
- Generally speaking, you can only get Motes from banners that cost gems. You cannot get Motes from free summon files, hell buns, parchments, etc!
- You may only perform the Motes-to-Stones exchange for demons that you have raised to level 50 (which itself requires evolving the demon to 6★).
- The exchange rate for Motes-to-Stones will vary by a demon's base rarity:
| Base Rarity |
Motes for 1 Stone
|
| 5★ |
50
|
| 4★ |
15
|
| 3★ |
10
|
| 1★ - 2★ |
5
|
- Transcend Stones, much like Spirits, are unit-specific - This means that, for example,
 Barong Transcend Stones cannot be used to upgrade
  Michael.
- Transcend grid progress applies to all demons of that type - For example: if you Transcended a
 Pixie, then that upgrade applies to all Pixies that you own, and all Pixies that you obtain later on.
Transcend Grid
- Transcend Stones can be spent to unlock panels on a demon's Transcend grid.
- All Transcend grids have the same general shape.
- Each grid contains 70 panels, split up into these types and quantities:
| Type |
Quantity
|
 (green) HP +20 (green) HP +20 |
x25
|
 (pink) HP +40 (pink) HP +40 |
x6
|
 (green) Phys Def +20 (green) Phys Def +20 |
x13
|
 (green) Mag Def +20 (green) Mag Def +20 |
x13
|
    (blue) [stat] +25 [Atk] or +35 [Def] (blue) [stat] +25 [Atk] or +35 [Def] |
x7
|
 Skill Switch Skill Switch |
x4
|
 Skill Slot Skill Slot |
x1
|
 Transferable Skill Switch Transferable Skill Switch |
x1
|
- For the blue stat panels, each demon is automatically assigned one stat out of: Phys Atk, Phys Def, Mag Atk, or Mag Def. Their blue stat panels will only boost their one assigned stat (for example,
 Gogmagog's blue stat panels will only boost his Phys Def).
Enishi Matsuri
Enishi Matsuri characters (and  Raidou Kuzunoha & Gouto) have an additional 20 panels on their Transcend grid. These panels are all batched up near the starting point, and all cost 1 stone each.
| Type |
Quantity
|
| (green) HP +20 |
x4
|
| (green) Phys Def +20 |
x4
|
| (green) Mag Def +20 |
x4
|
| 32px (green) Phys Atk +15 |
x4
|
| 32px (green) Mag Atk +15 |
x4
|
Cost Analysis
- The amount of Stones needed per panel will vary by their type and position in the grid:
- Green stat panels - These initially cost 1 Stone each, but increase to 2 Stones each after moving downwards from the second Skill Switch Panel, and then 3 Stones after moving down from the third Skill Switch. This amounts to 22 panels that cost 1 Stone, 19 panels that cost 2 Stones, and 10 panels that cost 3 Stones.
- Pink HP panels - These cost 5 Stones each, and there are 6 of them.
- Blue stat panels - the first three will cost 2 Stones each, the fourth and fifth cost 4 Stones, and the sixth and seventh cost 6 Stones.
- Skill Switch panels - The first one costs 2 stones, the second and third each cost 4, and the fourth costs 6.
- Skill Slot panel - costs 10 stones.
- Transferable Skill Switch panel - costs 10 stones.
2 Skill Switches Minimum
- If you only want the first 2 skill switches, and skip all non-required panels to get there, you will need a minimum of 15 stones.
- (9 * 1) + (1 * 2) + (1 * 4) = 15
- In Motes, that will cost the following:
| Base Rarity |
Total Motes needed
|
| 5★ |
750
|
| 4★ |
225
|
| 3★ |
150
|
| 1★ - 2★ |
75
|
Skill Slot + 3 Skill Switches Minimum
- If you only want the extra skill slot + 3 skill switches, and skip all non-required panels to get there, you will need a minimum of 75 stones.
- 94 - (13 * 1) - (3 * 2) = 75
- In Motes, that will cost the following:
| Base Rarity |
Total Motes needed
|
| 5★ |
3,750
|
| 4★ |
1,125
|
| 3★ |
750
|
| 1★ - 2★ |
375
|
Skill Slot Minimum
- If you only want the extra skill slot, and skip all non-required panels to get there, you will need a minimum of 69 stones.
- Note that the skill switch at the far left can be skipped - just go to the next green stat panel.
- 94 - (13 * 1) - (4 * 2) - (4 * 1) = 69
- In Motes, that will cost the following:
| Base Rarity |
Total Motes needed
|
| 5★ |
3,450
|
| 4★ |
1,035
|
| 3★ |
690
|
| 1★ - 2★ |
345
|
First 50 panels
- In total, unlocking the first 50 panels for a demon will cost 94 stones.
- [(22 * 1) + (19 * 2)] + [(3 * 2) + (2 * 4)] + [(1 * 2) + (2 * 4)] + [(1 * 10)] = 94
- In Motes, that will cost the following:
| Base Rarity |
Total Motes needed
|
| 5★ |
4,700
|
| 4★ |
1,410
|
| 3★ |
940
|
| 1★ - 2★ |
470
|
Transferable Skill Switch + 4 Skill Switches Minimum
- If you only want the transferable skill switch + 4 skill switches, and skip all non-required panels to get there, you will need a minimum of 130 stones.
- Again, note that the skill switches at the far left can be skipped - just go to the next green stat panel.
- Also note that this requires taking the left path (the green panels instead of the pink panels) at the last fork. This is because the pink panels costs more stones to unlock.
- 75 + (1 * 4) + (1 * 5) + (8 * 3) + (2 * 6) + (1 * 10) = 130
- In Motes, that will cost the following:
| Base Rarity |
Total Motes needed
|
| 5★ |
6,500
|
| 4★ |
1,950
|
| 3★ |
1,300
|
| 1★ - 2★ |
650
|
Transferable Skill Switch Minimum
- If you only want the transferable skill switch, and skip all non-required panels to get there, you will need a minimum of 118 stones.
- Again, note that the skill switches at the far left can be skipped - just go to the next green stat panel.
- Also note that this requires taking the left path (the green panels instead of the pink panels) at the last fork. This is because the pink panels cost more stones to unlock.
- 69 + (1 * 4) + (1 * 5) + (8 * 3) + (1 * 6) + (1 * 10) = 118
- In Motes, that will cost the following:
| Base Rarity |
Total Motes needed
|
| 5★ |
5,900
|
| 4★ |
1,770
|
| 3★ |
1,180
|
| 1★ - 2★ |
590
|
All 70 panels
- In total, unlocking all 70 panels for a demon will cost 182 Stones.
- 94 + (10 * 3) + (6 * 5) + (3 * 6) + (1 * 10) = 182
- In Motes, that will cost the following:
| Base Rarity |
Total Motes needed
|
| 5★ |
9,100
|
| 4★ |
2,730
|
| 3★ |
1,820
|
| 1★ - 2★ |
910
|
Transcending Guide
WIP
Main Notes:
- The Skill Slot panel is the most-important panel in the grid. The extra slot can be used for more damage, more bulk, more speed, etc - whatever your demon specializes in.
- The Transferable Skill Switch panel is the second-most-important. This allows you to change the demon's transferable skill slot (their first slot, at the upper-left), which is otherwise impossible to do. This is especially helpful for demons that have a not-so-useful skill in their transfer slot. Be aware that you can’t use Blank Genomes
 to extract Transferable Skills from demons.
- Skill Switch panels are the third-most-important. These allow you to run multiple builds' worth of skills on a single demon, and swap them as needed.
- Only invest if you have enough Motes/Stones to reach at least one of the above. If you don't have enough Motes/Stones, then there is no reason to transcend (the stat boosts are not that great), and you should wait until you have more resources.
How Skill Switch Works
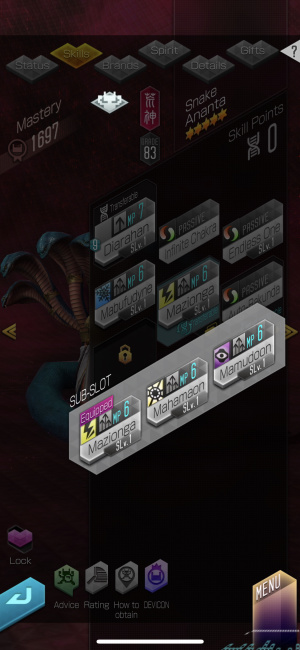
Example of 2 skill switches and the "tray"
- Each panel enables a transferable skill slot to access the "sub-slot tray", starting from the leftmost slot.
- Each panel also increases the capacity of the tray by 1.
- So for example, the first skill switch panel lets your first transferable skill slot use the tray, and the tray has a capacity of 1 (doesn't count currently-equipped skills).
- The second skill switch panel lets your second transferable skill slot use the tray, and increases the tray's capacity to 2.
- The third skill switch panel lets your third transferable skill slot use the tray, and increases the tray's capacity to 3.
Using the tray, you can switch a demon's transferable skills at any time outside of combat/aura gate.
- This effectively means you can have multiple builds on the same demon, saving the resources needed to panel a second copy (assuming your multiple builds are okay with using the same archetype color).
- Democalypse generalists especially benefit from this, as they can have multiple elemental spells in their tray, and can switch them out according to what's needed for the day.
- Demons that are used in multiple pieces of content can also benefit: for example,
 Mastema can use Resist Fire for Brands of Sin: Sloth farming, but use a damage booster for Democalypse.
- Unlocking 2 skill switches costs just 15 stones, which is 750 motes for a 5★. This is not a bad price for the utility gained.
Recommended skill switch investments:
 Masakado A: Run Auto-Taruka/Auto-Rakunda, plus up to 3 different elemental-physical AoE spells (such as Rending Ice) for Democalypse Prelim.
 Agni: Run
  Purple with Auto-Taruka, plus up to 3 different elemental AoE spells (such as Mamudodyne) for Democalypse Prelim.
 Garuda: Run Auto-Taruka (or Blood Rush/War Dance/Luster Candy if manual-buffing), plus up to 3 different elemental AoE spells for Democalypse Prelim.
- If he's
 Red , then
  Fire + 3 other elements can be covered this way.
 Ananta: Run Auto-Rakunda, plus up to 3 different elemental AoE spells (such as Mazionga) for Democalypse Prelim.
- If he's Red , then
 Ice + 3 other elements can be covered this way.
 Ishtar: Run Merciless Blow, plus up to 3 different elemental single-target spells (such as Ice Age) for Democalypse Boss.
- If she's Red , then
 Light + 3 other elements can be covered this way.
 Beelzebub☆: Run Merciless Blow, plus 3 elemental random-target spells (such as Holy Wrath) for Democalypse Boss
 Mot: Run Purple with Blood Rush/War Dance/Luster Candy, plus up to 3 different elemental single-target spells (such as Agidyne) for Democalypse Boss.
- If you want to use him in all 7 elements, then you of course won't have room for all 7 elemental spells at once - it may be more cost-effective for him to run -dynes and overwrite them by spending common
 Yasaka Magatamas, rather than spending rare Blank Genomes every couple weeks to take off valuable tier 4 skills.
- For which spells to keep on him, probably keep Zandyne on since it's only fusibly available from
 Loki, an expensive 4★.
 Elohim: Run Purple with a normal Fire build in 2 slots, and a build for a different Democalypse element in the remaining 2 slots. Use in Fire Boss, but Prelim for other elements.
 Izanami: Run Purple with an
  Elec build in 2 slots, and a
  Dark build in the remaining 2 slots. This saves resources, as you'd then only have to panel one copy of her.
- Mastema: Run Purple with Resist Fire for Brands of Sin: Sloth, otherwise switch to a damage booster such as Light Boost.
- If you only want 1 switch, then you can save some stones/motes here - unlocking just one switch costs 7 stones, or 350 motes. Make sure Resist Fire is in the leftmost slot if you do this!
