Difference between revisions of "Hell's Park Underside/Spike Hell Area/Force"
(wip page) |
(→Fusibles challenge) |
||
| (7 intermediate revisions by the same user not shown) | |||
| Line 4: | Line 4: | ||
==Overview== | ==Overview== | ||
| − | |||
| − | |||
<div class="toccolours mw-collapsible mw-collapsed" style="overflow:auto;"> | <div class="toccolours mw-collapsible mw-collapsed" style="overflow:auto;"> | ||
{{EnemyParty|d1=Mandrake|d2=Heimdall|d3=King Frost|d4=Mandrake|i1=HPUSpikeForceMandrake|i2=HPUSpikeForceHeimdall|i3=HPUSpikeForceKing Frost|i4=HPUSpikeForceMandrake | {{EnemyParty|d1=Mandrake|d2=Heimdall|d3=King Frost|d4=Mandrake|i1=HPUSpikeForceMandrake|i2=HPUSpikeForceHeimdall|i3=HPUSpikeForceKing Frost|i4=HPUSpikeForceMandrake | ||
|ice1=Wk|force1=Wk|dark1=Nu | |ice1=Wk|force1=Wk|dark1=Nu | ||
| − | |ice2=Nu|force2=Wk|light2=Nu|dark2=Rs | + | |fire2=Dr|ice2=Nu|force2=Wk|light2=Nu|dark2=Rs |
|ice3=Nu|force3=Wk|light3=Rs | |ice3=Nu|force3=Wk|light3=Rs | ||
|ice4=Wk|force4=Wk|dark4=Nu | |ice4=Wk|force4=Wk|dark4=Nu | ||
| Line 41: | Line 39: | ||
'''Explanation''' | '''Explanation''' | ||
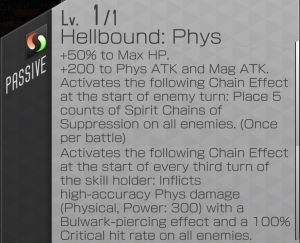
* '''Hellbound: Phys''' will apply 5 stacks of {{EffectIcon|Spirit Chains of Suppression|name=1}} to you. | * '''Hellbound: Phys''' will apply 5 stacks of {{EffectIcon|Spirit Chains of Suppression|name=1}} to you. | ||
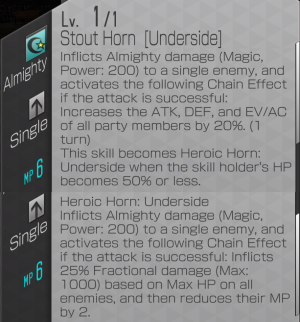
| − | * '''Hell Eater''' drains your MP whenever your turn starts, and King Frost will drain your MP with '''Cold World Underside''' when he attacks (as well as applying {{EffectIcon|DEF Debuff}}). When Heimdall falls below 50% HP, his '''Stout Horn Underside''' will also start draining your MP. | + | * '''Hell Eater''' drains your MP whenever your turn starts, and King Frost will drain your MP with '''{{ElementIcon|Ice|name=1}} Cold World Underside''' when he attacks (as well as applying {{EffectIcon|DEF Debuff}}). When Heimdall falls below 50% HP, his '''{{ElementIcon|Almighty|name=1}} Stout Horn Underside''' will also start draining your MP. |
* If you fail to kill the adds by the start of their second turn, they will hit you with a bulwark-piercing, 100%-crit enrage AoE. Heimdall will do one too, if he isn't dead by his third turn - however his lacks phys pierce, so it can be reflected back at him with {{EffectIcon|Repel Physical|name=1}}. | * If you fail to kill the adds by the start of their second turn, they will hit you with a bulwark-piercing, 100%-crit enrage AoE. Heimdall will do one too, if he isn't dead by his third turn - however his lacks phys pierce, so it can be reflected back at him with {{EffectIcon|Repel Physical|name=1}}. | ||
</div> | </div> | ||
| − | |||
===General strategy=== | ===General strategy=== | ||
| − | + | * '''Your primary objective is to kill King Frost with {{ElementIcon|Force|name=1}} attacks on the first turn.''' If you don't, then he will hit into your {{ElementIcon|Ice|name=1}} weaknesses, apply {{EffectIcon|DEF Debuff|name=1}} to you, and steal all your MP. The Mandrakes should go down easily afterwards, allowing you to isolate Heimdall. | |
| − | |||
* MP management is very tight in this fight, consider running Divine brands on as many demons as possible. | * MP management is very tight in this fight, consider running Divine brands on as many demons as possible. | ||
* If you have a {{DemonIcon|Mermaid|size=32px}} with the skill [[File:Icon Skill Genome.png|32px|link=]] [[Mermaid (Underside)]], bring her. | * If you have a {{DemonIcon|Mermaid|size=32px}} with the skill [[File:Icon Skill Genome.png|32px|link=]] [[Mermaid (Underside)]], bring her. | ||
| Line 60: | Line 56: | ||
* If you cast [[Tetrakarn]] or use a [[File:Icon Phys Reflector.png|32px|link=]] Phys Reflector (for {{EffectIcon|Repel Physical|name=1}}) just before Heimdall's enrage, then you can reflect it back at him, potentially dealing a lot of damage to finish him off. | * If you cast [[Tetrakarn]] or use a [[File:Icon Phys Reflector.png|32px|link=]] Phys Reflector (for {{EffectIcon|Repel Physical|name=1}}) just before Heimdall's enrage, then you can reflect it back at him, potentially dealing a lot of damage to finish him off. | ||
** However, you cannot have both Repel Physical and Repel Magic active at the same time, so only take this chance if you are sure the reflect will kill Heimdall. If Heimdall survives, then he will be free to use his Almighty attack, and might kill you. | ** However, you cannot have both Repel Physical and Repel Magic active at the same time, so only take this chance if you are sure the reflect will kill Heimdall. If Heimdall survives, then he will be free to use his Almighty attack, and might kill you. | ||
| − | ** If you plan to do this, make sure Heimdall doesn't have any stacks of {{EffectIcon|Intimidation|name=1}}, as those will reduce the power of the reflected damage. | + | ** If you plan to do this, make sure Heimdall doesn't have any stacks of {{EffectIcon|Intimidation|name=1}}, as those will reduce the power of the reflected damage. |
===Underside skill demons=== | ===Underside skill demons=== | ||
| Line 73: | Line 69: | ||
* {{ArchIcon|arch=Clear|name=1|size=15px}} for the fusibles ruleset. | * {{ArchIcon|arch=Clear|name=1|size=15px}} for the fusibles ruleset. | ||
* {{ArchIcon|arch=Purple|name=1|size=15px}} for [[Infinite Chakra]] (+1 MP regen, like Divine brands). | * {{ArchIcon|arch=Purple|name=1|size=15px}} for [[Infinite Chakra]] (+1 MP regen, like Divine brands). | ||
| − | ** While this seems useful to counteract the enemy's MP draining, it might not be necessary. The most-expensive skill she should be using, {{ElementIcon|Force}} [[Killing Wind]], costs 7 MP and | + | ** While this seems useful to counteract the enemy's MP draining, it might not be necessary. The most-expensive skill she should be using, {{ElementIcon|Force}} [[Killing Wind]], costs 7 MP and she discounts that to 4 MP. Her team-wide MP recovery also means she should have plenty of MP to work with. |
;Skill Transfer | ;Skill Transfer | ||
| Line 103: | Line 99: | ||
* If using {{ElementIcon|Force}} [[Killing Wind (Underside)]], then {{EffectIcon|Concentrate|name=1}} only affects the initial hit, not the AoE chain. | * If using {{ElementIcon|Force}} [[Killing Wind (Underside)]], then {{EffectIcon|Concentrate|name=1}} only affects the initial hit, not the AoE chain. | ||
* Consider [[transcend]]ing him for skill switches, as that lets him easily swap builds between multiple areas. | * Consider [[transcend]]ing him for skill switches, as that lets him easily swap builds between multiple areas. | ||
| + | </div> | ||
| + | |||
| + | ==Fusibles challenge== | ||
| + | <div class="toccolours mw-collapsible mw-collapsed" style="overflow:auto;"> | ||
| + | '''Team restrictions:''' | ||
| + | {| class="wikitable sortable" | ||
| + | ! Difficulty !! Restriction | ||
| + | |- | ||
| + | | Lv 3-5 || 3 or more demons must be [[Fusible Demons|fusible]]*. | ||
| + | |- | ||
| + | | Lv 6-8 || 4 or more demons must be fusible. | ||
| + | |- | ||
| + | | Lv 9+ || All 5 demons must be fusible. | ||
| + | |- | ||
| + | | Lv 6+ || 1 or more demons must be grade 79 (4★ base) or lower. | ||
| + | |- | ||
| + | | Lv 9+ || 1 or more demons must be {{ArchIcon|arch=Clear|name=1|size=15px}}. | ||
| + | |} | ||
| + | |||
| + | Notes regarding fusibles: | ||
| + | * Multi-fusions count. | ||
| + | ** {{DemonIcon|Beelzebub☆|size=32px}} counts, despite needing a gacha-exclusive material to make him. | ||
| + | ** For [[Fusible Demons#Limited-Time Multi-fusions|limited-time multi-fusions]], only the ones that are currently-available will count. | ||
| + | * {{DemonIcon|Pixie|size=32px}} and {{DemonIcon|Slime|size=32px}} count, even though you cannot fuse them. | ||
| + | |||
| + | {| border=0 align="left" | ||
| + | |+'''Sample party''' | ||
| + | | valign="top" |{{DemonBuild:Thin|demon=Baal|archetype=Purple|skill1=Force Boost|skill2=Back Attack|brands=MATK% Divine or Spell|statreq= - }} | ||
| + | | valign="top" |{{DemonBuild:Thin|demon=Susano-o|archetype=Purple|skill1=Force Boost|skill2=Force Amp|brands=PATK% Divine or War|statreq= - }} | ||
| + | | valign="top" |{{DemonBuild:Thin|demon=Seth|archetype=Purple|skill1=Force Boost|skill2=Master Assassin|brands=PATK% Divine or War|statreq= - }} | ||
| + | | valign="top" |{{DemonBuild:Thin|demon=Oberon|archetype=Purple|skill1=Assassin|skill2=Back Attack|brands=MATK% Divine or Spell|statreq= - }} | ||
| + | | valign="top" |{{DemonBuild:Thin|demon=Mermaid|archetype=Clear|skill1=Mermaid (Underside)|skill2=Killing Wind|brands=MATK% Spell|statreq= - }} | ||
| + | |} | ||
| + | <div style="clear: both;"></div> | ||
| + | |||
| + | '''Team notes:''' | ||
| + | * {{ArchIcon|arch=Purple|size=15px}}{{DemonIcon|Baal|size=32px}}: 204 magic, has [[Force Amp]], Purple has [[Merciless Blow]], p1 has 20% damage. 50% team damage aura (20% at p0, 30% at p3, 50% at p4). 140 power single-target normal attack, and {{ElementIcon|Force}} [[Tempest]] is a 140 power AoE that applies {{EffectIcon|ATK Buff|name=1}} and {{EffectIcon|DEF Debuff|name=1}}. | ||
| + | * {{ArchIcon|arch=Purple|size=15px}}{{DemonIcon|Susano-o|size=32px}}: 235 strength, has [[Assassin]], Purple has [[Merciless Blow]], p1 has 15% damage, p3 has 25% damage, p4 has 25% damage. [[Kusanagi]] is 200 power single-target, and applies {{EffectIcon|ATK Buff|name=1}}. | ||
| + | * {{ArchIcon|arch=Purple|size=15px}}{{DemonIcon|Seth|size=32px}}: 248 strength, Purple has [[Force Amp]], p1 has 15% damage, p4 has 25% damage. {{ElementIcon|Force}} [[Ouas]] (160 power single-target with 50% crit). | ||
| + | * {{DemonIcon|Oberon|size=32px}}: 216 magic, has [[Force Boost]], p3 has 10% damage. {{ElementIcon|Force}} [[Zandyne]] (160 power single-target). | ||
| + | |||
| + | Other options worth considering: | ||
| + | * {{DemonIcon|Cu Chulainn|size=32px}}: 190 magic, P1 has 20% damage, P3 has 20% damage, P4 has 25% damage. {{ElementIcon|Force}} [[Mazandyne]] (120 power AoE). | ||
| + | * {{ArchIcon|arch=Purple|size=15px}}{{DemonIcon|Anubis|size=32px}}: 217 magic, Purple has [[Merciless Blow]]. Transfer {{ElementIcon|Force}} [[Zandyne]] + [[Force Boost]]. | ||
| + | * {{ArchIcon|arch=Purple|size=15px}}{{DemonIcon|Titania|size=32px}}: 235 magic, Purple has [[Back Attack]]. Transfer {{ElementIcon|Force}} [[Zandyne]] + [[Force Boost]]. | ||
| + | * {{ArchIcon|arch=Yellow|size=15px}}{{DemonIcon|Long|size=32px}}: 183 magic, has [[Force Boost]], p3 has 10% damage. {{ElementIcon|Force}} [[Zandyne]] (160 power single-target). Yellow has {{EffectIcon|Concentrate|name=1}}. | ||
| + | * {{DemonIcon|Garuda|size=32px}}: 190 magic, p1 has 10% Force damage. {{ElementIcon|Force}} [[Zandyne]] (160 power single-target). Innately has [[Auto-Rakunda]] to apply {{EffectIcon|DEF Debuff|name=1}}. | ||
| + | * {{DemonIcon|Loki|size=32px}}: 198 magic, p3 has 5% damage. {{ElementIcon|Force}} [[Zandyne]] (160 power single-target). | ||
| + | * {{DemonIcon|Tsukuyomi|size=32px}}: 216 magic, p3 has 5% damage. {{ElementIcon|Force}} [[Zanma]] (140 power single-target). Needs [[Resist Phys]]. Can be re-used for the race challenge. | ||
| + | * {{DemonIcon|Sandalphon|size=32px}}: 170 magic (p1), has 10% damage on p3. {{ElementIcon|Force}} [[Zandyne]] (160 power single-target). | ||
| + | * {{ArchIcon|arch=Purple|size=15px}}{{DemonIcon|Isis|size=32px}}: 148 magic, Purple has [[Back Attack]]. {{ElementIcon|Force}} [[Zandyne]] (160 power single-target). | ||
| + | </div> | ||
| + | |||
| + | ==Race challenges== | ||
| + | ===Megami, Genma, Avian=== | ||
| + | <div class="toccolours mw-collapsible mw-collapsed" style="overflow:auto;"> | ||
| + | |||
| + | '''Team restrictions:''' | ||
| + | {| class="wikitable sortable" | ||
| + | ! Difficulty !! Restriction | ||
| + | |- | ||
| + | | Lv 3-5 || All 5 demons must be of the races Megami, Genma, Avian, Herald, or Vile. | ||
| + | |- | ||
| + | | Lv 6-8 || All 5 demons must be of the races Megami, Genma, Avian, or Herald. | ||
| + | |- | ||
| + | | Lv 9+ || All 5 demons must be of the races Megami, Genma, or Avian. | ||
| + | |} | ||
| + | |||
| + | {| border=0 align="left" | ||
| + | |+'''Sample party''' | ||
| + | | valign="top" |{{DemonBuild:Thin|demon=Garuda|archetype=Red|skill1=Merciless Blow|skill2=Auto-Taruka|brands=MATK% Divine|statreq= - }} | ||
| + | | valign="top" |{{DemonBuild:Thin|demon=Cu Chulainn A|archetype=Red|skill1=Serial Killer|skill2=Force Boost|brands=PATK% Divine|statreq= - }} | ||
| + | | valign="top" |{{DemonBuild:Thin|demon=Cu Chulainn|archetype=Purple|skill1=Merciless Blow|skill2=Force Amp|brands=MATK% Divine|statreq= - }} | ||
| + | | valign="top" |{{DemonBuild:Thin|demon=Cleopatra|archetype=Purple|skill1=-|skill2=-|brands=-|statreq= - }} | ||
| + | | valign="top" |{{DemonBuild:Thin|demon=Tsukuyomi|archetype=Red|skill1=Resist Phys|skill2=Force Boost|brands=MATK% Divine|statreq= - }} | ||
| + | |} | ||
| + | <div style="clear: both;"></div> | ||
| + | |||
| + | '''Team notes:''' | ||
| + | * {{DemonIcon|Garuda|size=32px}} innately has [[Auto-Rakunda]] to apply {{EffectIcon|DEF Debuff|name=1}}. We have [[Auto-Taruka]] transferred to apply {{EffectIcon|ATK Buff|name=1}} as well, providing a full buff swing. | ||
| + | * {{DemonIcon|Cu Chulainn A|size=32px}}: deals good damage with {{ElementIcon|Force}} [[Barbed Spear]]. | ||
| + | ** His color does not really matter. | ||
| + | * {{DemonIcon|Cu Chulainn|size=32px}}: 190 magic, P1 has 20% damage, P3 has 20% damage, P4 has 25% damage. {{ElementIcon|Force}} [[Mazandyne]] (120 power AoE). | ||
| + | * {{DemonIcon|Cleopatra|size=32px}}: casts {{EffectIcon|Spirit Chains of Corrosion|name=1}} at the beginning of the battle, greatly reducing enemy defenses even at higher levels. Doesn't need a Force transfer, as she can simply skip her turn. | ||
| + | ** Her [[Reverse damage reduction]] in [[Peerless Beauty]] and Panel 2 don't work under Hell's Park Underside rules. | ||
| + | * {{DemonIcon|Tsukuyomi|size=32px}}: 216 magic, P3 has 5% damage. {{ElementIcon|Force}} [[Zanma]] (140 power single). This skill costs 4 MP due to [[Lunar Blessing]], meaning he can attack every turn if he has Divine brands, regardless of the enemy's MP draining. | ||
| + | ** He's weak to {{ElementIcon|Phys|name=1}}, so he has [[Resist Phys]] transferred to cover it. | ||
| + | ** Damage-wise, he prefers using max-level {{ElementIcon|Force}} [[Zanma]] plus a damage booster, over using {{ElementIcon|Force}} [[Zandyne]] with no damage booster. Zanma can be leveled cheaply using 3★ fodder. | ||
| + | ** His color does not really matter, unless you specifically need more HP from Purple. | ||
| + | |||
| + | Other options worth considering: | ||
| + | * {{ArchIcon|arch=Purple|size=15px}}{{DemonIcon|Garuda A|size=32px}}: Good Force damage with {{ElementIcon|Force}} [[Gale Talon]]. | ||
| + | * {{DemonIcon|Izanami|size=32px}}: 226 magic (246 with maxed Yomotsu Okami), has Merciless Blow. Will need a Force transfer. Her panels do not help a Force build, so you can use a p0 copy (or just unlock p2 for the +100 MATK). | ||
| + | * {{ArchIcon|arch=Clear|size=15px}}{{DemonIcon|Norn|size=32px}}: 193 magic, has [[Merciless Blow]]. Automatic cast of [[Luster Candy]], and can do decent damage if given a Force transfer. | ||
| + | * {{DemonIcon|Ishtar|size=32px}}: 247 magic, {{ElementIcon|Almighty}} [[Mesopotamian Star]] casts [[Luster Candy]] and [[Debilitate]]. Will need a Force transfer. | ||
| + | * {{DemonIcon|Lakshmi|size=32px}}: 248 magic. Will need a Force transfer ([[Twister]] isn't very good). | ||
| + | * {{ArchIcon|arch=Red|size=15px}}{{DemonIcon|Kurama Tengu|size=32px}}: 134 mag. {{ElementIcon|Force}} [[Zanma]] (140 power single). | ||
</div> | </div> | ||
| Line 126: | Line 219: | ||
{| border=0 align="left" | {| border=0 align="left" | ||
|+'''Sample party''' | |+'''Sample party''' | ||
| − | | valign="top" |{{DemonBuild:Thin|demon= | + | | valign="top" |{{DemonBuild:Thin|demon=Mermaid|archetype=Clear|skill1=Mermaid (Underside)|skill2=Killing Wind|brands=MATK% Spell|statreq= - }} |
| + | | valign="top" |{{DemonBuild:Thin|demon=Harpy|archetype=Yellow|skill1=Force Boost|skill2=Serial Killer|brands=MATK% Divine or Spell|statreq= - }} | ||
| valign="top" |{{DemonBuild:Thin|demon=Susano-o|archetype=Purple|skill1=Force Boost|skill2=Force Amp|brands=PATK% Divine or War|statreq= - }} | | valign="top" |{{DemonBuild:Thin|demon=Susano-o|archetype=Purple|skill1=Force Boost|skill2=Force Amp|brands=PATK% Divine or War|statreq= - }} | ||
| valign="top" |{{DemonBuild:Thin|demon=Cu Chulainn|archetype=Purple|skill1=Force Boost|skill2=Force Amp|brands=MATK% Divine or Spell|statreq= - }} | | valign="top" |{{DemonBuild:Thin|demon=Cu Chulainn|archetype=Purple|skill1=Force Boost|skill2=Force Amp|brands=MATK% Divine or Spell|statreq= - }} | ||
| valign="top" |{{DemonBuild:Thin|demon=Cu Chulainn A|archetype=Red|skill1=Force Boost|skill2=Serial Killer|brands=PATK% Divine or War|statreq= - }} | | valign="top" |{{DemonBuild:Thin|demon=Cu Chulainn A|archetype=Red|skill1=Force Boost|skill2=Serial Killer|brands=PATK% Divine or War|statreq= - }} | ||
| − | |||
|} | |} | ||
<div style="clear: both;"></div> | <div style="clear: both;"></div> | ||
| Line 136: | Line 229: | ||
Team notes: | Team notes: | ||
* {{ArchIcon|arch=Purple|size=15px}}{{DemonIcon|Susano-o|size=32px}}: 235 strength, has [[Assassin]], Purple has [[Merciless Blow]], p1 has 15% damage, p3 has 25% damage, p4 has 25% damage. [[Kusanagi]] is 200 power single-target, and applies {{EffectIcon|ATK Buff|name=1}}. | * {{ArchIcon|arch=Purple|size=15px}}{{DemonIcon|Susano-o|size=32px}}: 235 strength, has [[Assassin]], Purple has [[Merciless Blow]], p1 has 15% damage, p3 has 25% damage, p4 has 25% damage. [[Kusanagi]] is 200 power single-target, and applies {{EffectIcon|ATK Buff|name=1}}. | ||
| + | * {{DemonIcon|Harpy|size=32px}}: 160 magic, 20% damage boost, p3 has 30% damage. 20% team damage aura on p2. {{ElementIcon|Force}} [[Wind Trick]] (100 power AoE, +2 MP restored to party). | ||
* {{DemonIcon|Cu Chulainn|size=32px}}: 190 magic, p1 has 15% AoE damage, p4 has 25% AoE damage. {{ElementIcon|Force}} [[Mazandyne]] (120 power AoE). | * {{DemonIcon|Cu Chulainn|size=32px}}: 190 magic, p1 has 15% AoE damage, p4 has 25% AoE damage. {{ElementIcon|Force}} [[Mazandyne]] (120 power AoE). | ||
* {{DemonIcon|Cu Chulainn A|size=32px}}: 201 strength, p3 has 20% damage boost. 10% Phys/Force aura and 10% AoE aura for the party. {{ElementIcon|Force}} [[Barbed Spear]] is a 105 power AoE followed by 125 power random-target. Very high crit chance. If p3, applies {{EffectIcon|DEF Debuff|name=1}} on the 1st turn. | * {{DemonIcon|Cu Chulainn A|size=32px}}: 201 strength, p3 has 20% damage boost. 10% Phys/Force aura and 10% AoE aura for the party. {{ElementIcon|Force}} [[Barbed Spear]] is a 105 power AoE followed by 125 power random-target. Very high crit chance. If p3, applies {{EffectIcon|DEF Debuff|name=1}} on the 1st turn. | ||
| − | |||
Other options worth considering: | Other options worth considering: | ||
| + | * {{ArchIcon|arch=Yellow|size=15px}}{{DemonIcon|Tengu|size=32px}}: 100% crit rate boost. 30% damage boost. Has [[Wretched Blow]]. p1 has 20% damage, p3 has 30% damage. Yellow has 20% damage. 20-35% damage aura for the team. When going first, gives self {{EffectIcon|Might|name=1}} and sets up {{EffectIcon|ATK Buff|name=1}} and {{EffectIcon|DEF Debuff|name=1}}. {{ElementIcon|Force}} [[Tengu's Buddhist Might]] (100 power single-target + 100 power AoE, gives self {{EffectIcon|Might|name=1}}, sets up {{EffectIcon|ATK Buff|name=1}} and {{EffectIcon|DEF Debuff|name=1}}) | ||
* {{ArchIcon|arch=Purple|size=15px}}{{DemonIcon|Kumbhanda|size=32px}}: {{ElementIcon|Force}} [[Souljack]] deals high-crit physical Force damage, and applies {{EffectIcon|Spirit Chains of Corrosion|name=1}} to increase the team's DPS. | * {{ArchIcon|arch=Purple|size=15px}}{{DemonIcon|Kumbhanda|size=32px}}: {{ElementIcon|Force}} [[Souljack]] deals high-crit physical Force damage, and applies {{EffectIcon|Spirit Chains of Corrosion|name=1}} to increase the team's DPS. | ||
| + | * {{ArchIcon|arch=Purple|size=15px}}{{DemonIcon|Albion|size=32px}}: Deals high damage based on PDEF. Purple has [[Wretched Blow]]. 15% damage from p1, 30% damage from p3. 30% damage aura for the team. {{ElementIcon|Force}} [[Pure All-Out Ruin]] (200 power single-target, pierces bulwarks). Also has an [[Order Crest]] that frequently hits the lowest-HP enemy with a 100-power single-target attack (inscribes when an ally hits an enemy weakness, an enemy hits your party's weaknesses, or a party member is revived). | ||
* {{ArchIcon|arch=Purple|size=15px}}{{DemonIcon|Pendragon|size=32px}}: 235 magic, 120% damage boost, p1 has 20% boost, p3 has 30% boost. | * {{ArchIcon|arch=Purple|size=15px}}{{DemonIcon|Pendragon|size=32px}}: 235 magic, 120% damage boost, p1 has 20% boost, p3 has 30% boost. | ||
| − | * {{ArchIcon|arch=Purple|size=15px}}{{DemonIcon|Garuda A|size=32px}}: 200 magic, has [[Force Amp]], p3 has 25% Force damage. {{ElementIcon|Force}} [[Gale Talon]] is 160-400 power random-target, | + | * {{ArchIcon|arch=Purple|size=15px}}{{DemonIcon|Garuda A|size=32px}}: 200 magic, has [[Force Amp]], p3 has 25% Force damage. {{ElementIcon|Force}} [[Gale Talon]] is 160-400 power random-target, pierces bulwarks. |
| − | * {{DemonIcon|Schierke|size=32px}}: 190 magic, 15% damage from p1, 15% damage from p4, 20% team damage aura from p3. 120-power | + | * {{DemonIcon|Schierke|size=32px}}: 190 magic, 15% damage from p1, 15% damage from p4, 20% team damage aura from p3. 120-power AoE. If panel 2, applies {{EffectIcon|ATK Buff|name=1}} on the 1st turn. |
| − | * | + | * {{DemonIcon|Oberon|size=32px}}: 216 magic, has [[Force Boost]], p3 has 10% damage. {{ElementIcon|Force}} [[Zandyne]] (160 power single-target). |
| − | |||
* {{ArchIcon|arch=Purple|size=15px}}{{DemonIcon|Titania|size=32px}}: 235 magic, Purple has [[Back Attack]]. Transfer {{ElementIcon|Force}} [[Zandyne]] + [[Force Boost]]. | * {{ArchIcon|arch=Purple|size=15px}}{{DemonIcon|Titania|size=32px}}: 235 magic, Purple has [[Back Attack]]. Transfer {{ElementIcon|Force}} [[Zandyne]] + [[Force Boost]]. | ||
* {{ArchIcon|arch=Purple|size=15px}}{{DemonIcon|Anubis|size=32px}}: 217 magic, Purple has [[Merciless Blow]]. Transfer {{ElementIcon|Force}} [[Zandyne]] + [[Force Boost]]. | * {{ArchIcon|arch=Purple|size=15px}}{{DemonIcon|Anubis|size=32px}}: 217 magic, Purple has [[Merciless Blow]]. Transfer {{ElementIcon|Force}} [[Zandyne]] + [[Force Boost]]. | ||
Latest revision as of 16:49, 27 November 2025
Spike Hell Area (weak to ![]() Force)
Force)
Contents
Overview
| Mandrake | Heimdall | King Frost | Mandrake |
|---|---|---|---|

|

|

|

|
| Resistances | |||||||
|---|---|---|---|---|---|---|---|
| Mandrake | - | - | Wk | - | Wk | - | Nu |
| Heimdall | - | Dr | Nu | - | Wk | Nu | Rs |
| King Frost | - | - | Nu | - | Wk | Rs | - |
| Mandrake | - | - | Wk | - | Wk | - | Nu |
| Battle Speed | 10,000 | ||||||
Skills on multiple demons:
Skills on ![]() Mandrakes only:
Mandrakes only:
Skills on ![]() Heimdall only:
Heimdall only:
Skills on ![]() King Frost only:
King Frost only:
Explanation
- Hellbound: Phys will apply 5 stacks of
 Spirit Chains of Suppression to you.
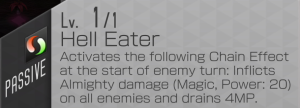
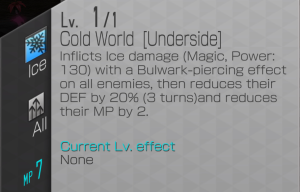
 - Hell Eater drains your MP whenever your turn starts, and King Frost will drain your MP with
 Ice Cold World Underside when he attacks (as well as applying
  ). When Heimdall falls below 50% HP, his
  Almighty Stout Horn Underside will also start draining your MP.
 - If you fail to kill the adds by the start of their second turn, they will hit you with a bulwark-piercing, 100%-crit enrage AoE. Heimdall will do one too, if he isn't dead by his third turn - however his lacks phys pierce, so it can be reflected back at him with
 Repel Physical.
General strategy
- Your primary objective is to kill King Frost with
 Force attacks on the first turn. If you don't, then he will hit into your
  Ice weaknesses, apply
  DEF Debuff to you, and steal all your MP. The Mandrakes should go down easily afterwards, allowing you to isolate Heimdall.
 - MP management is very tight in this fight, consider running Divine brands on as many demons as possible.
- If you have a
 Mermaid with the skill
  Mermaid (Underside), bring her.
 - For survival, it's recommended to use
 Repel Almighty Magic (such as from
  Huang Long) or
  Spirit Chains of Intimidation (such as from
  Lost Name). If neither is available, go all-in on attack.
 Repel Almighty Magic will stop Heimdall from using his unique
  Almighty attack. Now, Heimdall will resort to standard attacks.
- If possible, have Huang Long at panel 4 for his magic damage aura (+20% magic dealt and -20% magic received for the party while under Repel Magic). In this case, cast Five Elements ASAP to help push damage against King Frost.
- Heimdall doesn't have Phys Pierce, so Demons with innate Null/Repel/Drain Phys or a Null Phys transfer can wall Heimdall's standard attacks and his enrage.
- Example 5★ demons with innate NDR Phys: Teal

 Quetzalcoatl, Teal
 Gogmagog,
  Zaou-Gongen,
  Erlkonig,
  Fafnir,
  Masakado A,
  Beelzebub☆
 - Example 4★ demons with innate NDR Phys:
 Girimekhala,
  Rangda,
  Hecatoncheires, Teal
 Wu Kong
- Example 5★ demons with innate NDR Phys: Teal
- If you cast Tetrakarn or use a
 Phys Reflector (for
  Repel Physical) just before Heimdall's enrage, then you can reflect it back at him, potentially dealing a lot of damage to finish him off.
- However, you cannot have both Repel Physical and Repel Magic active at the same time, so only take this chance if you are sure the reflect will kill Heimdall. If Heimdall survives, then he will be free to use his Almighty attack, and might kill you.
- If you plan to do this, make sure Heimdall doesn't have any stacks of
 Intimidation, as those will reduce the power of the reflected damage.
Underside skill demons
 Mermaid (Underside) effect overview
- Self gets 50% HP, 180% Force damage, 20% accuracy, 3 MP discount for Force skills, and immunity to
 Spirit Chains of Suppression.
 - The team gets 20% Force damage and 20% accuracy.
- If any team member hits a weak point, Mermaid restores 2 MP to the whole team (up to 3 times per turn).
- Colors
 Clear for the fusibles ruleset.
 Purple for Infinite Chakra (+1 MP regen, like Divine brands).
- While this seems useful to counteract the enemy's MP draining, it might not be necessary. The most-expensive skill she should be using,
 Killing Wind, costs 7 MP and she discounts that to 4 MP. Her team-wide MP recovery also means she should have plenty of MP to work with.
- While this seems useful to counteract the enemy's MP draining, it might not be necessary. The most-expensive skill she should be using,
- Skill Transfer
 Killing Wind (Underside) is ideal, otherwise use the highest-damage single-target attack skill you have. For example:
  Killing Wind.
 Zandyne works as a cheap alternative.
- Brands
- MATK% Spell.
- Due to her MP discount and MP restores (counteracting the enemy's MP drains), Divine's MP regen is probably not necessary.
 Jack Frost (Underside) effect overview
- Self gets
 Concentrate (2.25x damage) on his first action - this is about 63% damage on average across his 2 actions on the first turn. Also gets 50% HP and immunity to
  Spirit Chains of Suppression.
- Colors
- (Any)
- Skill Transfer
- Use
 Zandyne.
 - Jack Frost does not have any MP discounts, so 7 MP skills such as
 Killing Wind may be too expensive to cast repeatedly.
 Killing Wind (Underside) starts at 7 MP, then becomes 6 MP at max level. This is the best skill he can use, but the cost of maxing it is very high.
- Brands
- MATK% Spell or Divine.
- Misc notes
- If using
 Killing Wind (Underside), then
  Concentrate only affects the initial hit, not the AoE chain.
 - Consider transcending him for skill switches, as that lets him easily swap builds between multiple areas.
Fusibles challenge
Team restrictions:
| Difficulty | Restriction |
|---|---|
| Lv 3-5 | 3 or more demons must be fusible*. |
| Lv 6-8 | 4 or more demons must be fusible. |
| Lv 9+ | All 5 demons must be fusible. |
| Lv 6+ | 1 or more demons must be grade 79 (4★ base) or lower. |
| Lv 9+ | 1 or more demons must be |
Notes regarding fusibles:
- Multi-fusions count.
 Beelzebub☆ counts, despite needing a gacha-exclusive material to make him.
- For limited-time multi-fusions, only the ones that are currently-available will count.
 Pixie and
  Slime count, even though you cannot fuse them.
|
|
|
|
|
Team notes:

 Baal: 204 magic, has Force Amp, Purple has Merciless Blow, p1 has 20% damage. 50% team damage aura (20% at p0, 30% at p3, 50% at p4). 140 power single-target normal attack, and
  Tempest is a 140 power AoE that applies
  ATK Buff and
  DEF Debuff.
 Susano-o: 235 strength, has Assassin, Purple has Merciless Blow, p1 has 15% damage, p3 has 25% damage, p4 has 25% damage. Kusanagi is 200 power single-target, and applies
  ATK Buff.
 Seth: 248 strength, Purple has Force Amp, p1 has 15% damage, p4 has 25% damage.
  Ouas (160 power single-target with 50% crit).
 Oberon: 216 magic, has Force Boost, p3 has 10% damage.
  Zandyne (160 power single-target).
Other options worth considering:
 Cu Chulainn: 190 magic, P1 has 20% damage, P3 has 20% damage, P4 has 25% damage.
  Mazandyne (120 power AoE).
 Anubis: 217 magic, Purple has Merciless Blow. Transfer
  Zandyne + Force Boost.
 Titania: 235 magic, Purple has Back Attack. Transfer
  Zandyne + Force Boost.
 Long: 183 magic, has Force Boost, p3 has 10% damage.
  Zandyne (160 power single-target). Yellow has
  Concentrate.
 Garuda: 190 magic, p1 has 10% Force damage.
  Zandyne (160 power single-target). Innately has Auto-Rakunda to apply
  DEF Debuff.
 Loki: 198 magic, p3 has 5% damage.
  Zandyne (160 power single-target).
 Tsukuyomi: 216 magic, p3 has 5% damage.
  Zanma (140 power single-target). Needs Resist Phys. Can be re-used for the race challenge.
 Sandalphon: 170 magic (p1), has 10% damage on p3.
  Zandyne (160 power single-target).
 Isis: 148 magic, Purple has Back Attack.
  Zandyne (160 power single-target).
Race challenges
Megami, Genma, Avian
Team restrictions:
| Difficulty | Restriction |
|---|---|
| Lv 3-5 | All 5 demons must be of the races Megami, Genma, Avian, Herald, or Vile. |
| Lv 6-8 | All 5 demons must be of the races Megami, Genma, Avian, or Herald. |
| Lv 9+ | All 5 demons must be of the races Megami, Genma, or Avian. |
|
|
|
|
|
Team notes:
 Garuda innately has Auto-Rakunda to apply
  DEF Debuff. We have Auto-Taruka transferred to apply
  ATK Buff as well, providing a full buff swing.
 Cu Chulainn A: deals good damage with
  Barbed Spear.
- His color does not really matter.
 Cu Chulainn: 190 magic, P1 has 20% damage, P3 has 20% damage, P4 has 25% damage.
  Mazandyne (120 power AoE).
 Cleopatra: casts
  Spirit Chains of Corrosion at the beginning of the battle, greatly reducing enemy defenses even at higher levels. Doesn't need a Force transfer, as she can simply skip her turn.
- Her Reverse damage reduction in Peerless Beauty and Panel 2 don't work under Hell's Park Underside rules.
 Tsukuyomi: 216 magic, P3 has 5% damage.
  Zanma (140 power single). This skill costs 4 MP due to Lunar Blessing, meaning he can attack every turn if he has Divine brands, regardless of the enemy's MP draining.
- He's weak to
 Phys, so he has Resist Phys transferred to cover it.
 - Damage-wise, he prefers using max-level
 Zanma plus a damage booster, over using
  Zandyne with no damage booster. Zanma can be leveled cheaply using 3★ fodder.
 - His color does not really matter, unless you specifically need more HP from Purple.
- He's weak to
Other options worth considering:

 Garuda A: Good Force damage with
  Gale Talon.
 Izanami: 226 magic (246 with maxed Yomotsu Okami), has Merciless Blow. Will need a Force transfer. Her panels do not help a Force build, so you can use a p0 copy (or just unlock p2 for the +100 MATK).
 Norn: 193 magic, has Merciless Blow. Automatic cast of Luster Candy, and can do decent damage if given a Force transfer.
 Ishtar: 247 magic,
  Mesopotamian Star casts Luster Candy and Debilitate. Will need a Force transfer.
 Lakshmi: 248 magic. Will need a Force transfer (Twister isn't very good).
 Kurama Tengu: 134 mag.
  Zanma (140 power single).
Low-grade challenge
Team restrictions:
| Difficulty | Restriction |
|---|---|
| Lv 3-5 | 3 or more demons must be grade 83 or lower. |
| Lv 6-8 | 4 or more demons must be grade 83 or lower. |
| Lv 9+ | All 5 demons must be grade 83 or lower. |
| Lv 6-8 | 1 or more demons must be grade 79 (4★ base) or lower. |
| Lv 9+ | 2 or more demons must be grade 79 (4★ base) or lower. |
| Lv 9+ | 1 or more demons must be grade 59 (3★ base) or lower. |
|
|
|
|
|
Team notes:

 Susano-o: 235 strength, has Assassin, Purple has Merciless Blow, p1 has 15% damage, p3 has 25% damage, p4 has 25% damage. Kusanagi is 200 power single-target, and applies
  ATK Buff.
 Harpy: 160 magic, 20% damage boost, p3 has 30% damage. 20% team damage aura on p2.
  Wind Trick (100 power AoE, +2 MP restored to party).
 Cu Chulainn: 190 magic, p1 has 15% AoE damage, p4 has 25% AoE damage.
  Mazandyne (120 power AoE).
 Cu Chulainn A: 201 strength, p3 has 20% damage boost. 10% Phys/Force aura and 10% AoE aura for the party.
  Barbed Spear is a 105 power AoE followed by 125 power random-target. Very high crit chance. If p3, applies
  DEF Debuff on the 1st turn.
Other options worth considering:

 Tengu: 100% crit rate boost. 30% damage boost. Has Wretched Blow. p1 has 20% damage, p3 has 30% damage. Yellow has 20% damage. 20-35% damage aura for the team. When going first, gives self
  Might and sets up
  ATK Buff and
  DEF Debuff.
  Tengu's Buddhist Might (100 power single-target + 100 power AoE, gives self
  Might, sets up
  ATK Buff and
  DEF Debuff)
 Kumbhanda:
  Souljack deals high-crit physical Force damage, and applies
  Spirit Chains of Corrosion to increase the team's DPS.
 Albion: Deals high damage based on PDEF. Purple has Wretched Blow. 15% damage from p1, 30% damage from p3. 30% damage aura for the team.
  Pure All-Out Ruin (200 power single-target, pierces bulwarks). Also has an Order Crest that frequently hits the lowest-HP enemy with a 100-power single-target attack (inscribes when an ally hits an enemy weakness, an enemy hits your party's weaknesses, or a party member is revived).
 Pendragon: 235 magic, 120% damage boost, p1 has 20% boost, p3 has 30% boost.
 Garuda A: 200 magic, has Force Amp, p3 has 25% Force damage.
  Gale Talon is 160-400 power random-target, pierces bulwarks.
 Schierke: 190 magic, 15% damage from p1, 15% damage from p4, 20% team damage aura from p3. 120-power AoE. If panel 2, applies
  ATK Buff on the 1st turn.
 Oberon: 216 magic, has Force Boost, p3 has 10% damage.
  Zandyne (160 power single-target).
 Titania: 235 magic, Purple has Back Attack. Transfer
  Zandyne + Force Boost.
 Anubis: 217 magic, Purple has Merciless Blow. Transfer
  Zandyne + Force Boost.
 Jack Frost with
  Jack Frost (Underside): 179 magic,
  Concentrate once (63% damage boost on average across 2 actions on first turn). Transfer
  Zandyne.
 Long: 183 magic, has Force Boost, p3 has 10% damage.
  Zandyne (160 power single-target).
 Garuda: 190 magic, p1 has 10% Force damage.
  Zandyne (160 power single-target). Innately has Auto-Rakunda to apply
  DEF Debuff.
 Loki: 198 magic, p3 has 5% damage.
  Zandyne (160 power single-target).
 Tsukuyomi: 216 magic, p3 has 5% damage.
  Zanma (140 power single-target). Needs Resist Phys. Can be re-used for the Genma race challenge.
 Sandalphon: 170 magic (p1), has 10% damage on p3.
  Zandyne (160 power single-target).
3★ options

 Lilim: 197 magic.
  Zandyne (160 power single-target) and
  Mazanma (100 power AoE).
 Purple swaps out Zandyne for Magic Amp II instead.

 Isis: 148 magic, Purple has Back Attack.
  Zandyne (160 power single-target).
 Illuyanka: 175 magic.
  Zanma (140 power single-target) and
  Mazanma (100 power AoE).
 Purple swaps out Mazanma for Magic Amp II instead.

 Unicorn: 185 magic, Purple has Serial Killer.
  Mazan (80 power AoE).
| Area | |||||||
|---|---|---|---|---|---|---|---|
| - | - | - | - | ||||
| - | - | - | - | - | - | ||
| - | - | - | - | - | - | ||
| - | - | - | - | - | |||
| - | - | - | - | - | |||
| - | - | - | - | - | |||
| - | - | - | - | - | - | ||
