Blood Pond Area (weak to  Elec)
Elec)
Overview
| Jatayu
|
Fafnir
|
Orochi
|
Jatayu
|

|

|

|

|
| Resistances
|

|

|

|
|

|

|

|
| Jatayu
|
-
|
Rs
|
-
|
Wk
|
Dr
|
Nu
|
Wk
|
| Fafnir
|
Dr
|
-
|
Wk
|
Wk
|
-
|
-
|
-
|
| Orochi
|
-
|
Nu
|
Nu
|
Wk
|
-
|
-
|
-
|
| Jatayu
|
-
|
Rs
|
-
|
Wk
|
Dr
|
Nu
|
Wk
|
| Battle Speed
|
10,000
|
Skills on multiple demons:


Skills on left  Jatayu only:
Skills on  Fafnir only:


Skills on  Orochi only:
Skills on right Jatayu only:
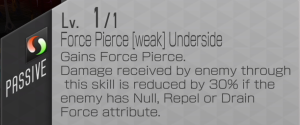

Explanation
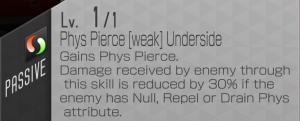
- Hellbound: Phys will apply 5 stacks of
 Spirit Chains of Suppression to you.
- Fafnir starts the battle by casting a 1-turn
 DEF Buff and
  EV/AC Buff.
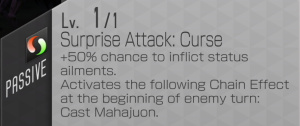
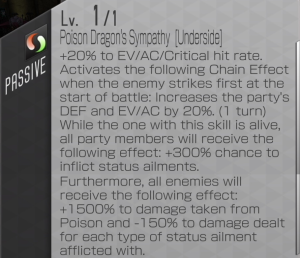
- The enemy starts each turn with various effects in this order:
 Curse from the left Jatayu,
  Weak from the right Jatayu, Barrier Break from Orochi, and finally
  Poison from Orochi.
- Due to this order, the Jatayus' ailments can be blocked by
 Barrier (such as from
  Ward brands), but Orochi's ailment cannot be blocked.
- The ailments have +350% inflict chance, meaning they are effectively guaranteed to land if not blocked by Barrier or an immunity.
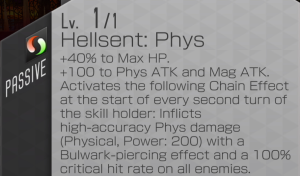
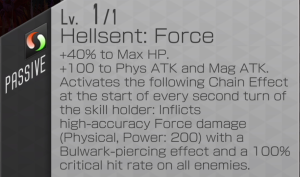
- Fafnir's passive makes you take +1500% damage per tick of Poison (effectively 16x, or 80% of your max health), and applies 150% reverse damage boost per ailment that is on you.
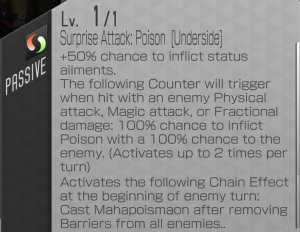
- If Orochi is hit by physical, magic, or fractional damage, then he will Poison the demon that attacked him (up to twice per turn).
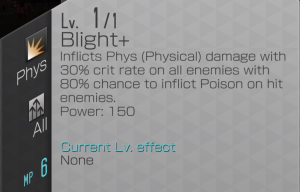
- Fafnir's Blight+ will inflict Poison to your team whenever he casts it.
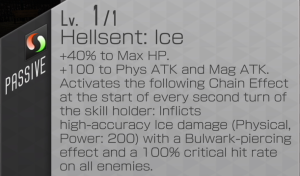
- If the adds are not dead at the start of their second turn, they will hit you with a bulwark-piercing, 100%-crit enrage AoE. Fafnir will do one too, if he isn't dead by his third turn.
General strategy
- You need to cleanse off all the ailments before you can deal meaningful damage. This can be done with a cleanser, or by using an
 Amrita Shower.
 Dominion with the skill
  Dominion (Underside) will automatically cleanse all ailments.
- If you go with a cleanser, then note that the cleanser doesn't need to have any immunities. Ideally the cleanser should act first, allowing you to start dealing damage ASAP, and so nobody has to eat the massive Poison damage (80% of max HP).
- Among fusibles, cleansers need to rely on Prayer or Silent Prayer for cleansing, but those require pulling from the gacha to transfer them. Alternatively, a few fusibles have access to these skills innately:
- Up to 2 times per turn, Orochi deals a revenge Poison to any demon that attacks him, which then immediately ticks for 80% of max HP. There are multiple ways to deal with this:
- Option 1: Bring Dominion with the skill Dominion (Underside), as he automatically gives Barriers to all team members, blocking the Poison.
- Option 2: Just eat the Poison damage, then cleanse it and heal the lost HP later. For efficient turn usage, use items in half-turns after hitting a weakness - one Amrita Shower to cleanse both attackers, then two
 Beads to heal the HP.
- Option 3: Kill Fafnir first, preferably with single-target attacks. Doing this will de-activate the increased poison damage and the DPS penalty while ailmented, making Orochi and the Jatayus into non-threats.
- Option 4: Transfer Null Poison to your first 2 attackers, meaning you don't take Poison damage at all. This is a gacha-exclusive skill, though. A few fusibles have it innately, but none of them are good at dealing Elec damage.
Underside skill demons
- Dominion
- Dominion (Underside) effect overview
- Self gets 50% HP, 180% Elec damage, 20% accuracy, 3 MP discount for Elec skills, immunity to Spirit Chains of Suppression, and immunity to Curse, Poison, and Weak,
- The team gets 30% Elec damage and 30% accuracy.
- When your first team member is about to act, Dominion cleanses your team's ailments and gives everyone Barriers. This saves you a Press Turn that would've been spent on cleansing, and the Barriers protect your team from Orochi's revenge Poison.
- Colors
 Clear for the fusibles ruleset.
 Red for Ziodyne. This frees up the transfer slot to run a damage booster.
- Skill Transfer
- Thunder Reign (Underside) is ideal, otherwise use the highest-damage single-target attack skill you have. For example: Thunder Reign.
- Ziodyne (from Red or transferred) works as a cheap alternative.
- Red should use a damage booster, such as Elec Amp or Elec Boost. If either version of Thunder Reign becomes available, then use that attack instead of a damage booster.
- Brands
- MATK% Spell.
- Due to his MP discount, Divine's MP regen is probably not necessary.
- Misc notes
- Generally speaking: If Ziodyne will be your main attack, use Red. If you have Thunder Reign (regular or Underside version), use Clear.
 Jack Frost
- Jack Frost (Underside) effect overview
- Self gets
 Concentrate (2.25x damage) on his first action - this is about 63% damage on average across his 2 actions on the first turn. Also gets 50% HP and immunity to Spirit Chains of Suppression.
- Colors
- Skill Transfer
- Use Ziodyne.
- Jack Frost does not have any MP discounts, so 7 MP skills such as Thunder Reign may be too expensive to cast repeatedly.
- Thunder Reign (Underside) starts at 7 MP, then becomes 6 MP at max level. This is the best skill he can use, but the cost of maxing it is very high.
- Brands
- Misc notes
Fusibles challenge
Race challenges
Megami, Night, Divine
Team restrictions:
| Difficulty |
Restriction
|
| Lv 3-5 |
All 5 demons must be of the races Megami, Night, Divine, Deity, or Lady.
|
| Lv 6-8 |
All 5 demons must be of the races Megami, Night, Divine, or Deity.
|
| Lv 9+ |
All 5 demons must be of the races Megami, Night, or Divine.
|
Team notes:
Other options worth considering:
Low-grade challenge
Team restrictions:
| Difficulty |
Restriction
|
| Lv 3-5 |
3 or more demons must be grade 83 or lower.
|
| Lv 6-8 |
4 or more demons must be grade 83 or lower.
|
| Lv 9+ |
All 5 demons must be grade 83 or lower.
|
| Lv 6-8 |
1 or more demons must be grade 79 (4★ base) or lower.
|
| Lv 9+ |
2 or more demons must be grade 79 (4★ base) or lower.
|
| Lv 9+ |
1 or more demons must be grade 59 (3★ base) or lower.
|
Team notes:
- This team uses an Amrita Shower to cleanse the initial ailments.
- After the ailments are dealt with, we just spam as much Elec damage as possible, with single-target damage directed toward Fafnir.
 Queen Mab: 223 magic, has Merciless Blow and 15% damage, P1 gives 20% damage, P3 gives 30% damage. Also has 25% Elec damage aura for the team. Cuailnge (180 power AoE w/ Concentrate). Sets up a 1-turn
  ATK Buff at start of combat.
 Thor: 180 magic, P1 has 20% AoE damage, P3 has 40% Elec damage. Mjolnir (500 power random).
 Titania: 235 magic, has Elec Boost, Purple has Back Attack, P3 has 10% Elec damage. Ziodyne and Merciless Blow transfers.
 Anubis: 217 magic, Purple has Merciless Blow. Ziodyne and Elec Boost transfers.
Other options worth considering:

 Albion: Deals high damage based on PDEF. Purple has Wretched Blow. 15% damage from p1, 30% damage from p3. 30% damage aura for the team. Pure All-Out Ruin (200 power single-target, pierces bulwarks). Also has an Order Crest that frequently hits the lowest-HP enemy with a 100-power single-target attack (inscribes when an ally hits an enemy weakness, an enemy hits your party's weaknesses, or a party member is revived).
-
 Vritra: Good damage, and Raijin Koryu Palm Strike applies
  DEF Debuff.
-
 Thor A: Good damage.
-
 Anzu: 170 magic, Purple has Elec Boost, P3 has 10% Elec damage. Ziodyne. War Cry for
  ATK and DEF Debuffs.
-
 Tlaltecuhtli: 184 magic, Purple has Elec Boost, P3 has 8% Elec damage. Mazionga.

 Mishaguji: 183 magic, has Elec Boost. Mazionga. Yellow also has Concentrate.
 White Rider: 198 magic, P1 has 5% single-target boost. Ziodyne.
-
 Loki: 198 magic, P3 has 5% all-damage boost. Ziodyne.
-
 Sphinx: 210 magic. Ziodyne.
-
 Succubus: 204 magic. Mazionga.


 Beelzebub☆ counts, despite needing a gacha-exclusive material to make him.
 Pixie and
  Slime count, even though you cannot fuse them.


 Indrajit provides
  Anat provides
  Izanami provides an Elec damage aura, and another 1 MP discount for the team's Elec skills.

 Lilith: 190 magic.
  Artemis:
  Norn: 193 magic, has Merciless Blow. Automatic cast of Luster Candy, and can do decent damage if given an Elec transfer.
 Ishtar: 247 magic,
  Mesopotamian Star casts Luster Candy and Debilitate. Will need an Elec transfer.
 Ame no Uzume: 170 magic.
