Difference between revisions of "Strange Signal: Neutral"
(→Tips: expanding recommendations) |
(days) |
||
| (3 intermediate revisions by the same user not shown) | |||
| Line 1: | Line 1: | ||
| − | + | Days: All | |
| − | Days: | ||
==Tips == | ==Tips == | ||
| Line 7: | Line 6: | ||
: From stage 6 on, they also use Ice magic. | : From stage 6 on, they also use Ice magic. | ||
: In stage 10, they also use Dark magic. | : In stage 10, they also use Dark magic. | ||
| − | |||
| − | |||
:Transfer Zio- magic, if your demons don't have it already. | :Transfer Zio- magic, if your demons don't have it already. | ||
| − | : | + | :{{DemonIcon|Phantom|size=32px}}, {{DemonIcon|Gremlin|size=32px}}, {{DemonIcon|Mokoi|size=32px}}, and {{DemonIcon|Suparna|size=32px}} have basic [[Zio]] available for transfer, and are 1★ - 2★ that can be fused for cheap. |
==Recommended Demons== | ==Recommended Demons== | ||
| Line 25: | Line 22: | ||
Stage 1-5, Null Force | Stage 1-5, Null Force | ||
| − | * 2★ Yaksini | + | * 2★ {{DemonIcon|Yaksini|size=32px}} |
| − | * 3★ Jatayu | + | * 3★ {{DemonIcon|Jatayu|size=32px}} |
| − | * 3★ Lilim | + | * 3★ {{DemonIcon|Lilim|size=32px}} |
| − | * 3★ Setanta | + | * 3★ {{DemonIcon|Setanta|size=32px}} |
| − | * 3★ | + | * 3★ {{DemonIcon|Scathach|size=32px}} |
| − | * 3★ Virtue | + | * 3★ {{DemonIcon|Virtue|size=32px}} |
| − | * 3★ Moh Shuvuu | + | * 3★ {{DemonIcon|Moh Shuvuu|size=32px}} |
| − | * 4★ Oberon | + | * 4★ {{DemonIcon|Oberon|size=32px}} |
| − | * 4★ Kikuri-Hime | + | * 4★ {{DemonIcon|Kikuri-Hime|size=32px}} |
| − | * 4★ Ganesha | + | * 4★ {{DemonIcon|Ganesha|size=32px}} |
| − | * 4★ Dantalian | + | * 4★ {{DemonIcon|Dantalian|size=32px}} |
| − | * 4★ Pazuzu | + | * 4★ {{DemonIcon|Pazuzu|size=32px}} |
| − | * 4★ Gurr | + | * 4★ {{DemonIcon|Gurr|size=32px}} |
| − | * 4★ Jikokuten | + | * 4★ {{DemonIcon|Jikokuten|size=32px}} |
| − | * 4★ Long | + | * 4★ {{DemonIcon|Long|size=32px}} |
| − | * 4★ Hanuman | + | * 4★ {{DemonIcon|Hanuman|size=32px}} |
Stage 6–9, Null Force/Ice | Stage 6–9, Null Force/Ice | ||
| − | * 3★ Silky (Teal) | + | * 3★ {{ArchIcon|arch=Teal|size=15px}} {{DemonIcon|Silky|size=32px}} (Teal) |
| − | * 3★ Virtue (Teal) | + | * 3★ {{ArchIcon|arch=Teal|size=15px}} {{DemonIcon|Virtue|size=32px}} (Teal) |
| − | * 5★ Asherah (Teal) | + | * 5★ {{ArchIcon|arch=Teal|size=15px}} {{DemonIcon|Asherah|size=32px}} (Teal) |
| − | * 5★ Mastema | + | * 5★ {{DemonIcon|Mastema|size=32px}} |
| − | * 5★ Hresvelgr | + | * 5★ {{DemonIcon|Hresvelgr|size=32px}} |
</div> | </div> | ||
| Line 53: | Line 50: | ||
: '''IMPORTANT : This strategy will fail if you give Shionyan her Assist skill which mutes enemies and causes them to use physical attacks!''' | : '''IMPORTANT : This strategy will fail if you give Shionyan her Assist skill which mutes enemies and causes them to use physical attacks!''' | ||
| − | : Fuse a Teal | + | : Fuse a Teal {{ArchIcon|arch=Teal|size=15px}} {{DemonIcon|Silky|size=32px}} |
: A Teal Silky can solo Strange Signal: Neutral on Auto for all stages up to 9 | : A Teal Silky can solo Strange Signal: Neutral on Auto for all stages up to 9 | ||
: Stage 8 provides a good balance between stamina cost and Aether recieved (You get Large, Medium and Small) | : Stage 8 provides a good balance between stamina cost and Aether recieved (You get Large, Medium and Small) | ||
Latest revision as of 05:44, 26 June 2022
Days: All
Tips
- Demons are generally weak to Elec and use Force magic in this Aether.
- From stage 6 on, they also use Ice magic.
- In stage 10, they also use Dark magic.
- Transfer Zio- magic, if your demons don't have it already.
 Phantom,
  Gremlin,
  Mokoi, and
  Suparna have basic Zio available for transfer, and are 1★ - 2★ that can be fused for cheap.
Recommended Demons
Guidelines for recommended demons:
- Prioritize demons with good magic stats.
- Stage 1-5 demons shouldn't depend on specific archetypes.
- Avoid listing 5★ and gacha-exclusive demons for stages 1-5.
- If a gacha-exclusive demon is listed, it should be in the permanent summon pool. (Nothing that's exclusive to specific banners or collaborations).
- Avoid listing 1★ demons, as they are usually too weak.
- If 2★ are listed, limit it to only the best one available.
Stage 1-5, Null Force
- 2★
 Yaksini
 - 3★
 Jatayu
 - 3★
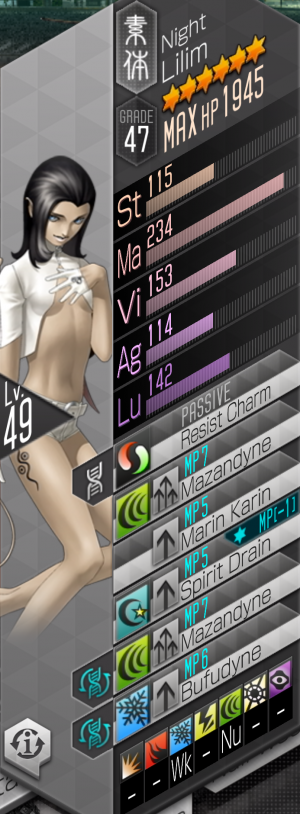
 Lilim
Lilim - 3★
 Setanta
 - 3★
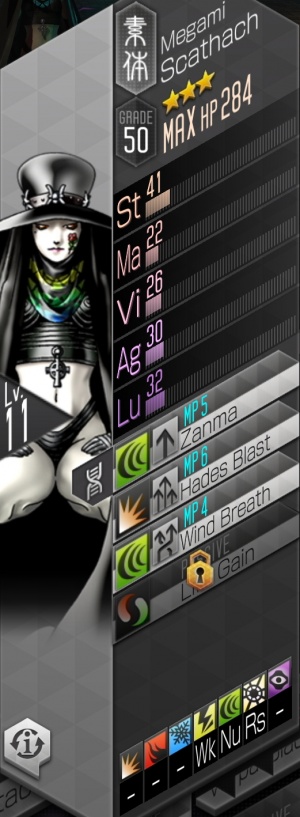
 Scathach
 - 3★
 Virtue
 - 3★
 Moh Shuvuu
 - 4★
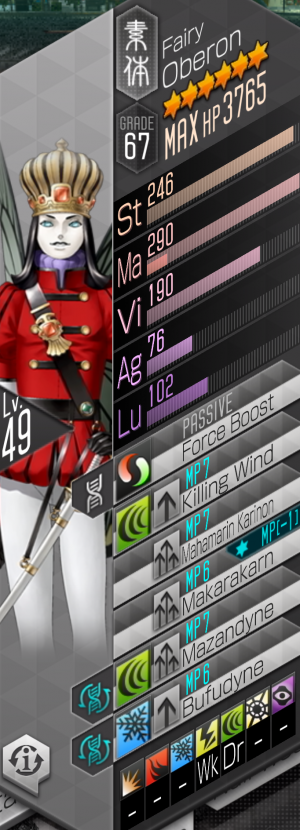
 Oberon
 - 4★
 Kikuri-Hime
 - 4★
 Ganesha
 - 4★
 Dantalian
 - 4★
 Pazuzu
 - 4★
 Gurr
Gurr - 4★
 Jikokuten
 - 4★
 Long
Long - 4★
 Hanuman
Stage 6–9, Null Force/Ice
General Strategy: Stages 1-9
- IMPORTANT : This strategy will fail if you give Shionyan her Assist skill which mutes enemies and causes them to use physical attacks!
- Fuse a Teal

 Silky
Silky - A Teal Silky can solo Strange Signal: Neutral on Auto for all stages up to 9
- Stage 8 provides a good balance between stamina cost and Aether recieved (You get Large, Medium and Small)
- The level of the silky is up to the user. A higher level will mean a faster completion time.
- At Level 40 you can auto Stage 8 for a long time as your stamina will replenish as you farm, perfect for unattended farming
- If you only have short periods of time available to farm, take the Silky to max level and ensure you transfer an electric magic attack
Stages
Stage 1
Wave 1
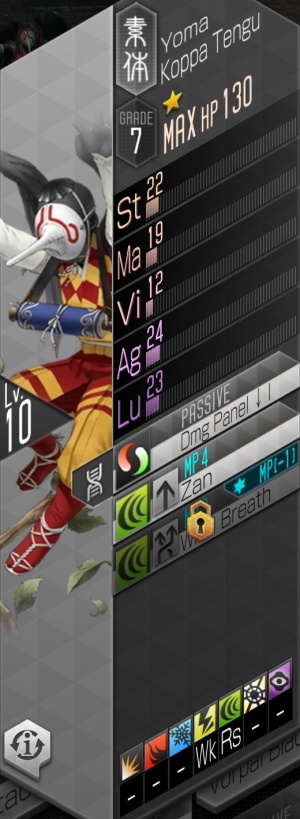
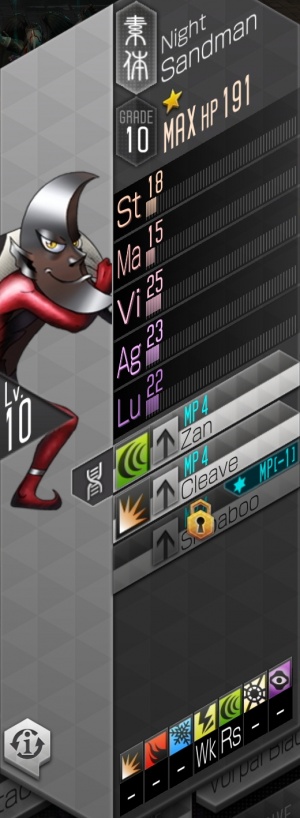
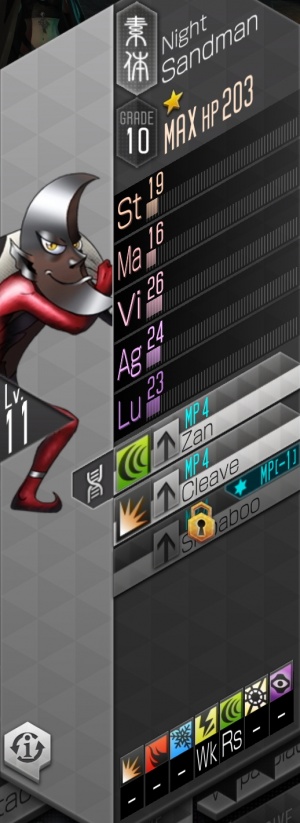
| Koppa Tengu | Sandman
|
|---|---|
| [[File:.jpg|300x600px]] | [[File:.jpg|300x600px]]
|
| Resistances | |||||||
|---|---|---|---|---|---|---|---|
| Koppa Tengu | - | - | - | Wk | Rs | - | - |
| Sandman | - | - | - | Wk | Rs | - | - |
| Battle Speed | 1175 | ||||||
Wave 2
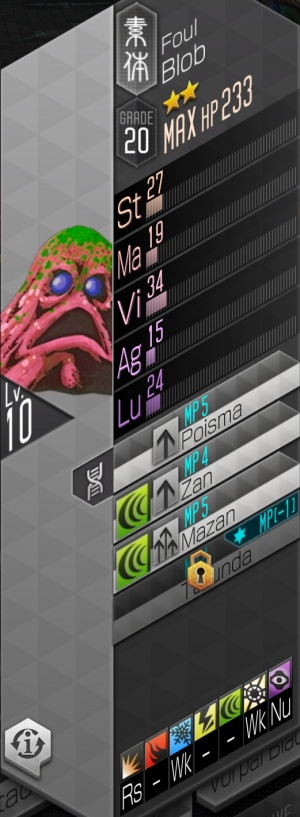
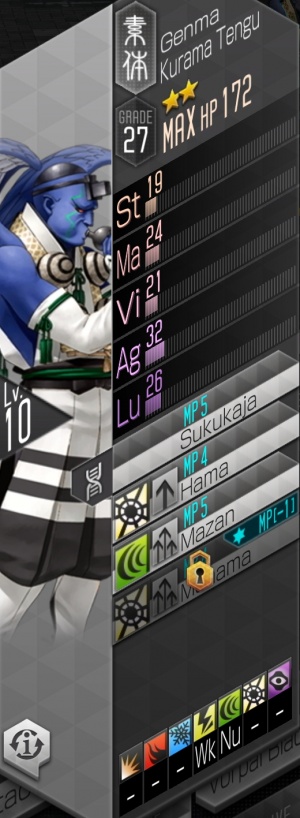
| Blob | Kurama Tengu
|
|---|---|
| [[File:.jpg|300x600px]] | [[File:.jpg|300x600px]]
|
| Resistances | |||||||
|---|---|---|---|---|---|---|---|
| Blob | Rs | - | Wk | - | - | Wk | Nu |
| Kurama Tengu | - | - | - | Wk | Nu | - | - |
| Battle Speed | 1175 | ||||||
Wave 3
| Scathach BOSS | Sandman
|
|---|---|
| [[File:.jpg|300x600px]] | [[File:.jpg|300x600px]]
|
| Resistances | |||||||
|---|---|---|---|---|---|---|---|
| Scathach BOSS | - | - | - | Wk | Nu | Rs | - |
| Sandman | - | - | - | Wk | Rs | - | - |
| Battle Speed | 1350 | ||||||
Stage 2
Wave 1
| Koppa Tengu | Sandman
|
|---|---|
| [[File:.jpg|300x600px]] | [[File:.jpg|300x600px]]
|
| Resistances | |||||||
|---|---|---|---|---|---|---|---|
| Koppa Tengu | - | - | - | Wk | Rs | - | - |
| Sandman | - | - | - | Wk | Rs | - | - |
| Battle Speed | ? | ||||||
Wave 2
| Blob | Kurama Tengu
|
|---|---|
| [[File:.jpg|300x600px]] | [[File:.jpg|300x600px]]
|
| Resistances | |||||||
|---|---|---|---|---|---|---|---|
| Blob | Rs | - | Wk | - | - | Wk | Nu |
| Kurama Tengu | - | - | - | Wk | Nu | - | - |
| Battle Speed | ? | ||||||
Wave 3
| Scathach BOSS | Sandman
|
|---|---|
| [[File:.jpg|300x600px]] | [[File:.jpg|300x600px]]
|
| Resistances | |||||||
|---|---|---|---|---|---|---|---|
| Scathach BOSS | - | - | - | Wk | Nu | Rs | - |
| Sandman | - | - | - | Wk | Rs | - | - |
| Battle Speed | ? | ||||||
Stage 3
Wave 1
| Koppa Tengu | Sandman
|
|---|---|
| [[File:.jpg|300x600px]] | [[File:.jpg|300x600px]]
|
| Resistances | |||||||
|---|---|---|---|---|---|---|---|
| Koppa Tengu | - | - | - | Wk | Rs | - | - |
| Sandman | - | - | - | Wk | Rs | - | - |
| Battle Speed | ? | ||||||
Wave 2
| Blob | Kurama Tengu
|
|---|---|
| [[File:.jpg|300x600px]] | [[File:.jpg|300x600px]]
|
| Resistances | |||||||
|---|---|---|---|---|---|---|---|
| Blob | Rs | - | Wk | - | - | Wk | Nu |
| Kurama Tengu | - | - | - | Wk | Nu | - | - |
| Battle Speed | ? | ||||||
Wave 3
| Scathach BOSS | Sandman
|
|---|---|
| [[File:.jpg|300x600px]] | [[File:.jpg|300x600px]]
|
| Resistances | |||||||
|---|---|---|---|---|---|---|---|
| Scathach BOSS | - | - | - | Wk | Nu | Rs | - |
| Sandman | - | - | - | Wk | Rs | - | - |
| Battle Speed | ? | ||||||
Stage 4
Wave 1
| Koppa Tengu | Sandman
|
|---|---|
| [[File:.jpg|300x600px]] | [[File:.jpg|300x600px]]
|
| Resistances | |||||||
|---|---|---|---|---|---|---|---|
| Koppa Tengu | - | - | - | Wk | Rs | - | - |
| Sandman | - | - | - | Wk | Rs | - | - |
| Battle Speed | ? | ||||||
Wave 2
| Blob | Kurama Tengu
|
|---|---|
| [[File:.jpg|300x600px]] | [[File:.jpg|300x600px]]
|
| Resistances | |||||||
|---|---|---|---|---|---|---|---|
| Blob | Rs | - | Wk | - | - | Wk | Nu |
| Kurama Tengu | - | - | - | Wk | Nu | - | - |
| Battle Speed | ? | ||||||
Wave 3
| Scathach BOSS | Sandman
|
|---|---|
| [[File:.jpg|300x600px]] | [[File:.jpg|300x600px]]
|
| Resistances | |||||||
|---|---|---|---|---|---|---|---|
| Scathach BOSS | - | - | - | Wk | Nu | Rs | - |
| Sandman | - | - | - | Wk | Rs | - | - |
| Battle Speed | ? | ||||||
Stage 5
Wave 1
| Koppa Tengu | Sandman
|
|---|---|
| [[File:.jpg|300x600px]] | [[File:.jpg|300x600px]]
|
| Resistances | |||||||
|---|---|---|---|---|---|---|---|
| Koppa Tengu | - | - | - | Wk | Rs | - | - |
| Sandman | - | - | - | Wk | Rs | - | - |
| Battle Speed | ? | ||||||
Wave 2
| Blob | Kurama Tengu
|
|---|---|
| [[File:.jpg|300x600px]] | [[File:.jpg|300x600px]]
|
| Resistances | |||||||
|---|---|---|---|---|---|---|---|
| Blob | Rs | - | Wk | - | - | Wk | Nu |
| Kurama Tengu | - | - | - | Wk | Nu | - | - |
| Battle Speed | ? | ||||||
Wave 3
| Scathach BOSS | Sandman
|
|---|---|
| [[File:.jpg|300x600px]] | [[File:.jpg|300x600px]]
|
| Resistances | |||||||
|---|---|---|---|---|---|---|---|
| Scathach BOSS | - | - | - | Wk | Nu | Rs | - |
| Sandman | - | - | - | Wk | Rs | - | - |
| Battle Speed | ? | ||||||
Stage 6
Wave 1
| Koppa Tengu | Sandman
|
|---|---|
| [[File:.jpg|300x600px]] | [[File:.jpg|300x600px]]
|
| Resistances | |||||||
|---|---|---|---|---|---|---|---|
| Koppa Tengu | - | - | - | Wk | Rs | - | - |
| Sandman | - | - | - | Wk | Rs | - | - |
| Battle Speed | ? | ||||||
Wave 2
| Blob | Kurama Tengu
|
|---|---|
| [[File:.jpg|300x600px]] | [[File:.jpg|300x600px]]
|
| Resistances | |||||||
|---|---|---|---|---|---|---|---|
| Blob | Rs | - | Wk | - | - | Wk | Nu |
| Kurama Tengu | - | - | - | Wk | Nu | - | - |
| Battle Speed | ? | ||||||
Wave 3
| Scathach BOSS | Sandman
|
|---|---|
| [[File:.jpg|300x600px]] | [[File:.jpg|300x600px]]
|
| Resistances | |||||||
|---|---|---|---|---|---|---|---|
| Scathach BOSS | - | - | - | Wk | Nu | Rs | - |
| Sandman | - | - | - | Wk | Rs | - | - |
| Battle Speed | ? | ||||||
Stage 7
Stage 8
Wave 3
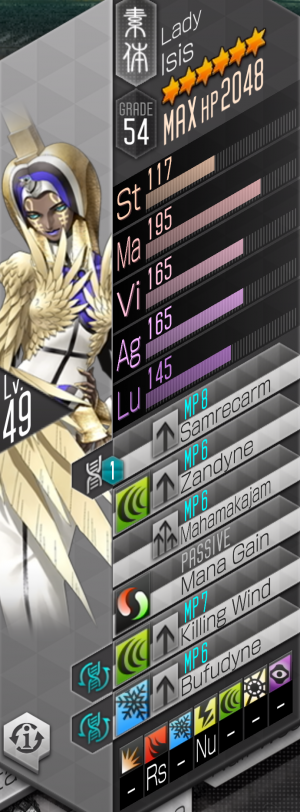
| Lilim | Oberon | Isis
|
|---|---|---|
| [[File:.jpg|300x600px]] | [[File:.jpg|300x600px]] | [[File:.jpg|300x600px]]
|
| Resistances | |||||||
|---|---|---|---|---|---|---|---|
| Lilim | - | - | - | - | - | - | - |
| Oberon | - | - | - | - | - | - | - |
| Isis | - | - | - | - | - | - | - |
| Battle Speed | ? | ||||||
Stage 9
Stage 10
Wave 1
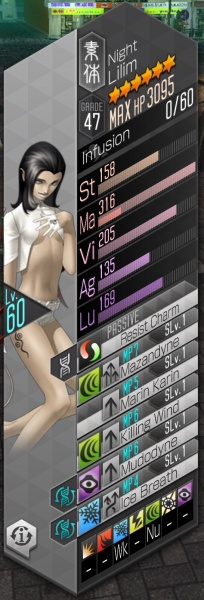
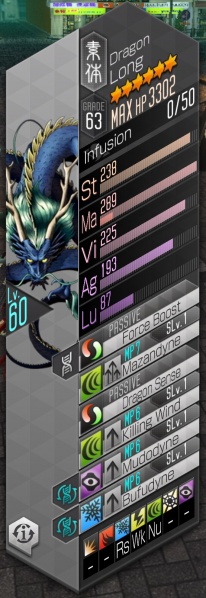
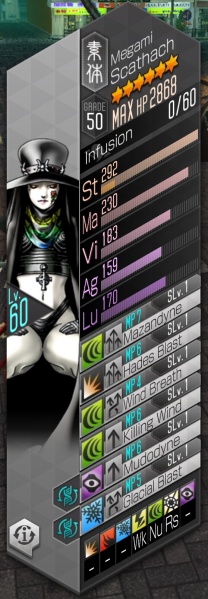
| Lilim | Long | Scathach
|
|---|---|---|
|
|
|
| Resistances | |||||||
|---|---|---|---|---|---|---|---|
| Lilim | - | - | Wk | - | Nu | - | - |
| Long | - | - | Rs | Wk | Nu | - | - |
| Scathach | - | - | - | Wk | Nu | Rs | - |
| Battle Speed | |||||||
Wave 2
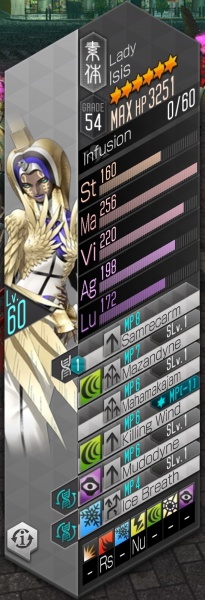
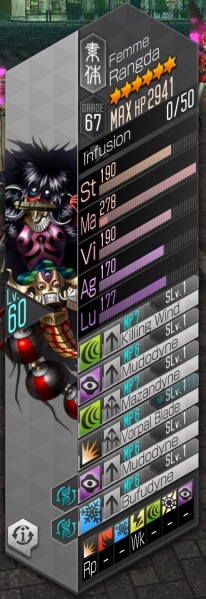
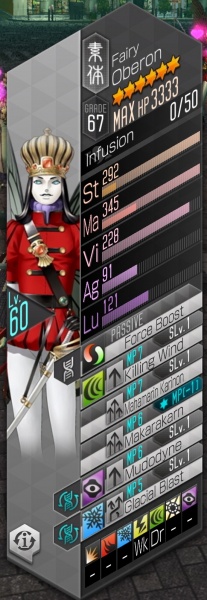
| Isis | Rangda | Oberon
|
|---|---|---|
|
|
|
| Resistances | |||||||
|---|---|---|---|---|---|---|---|
| Isis | Rs | - | - | Nu | - | - | - |
| Rangda | Rp | - | - | Wk | - | - | - |
| Oberon | - | - | - | Wk | Dr | - | - |
| Battle Speed | |||||||
Wave 3
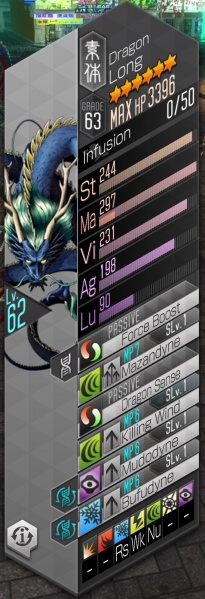
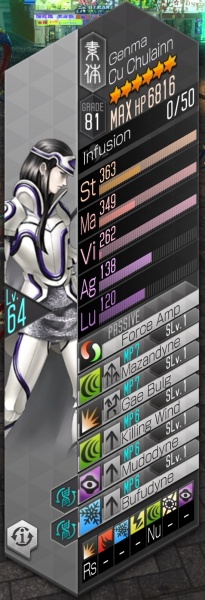
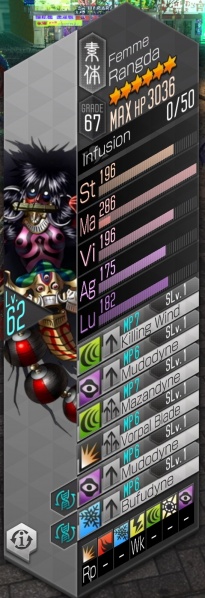
| Long | Cu Chulainn | Rangda
|
|---|---|---|
|
|
|
| Resistances | |||||||
|---|---|---|---|---|---|---|---|
| Long | - | - | Rs | Wk | Nu | - | - |
| Cu Chulainn | Rs | - | - | - | Nu | - | - |
| Rangda | Rp | - | - | Wk | - | - | - |
| Battle Speed | |||||||
