Difference between revisions of "Hollow World/Floors 1-10"
(→Floor 3: notes) |
(some notes) |
||
| Line 7: | Line 7: | ||
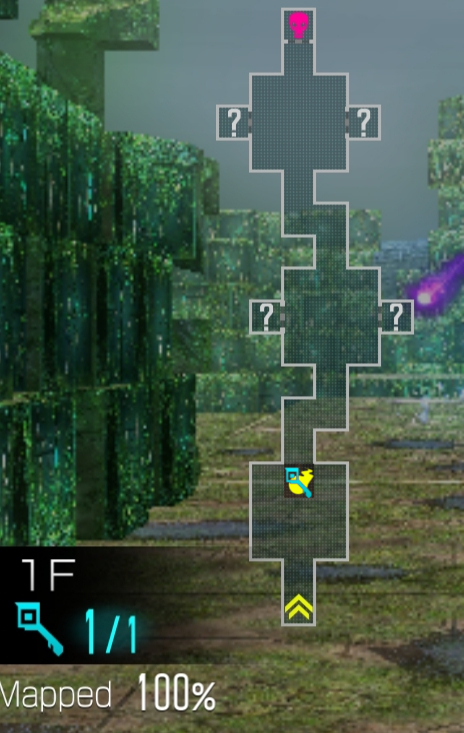
[[File:AG2Floor1.jpg|center|500px|thumb|Map Layout]] | [[File:AG2Floor1.jpg|center|500px|thumb|Map Layout]] | ||
| + | |||
| + | Notes: | ||
| + | * Talk to the Hollow to get the key. | ||
===Boss=== | ===Boss=== | ||
| Line 20: | Line 23: | ||
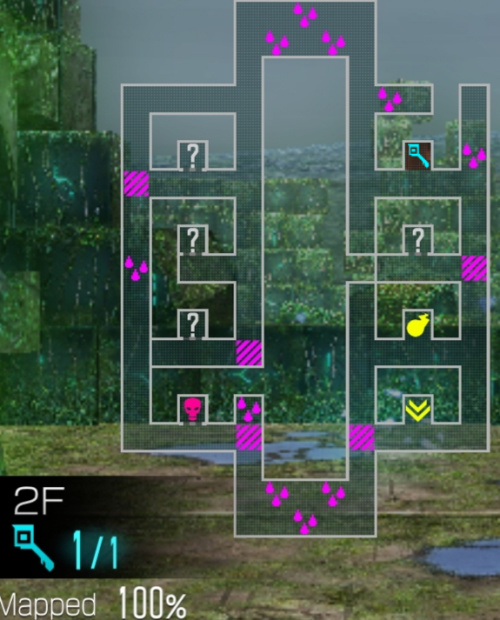
[[File:AG2Floor2.jpg|center|500px|thumb|Map Layout]] | [[File:AG2Floor2.jpg|center|500px|thumb|Map Layout]] | ||
| + | |||
| + | Notes: | ||
| + | * Talk to the Hollow to get the key. | ||
===Boss=== | ===Boss=== | ||
| Line 32: | Line 38: | ||
Notes: | Notes: | ||
| − | * Defeat the enemy at location K1, then talk to the | + | * Defeat the enemy at location K1, then talk to the Hollow at location K2 for the key. |
===Boss=== | ===Boss=== | ||
| Line 63: | Line 69: | ||
[[File:AG2Floor6.jpg|center|500px|thumb|Map Layout]] | [[File:AG2Floor6.jpg|center|500px|thumb|Map Layout]] | ||
| + | |||
| + | Notes: | ||
| + | * Talk to the Hollow at K1, then defeat the enemy at K2 to disable the barrier, and finally go to K3 to get the key. | ||
===Boss=== | ===Boss=== | ||
| Line 73: | Line 82: | ||
[[File:AG2Floor7.jpg|center|500px|thumb|Map Layout]] | [[File:AG2Floor7.jpg|center|500px|thumb|Map Layout]] | ||
| + | |||
| + | Notes: | ||
| + | * Go to location K for the key. | ||
===Boss=== | ===Boss=== | ||
| Line 83: | Line 95: | ||
[[File:AG2Floor8.jpg|center|500px|thumb|Map Layout]] | [[File:AG2Floor8.jpg|center|500px|thumb|Map Layout]] | ||
| + | |||
| + | Notes: | ||
| + | * Go to location K for the key. | ||
===Boss=== | ===Boss=== | ||
| Line 93: | Line 108: | ||
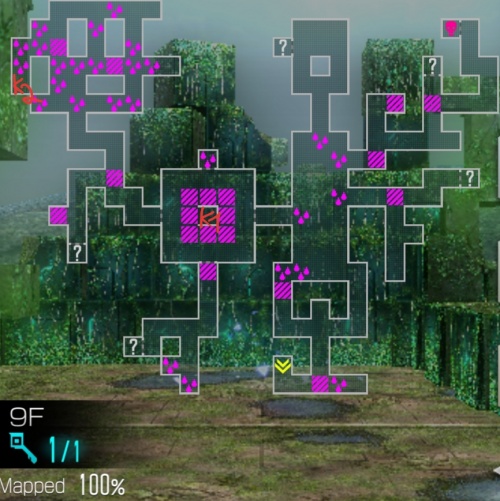
[[File:AG2Floor9.jpg|center|500px|thumb|Map Layout]] | [[File:AG2Floor9.jpg|center|500px|thumb|Map Layout]] | ||
| + | |||
| + | Notes: | ||
| + | * Go to location K1, then K2 for the key. | ||
===Boss=== | ===Boss=== | ||
Revision as of 12:47, 9 February 2024
Contents
General
- K denotes a Key Location.
- Number denotes the order in which you should go through the events
Floor 1
Notes:
- Talk to the Hollow to get the key.
Boss
| Cu Sith | Preta | Cu Sith
|
|---|---|---|

|

|

|
| Resistances | |||||||
|---|---|---|---|---|---|---|---|
| Cu Sith | - | - | - | - | - | Nu | - |
| Preta | - | Wk | Rs | - | Wk | Wk | Nu |
| Cu Sith | - | - | - | - | - | Nu | - |
| Battle Speed | 12966 | ||||||
Floor 2
Notes:
- Talk to the Hollow to get the key.
Boss
| Hamsa | Kelpie | Yaksini
|
|---|---|---|

|

|

|
| Resistances | |||||||
|---|---|---|---|---|---|---|---|
| Hamsa | - | - | - | - | - | - | - |
| Kelpie | - | - | - | - | - | - | - |
| Yaksini | - | - | - | - | - | - | - |
| Battle Speed | 18733 | ||||||
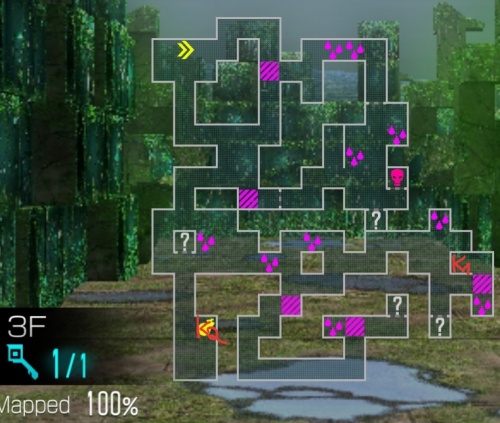
Floor 3
Notes:
- Defeat the enemy at location K1, then talk to the Hollow at location K2 for the key.
Boss
| Forneus | Eligor | Isis
|
|---|---|---|

|

|

|
| Resistances | |||||||
|---|---|---|---|---|---|---|---|
| Forneus | - | - | - | - | - | - | - |
| Eligor | - | - | - | - | - | - | - |
| Isis | - | - | - | - | - | - | - |
| Battle Speed | 12166 | ||||||
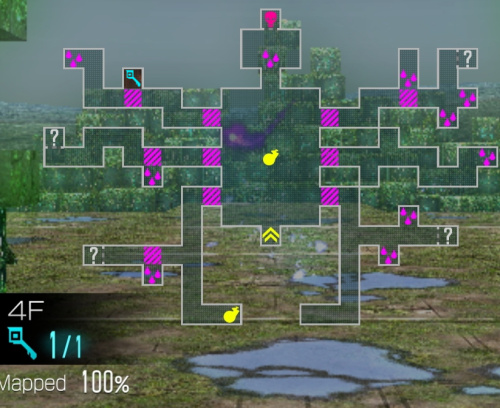
Floor 4
Boss
| Peallaidh | Ares | Kinmamon
|
|---|---|---|

|

|

|
| Resistances | |||||||
|---|---|---|---|---|---|---|---|
| Peallaidh | - | - | - | - | - | - | - |
| Ares | - | - | - | - | - | - | - |
| Kinmamon | - | - | - | - | - | - | - |
| Battle Speed | 14533 | ||||||
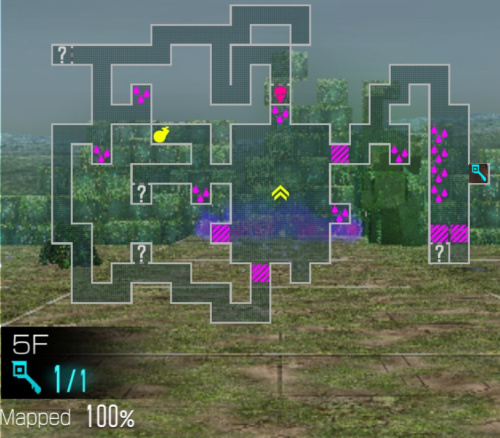
Floor 5
Boss
| Silky | Efreet | Shiki-Ouji
|
|---|---|---|

|

|

|
| Resistances | |||||||
|---|---|---|---|---|---|---|---|
| Silky | - | - | - | - | - | - | - |
| Efreet | - | - | - | - | - | - | - |
| Shiki-Ouji | - | - | - | - | - | - | - |
| Battle Speed | 11633 | ||||||
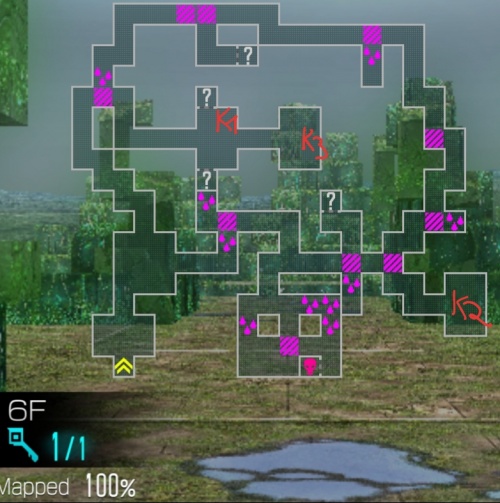
Floor 6
Notes:
- Talk to the Hollow at K1, then defeat the enemy at K2 to disable the barrier, and finally go to K3 to get the key.
Boss
| Illuyanka | Lilim | Illuyanka
|
|---|---|---|

|

|

|
| Resistances | |||||||
|---|---|---|---|---|---|---|---|
| Illuyanka | - | - | - | - | - | - | - |
| Lilim | - | - | - | - | - | - | - |
| Illuyanka | - | - | - | - | - | - | - |
| Battle Speed | 13600 | ||||||
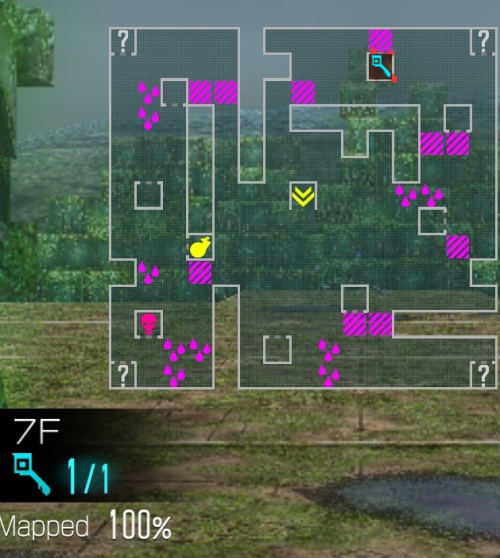
Floor 7
Notes:
- Go to location K for the key.
Boss
| Koumokuten | Scathach | Ose
|
|---|---|---|

|

|

|
| Resistances | |||||||
|---|---|---|---|---|---|---|---|
| Koumokuten | - | - | - | - | - | - | - |
| Scathach | - | - | - | - | - | - | - |
| Ose | - | - | - | - | - | - | - |
| Battle Speed | 14300 | ||||||
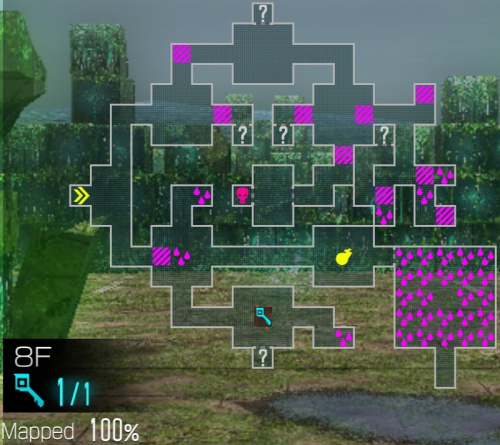
Floor 8
Notes:
- Go to location K for the key.
Boss
| Horus | Fenrir | Jatayu
|
|---|---|---|

|

|

|
| Resistances | |||||||
|---|---|---|---|---|---|---|---|
| Horus | - | - | - | - | - | - | - |
| Fenrir | - | - | - | - | - | - | - |
| Jatayu | - | - | - | - | - | - | - |
| Battle Speed | 48000 | ||||||
Floor 9
Notes:
- Go to location K1, then K2 for the key.
Boss
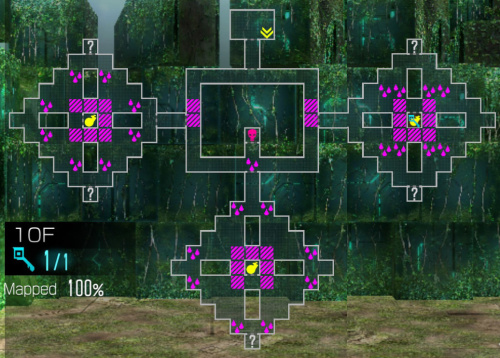
Floor 10
Boss
| Prometheus | White Rider | Persephone
|
|---|---|---|

|

|

|
| Resistances | |||||||
|---|---|---|---|---|---|---|---|
| Prometheus | - | Nu | Wk | - | Nu | Rs | - |
| White Rider | - | - | - | Dr | Wk | Rs | Rs |
| Persephone | Nu | - | Nu | Wk | - | - | Nu |
| Battle Speed | 15900 | ||||||
