Difference between revisions of "Hollow World/Floors 21-30"
(→Floor 29) |
m (→Floor 23: typo) |
||
| (39 intermediate revisions by 9 users not shown) | |||
| Line 5: | Line 5: | ||
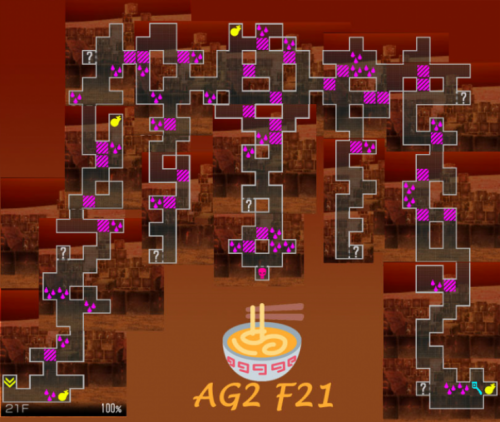
==Floor 21== | ==Floor 21== | ||
| − | [[File: | + | [[File:F21.png|center|500px|thumb|Map Layout]] |
| + | |||
| + | ===Boss=== | ||
| + | <div class="toccolours mw-collapsible mw-collapsed" style="overflow:auto;"> | ||
| + | {{EnemyParty|d1=Decarabia|d2=Ikusa|d3=Decarabia|i1=ag2f21add1|i2=ag2f21boss|i3=ag2f21add2 | ||
| + | |speed=19700}} | ||
| + | </div> | ||
==Floor 22== | ==Floor 22== | ||
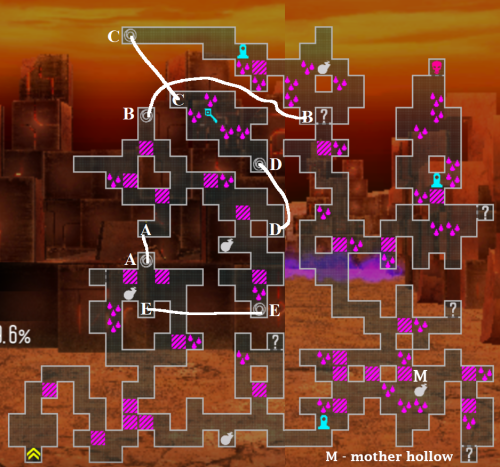
| + | [[File:AG2Floor22.png|center|500px|thumb|Map Layout]] | ||
| + | |||
| + | Notes: | ||
| + | * You need [[File:Icon Purge Extract Ag.png|32px|link=]] Purge Extract Ag x3 to trade for a key, so make sure to be on the lookout for them in the Black Market. | ||
| + | * Talk to the mother-and-son hollow at the bottom right for a key on a later floor. | ||
| + | * The fastest route is to first go through the portals to get the key, then talk to the mother-and-son hollow on the way to the boss room. | ||
| − | + | ===Boss=== | |
| + | <div class="toccolours mw-collapsible mw-collapsed" style="overflow:auto;"> | ||
| + | {{EnemyParty|d1=Apis|d2=Forneus|d3=Isis|i1=ag2f22add1|i2=ag2f22boss|i3=ag2f22add2 | ||
| + | |speed=18166}} | ||
| + | </div> | ||
==Floor 23== | ==Floor 23== | ||
| Line 15: | Line 31: | ||
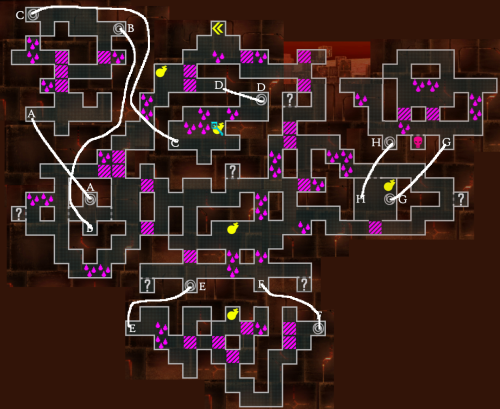
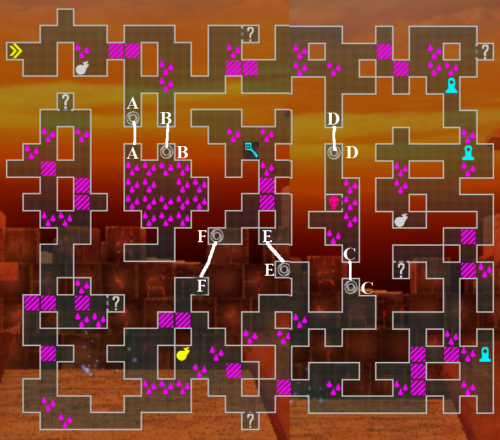
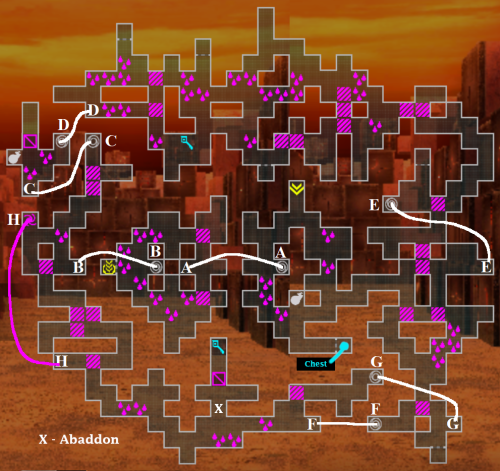
[[File:AG2Floor23.png|center|500px|thumb|Map Layout]] | [[File:AG2Floor23.png|center|500px|thumb|Map Layout]] | ||
| − | To get the key, head south-west from the spawn point and take warp point A, then warp point C. Talk to the hollow and tell her you won't hurt her, and she'll give you the key. | + | Notes: |
| + | * To get the key, head south-west from the spawn point and take warp point A, then warp point C. Talk to the hollow and tell her you won't hurt her, and she'll give you the key. | ||
| + | * Warp point G is locked by default, you have to talk to the mother and son hollow in F22. If you have talked to them the son hollow will appear one tile south of the warp point G, talk to him and he'll unlock the warp point. | ||
| + | * Head south-east from the spawn point and take warp point G to get to the boss room. | ||
| − | + | ===Boss=== | |
| + | <div class="toccolours mw-collapsible mw-collapsed" style="overflow:auto;"> | ||
| + | {{EnemyParty|d1=Black Ooze|d2=Incubus|d3=Black Ooze|i1=ag2f23add1|i2=ag2f23boss|i3=ag2f23add1 | ||
| + | |speed=15300}} | ||
| + | </div> | ||
| − | + | ==Floor 24== | |
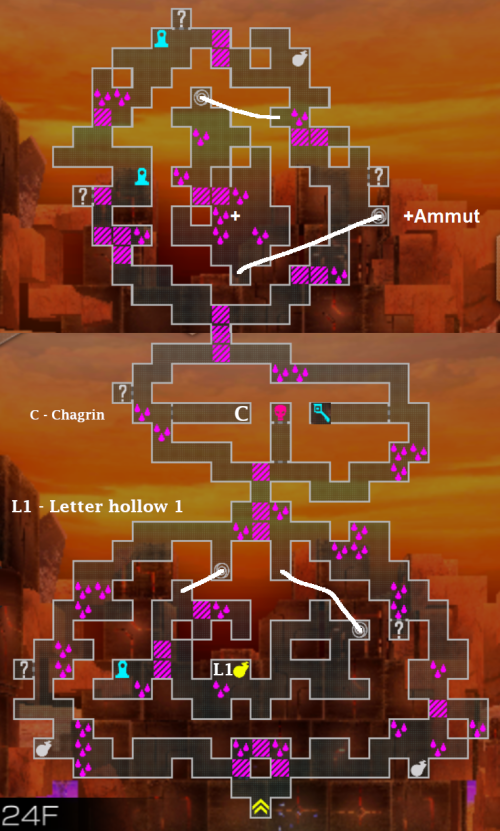
| + | [[File:AG2Floor24.png|center|500px|thumb|Map Layout]] | ||
| − | + | Notes: | |
| + | * Defeat Chagrin to unlock the barrier guarding the key. He's at the dead-end path to the west of the key. | ||
| + | * Defeat Ammut in the upper teleport area, to get a key on a later floor. | ||
| + | * Talk to Letter Hollow 1 (in the lower teleport area) for a letter, and bring it to Letter Hollow 2 on 25F. You will need to deliver multiple letters between these two Hollows, to get a key for 25F. | ||
| − | + | ===Boss=== | |
| + | <div class="toccolours mw-collapsible mw-collapsed" style="overflow:auto;"> | ||
| + | {{EnemyParty|d1=Mitra|d2=Shiki-Ouji|d3=Berserker|i1=ag2f24add1|i2=ag2f24boss|i3=ag2f24add2 | ||
| + | |speed=17700}} | ||
| + | </div> | ||
==Floor 25== | ==Floor 25== | ||
| + | [[File:AG2Floor25.png|center|500px|thumb|Map Layout]] | ||
| + | |||
| + | Notes: | ||
| + | * Talk to Letter Hollow 1 on 24F for a letter, and bring it to Letter Hollow 2 on 25F (bottom-left of the map). You will need to deliver multiple letters between these two Hollows, until Letter Hollow 2 gives you a key for 25F. | ||
| + | * For 25F's second key, take teleporter E to enter the top-left house, then loot the pile of debris in the bottom-right of the house. | ||
| + | * Talk to the Hollow couple for a key on a later floor. To find them, take teleporter C to enter the bottom-left house, then talk to them in the middle of the house. | ||
| + | |||
| + | ===Boss=== | ||
| + | <div class="toccolours mw-collapsible mw-collapsed" style="overflow:auto;"> | ||
| + | {{EnemyParty|d1=Grendel|d2=Jatayu|d3=Grendel|i1=ag2f25add1|i2=ag2f25boss|i3=ag2f25add1 | ||
| + | |speed=18666}} | ||
| + | |||
| − | [[File: | + | [[File:ag2f25AvianJudgment.jpg|500px]] |
| + | [[File:ag2f25PhysReduction.jpg|500px]] | ||
| + | </div> | ||
==Floor 26== | ==Floor 26== | ||
| Line 33: | Line 78: | ||
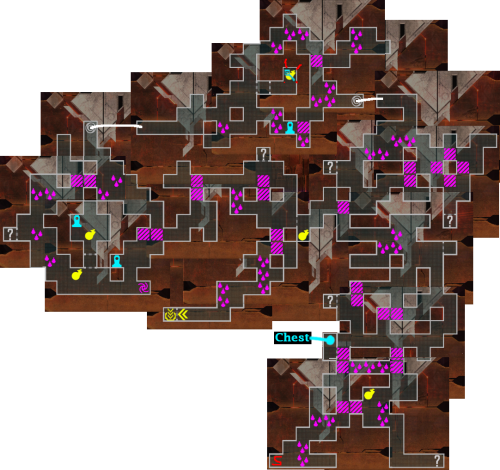
[[File:AGFloor26.png|center|500px|thumb|Map Layout]] | [[File:AGFloor26.png|center|500px|thumb|Map Layout]] | ||
| − | *To get the Key, | + | Notes: |
| + | *To get the Key, you need to do these steps in order: | ||
| + | ** Kill Ammut on 24F | ||
| + | ** Talk to the Hollow couple on 25F | ||
| + | ** Talk to the husband hollow on this floor (marked 3) to unlock teleporter E | ||
| + | ** Talk to the wife hollow (marked 4) to get the Key. | ||
| + | |||
| + | ===Boss=== | ||
| + | <div class="toccolours mw-collapsible mw-collapsed" style="overflow:auto;"> | ||
| + | {{EnemyParty|d1=Mara|i1=ag2f26boss | ||
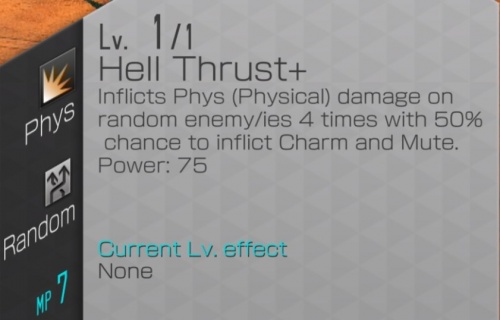
| + | |speed=22200}} | ||
| + | |||
| + | [[File:Ag2f26Hellthrust.jpg|500px]] | ||
| + | </div> | ||
==Floor 27== | ==Floor 27== | ||
| Line 39: | Line 97: | ||
[[File:AG2Floor27.png|center|500px|thumb|Map Layout]] | [[File:AG2Floor27.png|center|500px|thumb|Map Layout]] | ||
| − | *To get the Key, a | + | Notes: |
| + | *To get the Key, a {{DemonIcon|King Frost|size=32px}} is needed in either your main or your sub-party. | ||
| + | |||
| + | ===Boss=== | ||
| + | <div class="toccolours mw-collapsible mw-collapsed" style="overflow:auto;"> | ||
| + | {{EnemyParty|d1=Mermaid|d2=Horus|d3=Unicorn|i1=ag2f27add1|i2=ag2f27boss|i3=ag2f27add2 | ||
| + | |speed=30833}} | ||
| + | |||
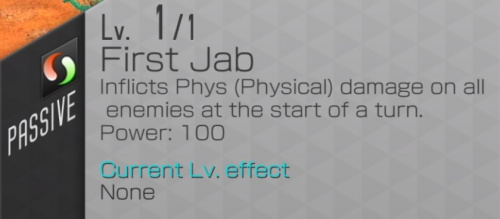
| + | [[File:ag2f27FirstJab.jpg|500px]] | ||
| + | </div> | ||
==Floor 28== | ==Floor 28== | ||
[[File:AG2Floor28.png|center|500px|thumb|Map Layout]] | [[File:AG2Floor28.png|center|500px|thumb|Map Layout]] | ||
| + | |||
| + | Notes: | ||
| + | * This floor has some false walls that you can walk through. The key requires passing through one. | ||
| + | |||
| + | ===Boss=== | ||
| + | <div class="toccolours mw-collapsible mw-collapsed" style="overflow:auto;"> | ||
| + | {{EnemyParty|d1=Hamsa|d2=Pisaca|d3=Hamsa|i1=ag2f28add1|i2=ag2f28boss|i3=ag2f28add1 | ||
| + | |speed=24400}} | ||
| + | |||
| + | * Berserk Spells: Damage is reduced by 30% if your berserk level in this element is 20 or higher | ||
| + | </div> | ||
==Floor 29== | ==Floor 29== | ||
[[File:AG2Floor29.png|center|500px|thumb|Map Layout]] | [[File:AG2Floor29.png|center|500px|thumb|Map Layout]] | ||
| + | *One of the keys is guarded by Abaddon, the barrier will open up after defeating him | ||
| + | *The northwest barrier holds an optional chest containing Mitama extract (NOT a key!). To unlock it, you will need a {{DemonIcon|Mara|size=32px}} (the Hollow next to the the barrier mentions how "only Lord Mara can pass here") | ||
| − | + | ===Boss=== | |
| + | <div class="toccolours mw-collapsible mw-collapsed" style="overflow:auto;"> | ||
| + | {{EnemyParty|d1=Efreet|d2=Hanuman|d3=Hel|i1=ag2f29add1|i2=ag2f29boss|i3=ag2f29add2 | ||
| + | |speed=22000}} | ||
| + | </div> | ||
==Floor 30== | ==Floor 30== | ||
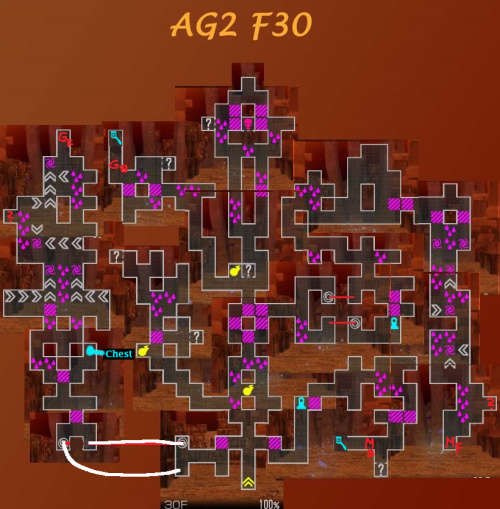
| Line 62: | Line 146: | ||
GB = Girimekhala Barrier | GB = Girimekhala Barrier | ||
| + | |||
| + | Go to GF and MF to beat the mini bosses.After beating them go to GB and GF respectively to get the keys. | ||
| + | |||
| + | ===Boss=== | ||
| + | <div class="toccolours mw-collapsible mw-collapsed" style="overflow:auto;"> | ||
| + | {{EnemyParty|d1=Pixie|d2=Mara|d3=Pixie|i1=ag2f30add1|i2=ag2f30boss|i3=ag2f30add2 | ||
| + | |speed=26066}} | ||
| + | |||
| + | [[File:ag2f26Hellthrust.jpg|500px]] | ||
| + | [[File:ag2f30MadFever.jpg|500px]] | ||
| + | [[File:ag2f30Magnificence.jpg|500px]] | ||
| + | [[File:ag2f30Mediarahan.jpg|500px]] | ||
| + | [[File:ag2f30Samrecarm.jpg|500px]] | ||
| + | </div> | ||
| + | |||
| + | ====Tested Teams==== | ||
| + | <div class="toccolours mw-collapsible mw-collapsed" style="overflow:auto;"> | ||
| + | Tested by Boblers; team suggested by SnippyTheRat | ||
| + | |||
| + | '''Party 1: {{LiberatorIcon|Kangaroo Boxer|name=1}}''' | ||
| + | |||
| + | Strategy: {{EffectIcon|Revive Seal|name=1}} the Pixies, while [[Daisoujou]] cleanses ailments. | ||
| + | {{Party | ||
| + | |h1=Cleanser|h2=Revive Sealer|h3=Damage|h4=Damage | ||
| + | |a1=ArchClear|a2=ArchPurple|a3=ArchPurple|a4=ArchRed | ||
| + | |d1=Daisoujou|d2=Skull Knight|d3=Marici|d4=Ose Hallel | ||
| + | ||s1=Void Dark Zones|s1b=|s2=Enduring Soul|s2b=|s3=|s3b=|s4=Death Blow|s4b=Phys Boost | ||
| + | }} | ||
| + | |||
| + | Brands: | ||
| + | * Daisoujou: HP %, life + lead (make sure he goes first, so he can cleanse the party!) | ||
| + | * Everyone else: PAtk %, divine. (Try to fit some HP% in there too, to help the team survive long enough to seal the pixies.) | ||
| + | |||
| + | Panels: | ||
| + | * Marici: panel 1 | ||
| + | |||
| + | Berserk levels: | ||
| + | * Phys: 20 | ||
| + | |||
| + | Notes: | ||
| + | * If you don't have enough speed to go first, close and re-open the game until Kangaroo Boxer's Position Hack lets you go first. | ||
| + | * You need to make sure that the revive-sealer scores the killing blow on the Pixies. Use the other damage-dealers to soften the enemy up. | ||
| + | ** [[Skull Knight]] isn't really ideal for the sealer, since [[Sword of Actuation]] is {{ElementIcon|Almighty|name=1}}, which cannot be boosted by Berserk levels and is difficult to boost with transfers. This makes it tricky to reach the "sweet spot" amount of HP to let him kill. Someone like {{DemonIcon|Astaroth|size=32px}} would likely be easier to use. | ||
| + | * The damage-dealers and revive-sealer should either have piercing, or should deal {{ElementIcon|Force|name=1}} damage (the only element that the Pixies don't Null). Something that can crit would be best, so you can get more press turns. | ||
| + | * Daisoujou's color isn't really important. Ose Hallel doesn't need to be {{ArchIcon|arch=Red|size=15px}} Red, but if he's {{ArchIcon|arch=Purple|size=15px}} Purple then be careful not to kill the Pixies with him. | ||
| + | * This team needs to survive long enough to seal both Pixies, but after that, you can let Mara kill them. Since Mara has 50% phys damage reduction, there's not much point to keeping this team alive after the sealing is done. | ||
| + | |||
| + | '''Party 2: {{LiberatorIcon|Templar Dragon|name=1}}''' | ||
| + | |||
| + | Strategy: Repel Pierce, debuff, and exploit Mara's {{ElementIcon|Ice|name=1}} weakness. | ||
| + | {{Party | ||
| + | |h1=Repel Pierce|h2=Repel Phys|h3=Repel Phys/Damage|h4=Repel Phys/Damage | ||
| + | |a1=ArchClear|a2=ArchTeal|a3=ArchClear|a4=ArchYellow | ||
| + | |d1=Alilat|d2=Gogmagog|d3=Rangda|d4=Mitra | ||
| + | ||s1=Lydia|s1b=War Cry|s2=Epitome of Aggression|s2b=|s3=Mabufula|s3b=|s4=Bufula|s4b= | ||
| + | }} | ||
| + | |||
| + | Brands: | ||
| + | * Alilat: HP%, life + guard | ||
| + | * Gogmagog: PDef %, divine + guard | ||
| + | * Rangda/Mitra: MAtk %, divine | ||
| + | |||
| + | Panels: | ||
| + | * Alilat: panel 3 | ||
| + | * Gogmagog: panels 1 + 2 | ||
| + | |||
| + | Berserk levels: | ||
| + | * Ice: 30 | ||
| + | |||
| + | Notes: | ||
| + | * Alilat ideally should '''NOT''' go first (but you ''can'' still win if she does). The team is effectively immune to damage/ailments aside from her, so there is a chance she could get charmed. Having her non-first means you can cleanse charm off her before she does something bad. | ||
| + | * It is crucial that Alilat stays alive, to maintain Repel Pierce. Her panels decrease her chance of getting charmed (p1) and increase her bulk (p2, p3). Gogmagog's p2 also helps Alilat's bulk, but might not be necessary. | ||
| + | * When you need to heal or cleanse Alilat, use an item - Templar Dragon ensures you only use up 1/2 a press turn icon when you do this. | ||
| + | * Fog Breath on Yellow Mitra helps to make Mara's attacks less threatening. Alilat with War Cry also reduces Mara's def, to speed up the fight a bit. | ||
| + | * The damage dealers should have {{ElementIcon|Ice|name=1}} spells transferred, to exploit Mara's ice weakness. | ||
| + | * Rangda's color isn't really important. | ||
| + | </div> | ||
===Encounters=== | ===Encounters=== | ||
| Line 134: | Line 295: | ||
|s1=Mudo|s2=Zan|s3=Rakunda|s4=Zio|s4b=Mudo}} | |s1=Mudo|s2=Zan|s3=Rakunda|s4=Zio|s4b=Mudo}} | ||
| − | *With this Setup you are looking at 23175 BS with Megakin (The main Liberator you want to use in AG because of talking to Rare Encounters such as Mitama). | + | *With this Setup you are looking at 23175 BS with {{LiberatorIcon|Megakin|name=1}} (The main Liberator you want to use in AG because of talking to Rare Encounters such as Mitama). |
**That means you need either 13% Speed via Brands on Fenrir, 18% Speed on Sleipnir or just one Speed Set of Brands on either of them (as they give 25% Speed Boost) | **That means you need either 13% Speed via Brands on Fenrir, 18% Speed on Sleipnir or just one Speed Set of Brands on either of them (as they give 25% Speed Boost) | ||
| Line 142: | Line 303: | ||
|h1=Dark AoE|h2=Flex|h3=Speedster|h4=Light AoE | |h1=Dark AoE|h2=Flex|h3=Speedster|h4=Light AoE | ||
|a1=ArchPurple|a4=ArchPurple|a3=ArchRed | |a1=ArchPurple|a4=ArchPurple|a3=ArchRed | ||
| − | |d1=Alice|d2=|d3=Garuda|d4=Mastema | + | |d1=Alice|d2=Any Demon|d3=Garuda|d4=Mastema |
||s3=Speedster|}} | ||s3=Speedster|}} | ||
*Use Flex to hit Battle Speed of 23900+ and with a nice AoE. | *Use Flex to hit Battle Speed of 23900+ and with a nice AoE. | ||
| − | *Dark AoE Replacement: | + | *Dark AoE Replacement: {{DemonIcon|Black Frost|size=32px}} |
| − | * | + | *{{DemonIcon|Cybele|size=32px}} is also good in this Floor |
Latest revision as of 10:15, 7 February 2024
Contents
General
K denotes a Key Location.
Floor 21
Boss
| Decarabia | Ikusa | Decarabia
|
|---|---|---|

|

|

|
| Resistances | |||||||
|---|---|---|---|---|---|---|---|
| Decarabia | - | - | - | - | - | - | - |
| Ikusa | - | - | - | - | - | - | - |
| Decarabia | - | - | - | - | - | - | - |
| Battle Speed | 19700 | ||||||
Floor 22
Notes:
- You need
 Purge Extract Ag x3 to trade for a key, so make sure to be on the lookout for them in the Black Market.
 - Talk to the mother-and-son hollow at the bottom right for a key on a later floor.
- The fastest route is to first go through the portals to get the key, then talk to the mother-and-son hollow on the way to the boss room.
Boss
| Apis | Forneus | Isis
|
|---|---|---|

|

|

|
| Resistances | |||||||
|---|---|---|---|---|---|---|---|
| Apis | - | - | - | - | - | - | - |
| Forneus | - | - | - | - | - | - | - |
| Isis | - | - | - | - | - | - | - |
| Battle Speed | 18166 | ||||||
Floor 23
Notes:
- To get the key, head south-west from the spawn point and take warp point A, then warp point C. Talk to the hollow and tell her you won't hurt her, and she'll give you the key.
- Warp point G is locked by default, you have to talk to the mother and son hollow in F22. If you have talked to them the son hollow will appear one tile south of the warp point G, talk to him and he'll unlock the warp point.
- Head south-east from the spawn point and take warp point G to get to the boss room.
Boss
| Black Ooze | Incubus | Black Ooze
|
|---|---|---|

|

|

|
| Resistances | |||||||
|---|---|---|---|---|---|---|---|
| Black Ooze | - | - | - | - | - | - | - |
| Incubus | - | - | - | - | - | - | - |
| Black Ooze | - | - | - | - | - | - | - |
| Battle Speed | 15300 | ||||||
Floor 24
Notes:
- Defeat Chagrin to unlock the barrier guarding the key. He's at the dead-end path to the west of the key.
- Defeat Ammut in the upper teleport area, to get a key on a later floor.
- Talk to Letter Hollow 1 (in the lower teleport area) for a letter, and bring it to Letter Hollow 2 on 25F. You will need to deliver multiple letters between these two Hollows, to get a key for 25F.
Boss
| Mitra | Shiki-Ouji | Berserker
|
|---|---|---|

|

|

|
| Resistances | |||||||
|---|---|---|---|---|---|---|---|
| Mitra | - | - | - | - | - | - | - |
| Shiki-Ouji | - | - | - | - | - | - | - |
| Berserker | - | - | - | - | - | - | - |
| Battle Speed | 17700 | ||||||
Floor 25
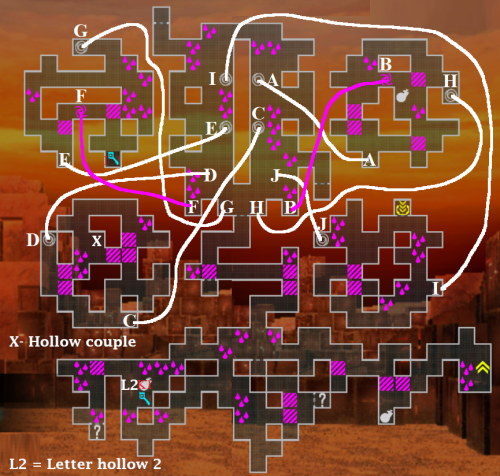
Notes:
- Talk to Letter Hollow 1 on 24F for a letter, and bring it to Letter Hollow 2 on 25F (bottom-left of the map). You will need to deliver multiple letters between these two Hollows, until Letter Hollow 2 gives you a key for 25F.
- For 25F's second key, take teleporter E to enter the top-left house, then loot the pile of debris in the bottom-right of the house.
- Talk to the Hollow couple for a key on a later floor. To find them, take teleporter C to enter the bottom-left house, then talk to them in the middle of the house.
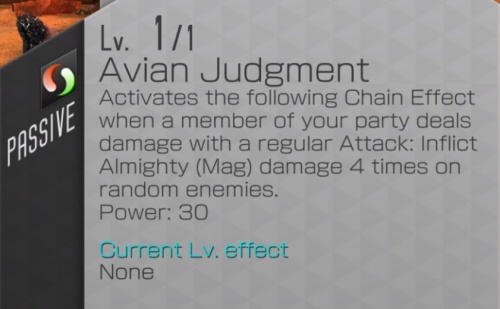
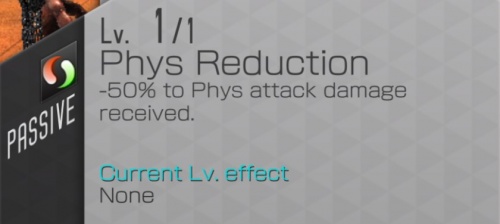
Boss
| Grendel | Jatayu | Grendel
|
|---|---|---|

|

|

|
| Resistances | |||||||
|---|---|---|---|---|---|---|---|
| Grendel | - | - | - | - | - | - | - |
| Jatayu | - | - | - | - | - | - | - |
| Grendel | - | - | - | - | - | - | - |
| Battle Speed | 18666 | ||||||
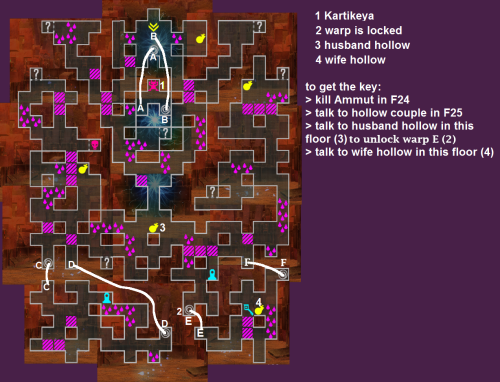
Floor 26
Notes:
- To get the Key, you need to do these steps in order:
- Kill Ammut on 24F
- Talk to the Hollow couple on 25F
- Talk to the husband hollow on this floor (marked 3) to unlock teleporter E
- Talk to the wife hollow (marked 4) to get the Key.
Boss
Floor 27
Notes:
- To get the Key, a
 King Frost is needed in either your main or your sub-party.
Boss
| Mermaid | Horus | Unicorn
|
|---|---|---|

|

|

|
| Resistances | |||||||
|---|---|---|---|---|---|---|---|
| Mermaid | - | - | - | - | - | - | - |
| Horus | - | - | - | - | - | - | - |
| Unicorn | - | - | - | - | - | - | - |
| Battle Speed | 30833 | ||||||
Floor 28
Notes:
- This floor has some false walls that you can walk through. The key requires passing through one.
Boss
| Hamsa | Pisaca | Hamsa
|
|---|---|---|

|

|

|
| Resistances | |||||||
|---|---|---|---|---|---|---|---|
| Hamsa | - | - | - | - | - | - | - |
| Pisaca | - | - | - | - | - | - | - |
| Hamsa | - | - | - | - | - | - | - |
| Battle Speed | 24400 | ||||||
- Berserk Spells: Damage is reduced by 30% if your berserk level in this element is 20 or higher
Floor 29
- One of the keys is guarded by Abaddon, the barrier will open up after defeating him
- The northwest barrier holds an optional chest containing Mitama extract (NOT a key!). To unlock it, you will need a
 Mara (the Hollow next to the the barrier mentions how "only Lord Mara can pass here")
Boss
| Efreet | Hanuman | Hel
|
|---|---|---|

|

|

|
| Resistances | |||||||
|---|---|---|---|---|---|---|---|
| Efreet | - | - | - | - | - | - | - |
| Hanuman | - | - | - | - | - | - | - |
| Hel | - | - | - | - | - | - | - |
| Battle Speed | 22000 | ||||||
Floor 30
MF = Mishaguji Fight
MB = Mishaguji Barrier
GF = Girimekhala Fight
GB = Girimekhala Barrier
Go to GF and MF to beat the mini bosses.After beating them go to GB and GF respectively to get the keys.
Boss
| Pixie | Mara | Pixie
|
|---|---|---|

|

|

|
| Resistances | |||||||
|---|---|---|---|---|---|---|---|
| Pixie | - | - | - | - | - | - | - |
| Mara | - | - | - | - | - | - | - |
| Pixie | - | - | - | - | - | - | - |
| Battle Speed | 26066 | ||||||
Tested Teams
Tested by Boblers; team suggested by SnippyTheRat
Party 1: ![]() Kangaroo Boxer
Kangaroo Boxer
Strategy: ![]() Revive Seal the Pixies, while Daisoujou cleanses ailments.
Revive Seal the Pixies, while Daisoujou cleanses ailments.
| Cleanser | Revive Sealer | Damage | Damage |
|---|---|---|---|
 Daisoujou Daisoujou
|
 Skull Knight Skull Knight
|
 Marici Marici
|
 Ose Hallel Ose Hallel
|
| Void Dark Zones | Enduring Soul | Death Blow | |
| Phys Boost |
Brands:
- Daisoujou: HP %, life + lead (make sure he goes first, so he can cleanse the party!)
- Everyone else: PAtk %, divine. (Try to fit some HP% in there too, to help the team survive long enough to seal the pixies.)
Panels:
- Marici: panel 1
Berserk levels:
- Phys: 20
Notes:
- If you don't have enough speed to go first, close and re-open the game until Kangaroo Boxer's Position Hack lets you go first.
- You need to make sure that the revive-sealer scores the killing blow on the Pixies. Use the other damage-dealers to soften the enemy up.
- Skull Knight isn't really ideal for the sealer, since Sword of Actuation is
 Almighty, which cannot be boosted by Berserk levels and is difficult to boost with transfers. This makes it tricky to reach the "sweet spot" amount of HP to let him kill. Someone like
  Astaroth would likely be easier to use.
- Skull Knight isn't really ideal for the sealer, since Sword of Actuation is
- The damage-dealers and revive-sealer should either have piercing, or should deal
 Force damage (the only element that the Pixies don't Null). Something that can crit would be best, so you can get more press turns.
 - Daisoujou's color isn't really important. Ose Hallel doesn't need to be
 Red, but if he's
  Purple then be careful not to kill the Pixies with him.
 - This team needs to survive long enough to seal both Pixies, but after that, you can let Mara kill them. Since Mara has 50% phys damage reduction, there's not much point to keeping this team alive after the sealing is done.
Party 2: ![]() Templar Dragon
Templar Dragon
Strategy: Repel Pierce, debuff, and exploit Mara's ![]() Ice weakness.
Ice weakness.
| Repel Pierce | Repel Phys | Repel Phys/Damage | Repel Phys/Damage |
|---|---|---|---|
 Alilat Alilat
|
 Gogmagog Gogmagog
|
 Rangda Rangda
|
 Mitra Mitra
|
| Lydia | Epitome of Aggression | Mabufula | Bufula |
| War Cry |
Brands:
- Alilat: HP%, life + guard
- Gogmagog: PDef %, divine + guard
- Rangda/Mitra: MAtk %, divine
Panels:
- Alilat: panel 3
- Gogmagog: panels 1 + 2
Berserk levels:
- Ice: 30
Notes:
- Alilat ideally should NOT go first (but you can still win if she does). The team is effectively immune to damage/ailments aside from her, so there is a chance she could get charmed. Having her non-first means you can cleanse charm off her before she does something bad.
- It is crucial that Alilat stays alive, to maintain Repel Pierce. Her panels decrease her chance of getting charmed (p1) and increase her bulk (p2, p3). Gogmagog's p2 also helps Alilat's bulk, but might not be necessary.
- When you need to heal or cleanse Alilat, use an item - Templar Dragon ensures you only use up 1/2 a press turn icon when you do this.
- Fog Breath on Yellow Mitra helps to make Mara's attacks less threatening. Alilat with War Cry also reduces Mara's def, to speed up the fight a bit.
- The damage dealers should have
 Ice spells transferred, to exploit Mara's ice weakness.
 - Rangda's color isn't really important.
Encounters
Take-Minakata Counter
| Take-Minakata | Take-Minakata | Take-Minakata
|
|---|---|---|

|

|

|
| Resistances | |||||||
|---|---|---|---|---|---|---|---|
| Take-Minakata | - | Wk | - | Rs | - | - | - |
| Take-Minakata | - | Wk | - | Rs | - | - | - |
| Take-Minakata | - | Wk | - | Rs | - | - | - |
| Battle Speed | 18900 | ||||||
Variety Fight
| Fomorian | Kodama | Naga | Suparna |
|---|---|---|---|

|

|

|

|
| Resistances | |||||||
|---|---|---|---|---|---|---|---|
| Fomorian | - | Wk | Nu | - | - | - | - |
| Kodama | - | Wk | - | - | Nu | - | - |
| Naga | - | Wk | Rs | Rs | Wk | - | Wk |
| Suparna | - | - | - | Nu | - | Rs | Wk |
| Battle Speed | 20900 | ||||||
Speedy Fight
| Hathor | High Pixie | Hathor | High Pixie |
|---|---|---|---|

|

|

|

|
| Resistances | |||||||
|---|---|---|---|---|---|---|---|
| Hathor | Wk | - | Rs | - | Rs | Nu | - |
| High Pixie | - | - | - | - | Rs | - | - |
| Hathor | Wk | - | Rs | - | Rs | Nu | - |
| High Pixie | - | - | - | - | Rs | - | - |
| Battle Speed | 23900 | ||||||
Ose Retaliate
Oni Gang
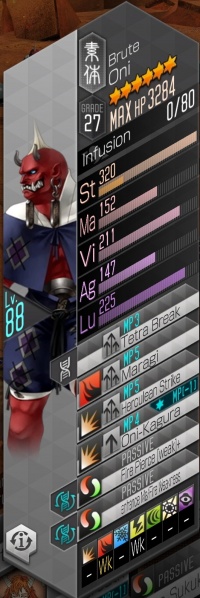
| Kamiotoko | Oni | Oni | Kamiotoko |
|---|---|---|---|

|
|

|

|
| Resistances | |||||||
|---|---|---|---|---|---|---|---|
| Kamiotoko | - | - | - | - | - | Wk | Rp |
| Oni | - | Wk | - | Wk | - | - | - |
| Oni | - | Wk | - | Wk | - | - | - |
| Kamiotoko | - | - | - | - | - | Wk | Rp |
| Battle Speed | 19250 | ||||||
Shiisaa/Decarabia Gang
| Decarabia | Shiisaa | Shiisaa | Decarabia |
|---|---|---|---|

|

|

|

|
| Resistances | |||||||
|---|---|---|---|---|---|---|---|
| Decarabia | - | - | - | - | - | Wk | Rs |
| Shiisaa | - | Rs | - | - | Nu | Rs | - |
| Shiisaa | - | Rs | - | - | Nu | Rs | - |
| Decarabia | - | - | - | - | - | Wk | Rs |
| Battle Speed | 22000 | ||||||
Teams
- You want to beat 23900 BS to go first.
- Try to get a Fire AoE in, as a lot of encounters are weak to it.
Budget
| Fire AoE | Fire AoE #2 | Speedster | Light AoE |
|---|---|---|---|
 Hua Po Hua Po
|
 Efreet Efreet
|
 Fenrir Fenrir
|
 Sleipnir Sleipnir
|
| Mudo | Zan | Rakunda | Zio |
| Mudo |
- With this Setup you are looking at 23175 BS with
 Megakin (The main Liberator you want to use in AG because of talking to Rare Encounters such as Mitama).
- That means you need either 13% Speed via Brands on Fenrir, 18% Speed on Sleipnir or just one Speed Set of Brands on either of them (as they give 25% Speed Boost)
Expensive
| Dark AoE | Flex | Speedster | Light AoE |
|---|---|---|---|
 Alice Alice
|
Any Demon |  Garuda Garuda
|
 Mastema Mastema
|
| Speedster | |||
- Use Flex to hit Battle Speed of 23900+ and with a nice AoE.
- Dark AoE Replacement:
 Black Frost
  Cybele is also good in this Floor
