Difference between revisions of "Brands of Sin: Sloth"
Sushimuffin (talk | contribs) (added Sloth 12) |
(→Example Party) |
||
| Line 1,545: | Line 1,545: | ||
====Example Party==== | ====Example Party==== | ||
| − | + | The Parties to use are the same as Sloth 11, but perhaps you may need more Accuracies (or ACC buffs/debuffs) on your demons because of Lucifer high evasion rate. | |
</div> | </div> | ||
Revision as of 05:10, 12 July 2020
Contents
Stages
Kikuri-Hime (Stage 1~5)
Stage 1-3
Wave 1
| Raijuu | Cu Sith
|
|---|---|

|

|
| Resistances | |||||||
|---|---|---|---|---|---|---|---|
| Raijuu | - | - | - | Rs | Wk | - | - |
| Cu Sith | - | - | - | - | - | Nu | - |
| Battle Speed | ? | ||||||
Wave 2
| Black Ooze | Raijuu
|
|---|---|

|

|
| Resistances | |||||||
|---|---|---|---|---|---|---|---|
| Black Ooze | Rs | - | - | Wk | - | Wk | Nu |
| Raijuu | - | - | - | Rs | Wk | - | - |
| Battle Speed | ? | ||||||
Boss
| Kikuri-Hime
|
|---|

|
| Resistances | |||||||
|---|---|---|---|---|---|---|---|
| Kikuri-Hime | - | - | - | Wk | Nu | - | Wk |
| Battle Speed | ? | ||||||
Stage 4~5
Wave 1
| Demon | Phys | Fire | Ice | Elec | Force | Light | Dark |
|---|---|---|---|---|---|---|---|
| Incubus | - | - | - | Weak | Resist | - | - |
| Marin Karin, Mudoon, Zan, --- | |||||||
| Black Ooze | Resist | - | - | Weak | - | Weak | Null |
| Ju, Poisma, Charm Bite, --- | |||||||
| Blob | Resist | - | Weak | - | - | Weak | Null |
| Poisma, Zan, Mazan, --- | |||||||
Wave 2
| Demon | Phys | Fire | Ice | Elec | Force | Light | Dark |
|---|---|---|---|---|---|---|---|
| Mermaid | - | - | Resist | Weak | Resist | - | - |
| Ice Breath, Wind Breath, Media, --- | |||||||
| Black Ooze | Resist | - | - | Weak | - | Weak | Null |
| Ju, Poisma, Charm Bite, --- | |||||||
| Blob | Resist | - | Weak | - | - | Weak | Null |
| Poisma, Zan, Mazan, --- | |||||||
Wave 3
| Demon | Phys | Fire | Ice | Elec | Force | Light | Dark |
|---|---|---|---|---|---|---|---|
| Mermaid | - | - | Resist | Weak | Resist | - | - |
| Ice Breath, Wind Breath, Media, --- | |||||||
| Kikuri-Hime (Boss) | - | - | - | Weak | Null | - | Weak |
| Redia, Maragion, Marin Karion, --- | |||||||
| Black Ooze | Resist | - | - | Weak | - | Weak | Null |
| Ju, Poisma, Charm Bite, --- | |||||||
Trumpeter (Stage 6~9)
Stage 6~7
Wave 1
| Demon | Phys | Fire | Ice | Elec | Force | Light | Dark |
|---|---|---|---|---|---|---|---|
| Black Ooze | Resist | - | - | Weak | - | Weak | Null |
| Ju, Poisma, Charm Bite, Disturbance | |||||||
| Silky | - | Weak | Null | - | - | - | - |
| Meweakdi, Null Weak, Bufudyne, Mediara | |||||||
| Mad Gasser | - | - | - | - | - | Weak | Resist |
| Mapoisma, Poison Pursuit, Mudodyne, Hellish Mask | |||||||
Wave 2
| Demon | Phys | Fire | Ice | Elec | Force | Light | Dark |
|---|---|---|---|---|---|---|---|
| Shiki-Ouji | Null | Weak | Weak | - | - | Resist | Resist |
| Resist Mute, Hama, Mudo, Dekaja | |||||||
| Silky | - | Weak | Null | - | - | - | - |
| Meweakdi, Null Weak, Bufudyne, Mediara | |||||||
| Mad Gasser | - | - | - | - | - | Weak | Resist |
| Mapoisma, Poison Pursuit, Mudodyne, Hellish Mask | |||||||
Wave 3
| Demon | Phys | Fire | Ice | Elec | Force | Light | Dark |
|---|---|---|---|---|---|---|---|
| Shiki-Ouji | Null | Weak | Weak | - | - | Resist | Resist |
| Resist Mute, Hama, Mudo, Dekaja | |||||||
| Silky | - | Weak | Null | - | - | - | - |
| Meweakdi, Null Weak, Bufudyne, Mediara | |||||||
| Trumpeter | - | - | - | - | - | Null | Null |
| Concentrate, Soul Drain, Apocalypse, Mamakajaon | |||||||
Stage 8~9
Wave 1
| Demon | Phys | Fire | Ice | Elec | Force | Light | Dark |
|---|---|---|---|---|---|---|---|
| Shiki-Ouji | Null | Weak | Weak | - | - | Resist | Resist |
| Resist Mute, Hama, Mudo, Dekaja, Mamarin Karion | |||||||
| Lilim | - | - | Weak | - | Null | - | - |
| Resist Charm, Mazanma, Marin Karin, Spirit Drain, Mamarin Karion | |||||||
| Lailah | - | - | - | Weak | Resist | Null | Weak |
| Mediara, Light Boost, Mahamaon, Makajamaon, Mamarin Karion | |||||||
| Battle Speed (10000 / 11234) |
Wave 2
| Demon | Phys | Fire | Ice | Elec | Force | Light | Dark |
|---|---|---|---|---|---|---|---|
| Dakini | Resist | Drain | Weak | - | - | - | - |
| Barrier Break, Agilao, Berserker God, Poismaon, Mamarin Karion | |||||||
| Lilim | - | - | Weak | - | Null | - | - |
| Resist Charm, Mazanma, Marin Karin, Spirit Drain, Mamarin Karion | |||||||
| Lailah | - | - | - | Weak | Resist | Null | Weak |
| Mediara, Light Boost, Mahamaon, Makajamaon, Mamarin Karion | |||||||
| Battle Speed (10967 / 12300) |
Wave 3
| Demon | Phys | Fire | Ice | Elec | Force | Light | Dark |
|---|---|---|---|---|---|---|---|
| Dakini (2.1k HP / 2.3k HP) | Resist | Drain | Weak | - | - | - | - |
| Barrier Break, Agilao, Berserker God, Poismaon, Mamarin Karion | |||||||
| Lilim (1.9k HP / 2.1k HP) | - | - | Weak | - | Null | - | - |
| Resist Charm, Mazanma, Marin Karin, Spirit Drain, Mamarin Karion | |||||||
| Trumpeter (3.5k HP / 4k HP) | - | - | - | - | - | Null | Null |
| Concentrate, Mad King, Apocalypse, Mamakajaon, Ceaseless Mute, Mamarin Karion | |||||||
| Battle Speed (13134 / 14734) |
- A Ward Brand Set is mandatory as this stage is full of status ailment users.
- Try to finish each battle within 3 turns before Auto Barrier wears off.
- Trumpeter will combo Concentrate with Apocalypse, so be wary of how much damage it can do. Apocalypse can also mute your entire party, so bring Phys attackers.
- Recommended Demons: 3★ Ose, 3★ Horus, 4★ Sandalphon, 5★ Surt, 5★ Vishnu, 5★ Yoshitsune
Lucifer (Stage 10)
Wave 1
| Girimekhala | Isis | Lilim
|
|---|---|---|
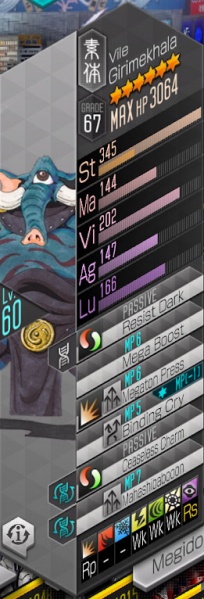
|
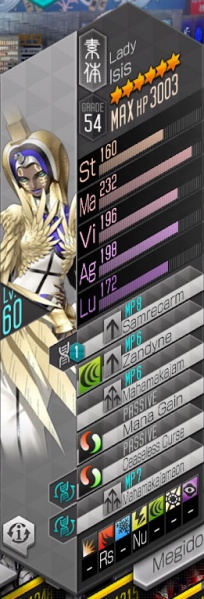
|
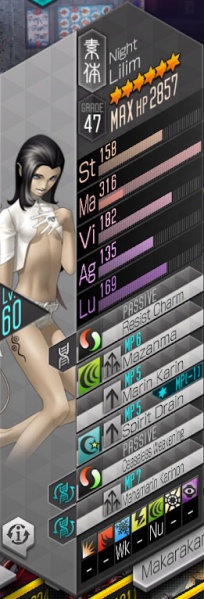
|
| Resistances | |||||||
|---|---|---|---|---|---|---|---|
| Girimekhala | Rp | - | - | Wk | Wk | Wk | Rs |
| Isis | - | Rs | - | Nu | - | - | - |
| Lilim | - | - | Wk | - | Nu | - | - |
| Battle Speed | 16,000 | ||||||
Wave 2
| Skadi | Girimekhala | Isis
|
|---|---|---|
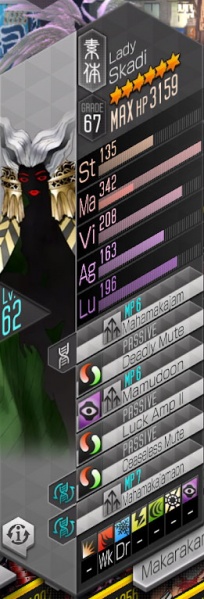
|

|

|
| Resistances | |||||||
|---|---|---|---|---|---|---|---|
| Skadi | - | Wk | Dr | - | - | - | - |
| Girimekhala | Rp | - | - | Wk | Wk | Wk | Rs |
| Isis | - | Rs | - | Nu | - | - | - |
| Battle Speed | 16,933 | ||||||
Wave 3
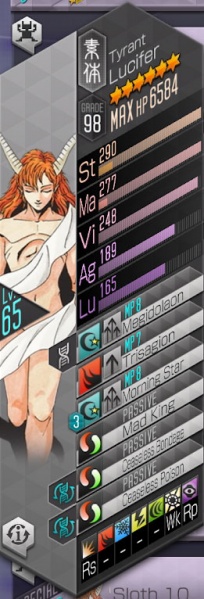
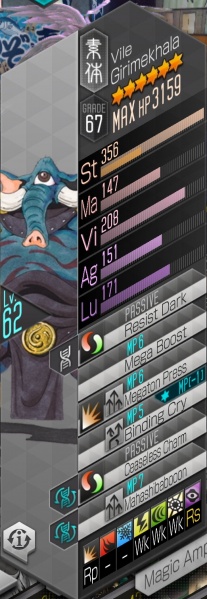
| Skadi | Lucifer | Girimekhala
|
|---|---|---|

|
|
|
| Resistances | |||||||
|---|---|---|---|---|---|---|---|
| Skadi | - | Wk | Dr | - | - | - | - |
| Lucifer | Rs | - | - | - | - | Wk | Rp |
| Girimekhala | Rp | - | - | Wk | Wk | Wk | Rs |
| Battle Speed | 16,733 | ||||||
Auto-Battle Party
Explanation
- Almost all of the demons in this node are weak to Light. The goal is to go first, and get your demons to spam Hama to get extra press turns and easily kill the demons. They all need the Ward set because without it, they will get statused when it's the enemy's turn to act. There's a timer of 3 turns per wave that you need to hit, and the timer for the last wave is a lot shorter due to Lucifer being a threat with Morning Star and Megidolaon spam.
Demons:
- Sleipnir is used because of innate Light Boost + Speedster as well as access to Mahamaon.
- Horus is used because of high Agility + Light Boost on awakening.
- Sandalphon is used because of Null Dark that saves us a Resist Dark transfer on Horus, as well as having access to Hamadyne and Hamamaon.
- Mermaid is used because she's the most budget Infinite Chakra user - Tsukuyomi/Prometheus are too slow and do not have two free slots for Light magic.
Example Party
| Sweeper 1 | Sweeper 2 | Sweeper 3 | Sweeper 4 |
|---|---|---|---|
 Sleipnir Sleipnir
|
 Horus Horus
|
 Mermaid Mermaid
|
 Sandalphon Sandalphon
|
| Resist Fire | Hama | Hamaon | Light Boost |
| Hama | Mahama | Hama |
- Battle Speed should be 17,000+. MATK should be 1,100+.
- Light Boost can be dropped if you feel that you have enough MATK to kill the waves within 3 turns without dying. Alternatively, take Light Boost if you're lacking in damage.
- Alternatives include: Red Kushinada, Red Feng Huang, Purple Kresnik, Red Lailah
- Purple Mastema is an extremely powerful Light element attacker. It's overkill, but if you do happen to have access to a Mastema of any archetype, use it.
- Brands should be Divine + Ward, prioritize MATK then Speed. You can take Hama instead of Hamaon on Mermaid if you run Spell Brands.
- Judgement Light can work as better replacement of Hama when the Dx2 is Eileen due her skills Fragant Lily, Lucky Press II, Post Script and Happy Ending. Getting Judgement Light and level it tends to be uncommon and difficult.
- Mana Aid is a skill that sometimes appears as a featured Skill Extraction skill. It's not very useful in general, but this is one of the few situations in which it comes in handy - one of the common ways to lose this fight when auto-battling is to run out of MP just before the Lucifer fight and be unable to kill him before dying to Almighty spells.
Videos of clears:
Additional discussion:
Lucifer (Stage 11)
Wave 1
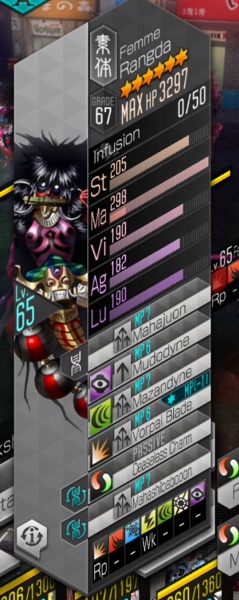
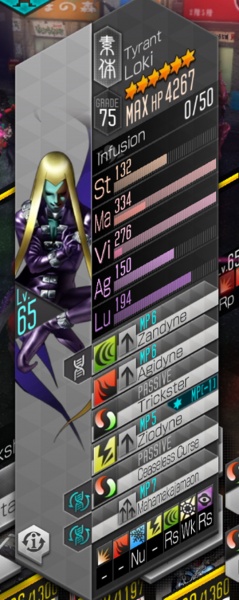
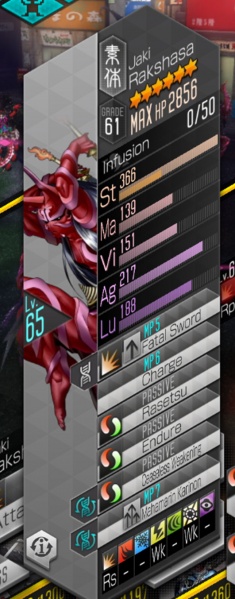
| Rangda | Loki | Rakshasa
|
|---|---|---|
|
|
|
| Resistances | |||||||
|---|---|---|---|---|---|---|---|
| Rangda | Rp | - | - | Wk | - | - | - |
| Loki | - | - | Nu | - | Rs | Wk | Rs |
| Rakshasa | Rs | - | - | Wk | - | Wk | - |
| Battle Speed | 18300 | ||||||
Wave 2
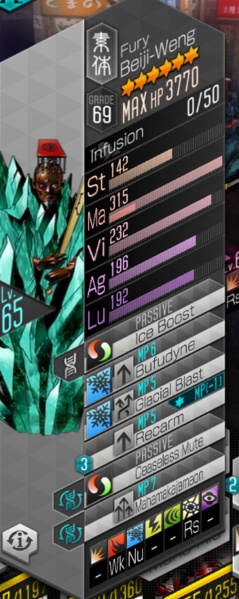
| Rakshasa | Loki | Beiji-Weng
|
|---|---|---|

|

|
|
| Resistances | |||||||
|---|---|---|---|---|---|---|---|
| Rakshasa | Rs | - | - | Wk | - | Wk | - |
| Loki | - | - | Nu | - | Rs | Wk | Rs |
| Beiji-Weng | - | Wk | Nu | - | - | Rs | - |
| Battle Speed | 18766 | ||||||
Wave 3
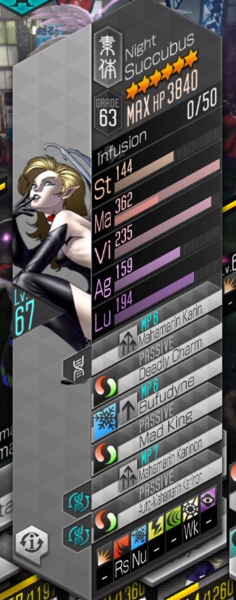
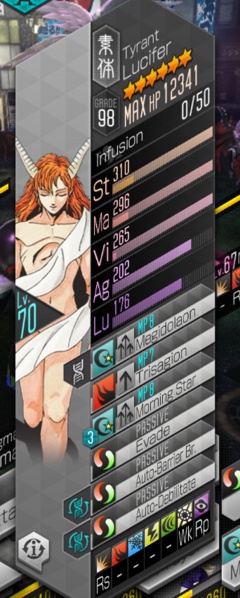
| Succubus | Lucifer | Kudlak
|
|---|---|---|
|
|
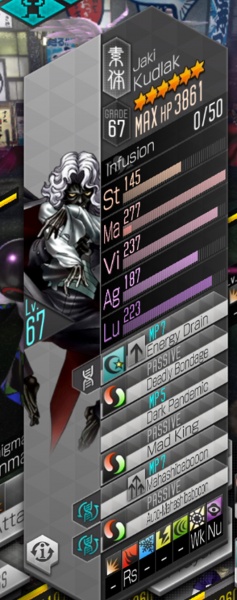
|
| Resistances | |||||||
|---|---|---|---|---|---|---|---|
| Succubus | - | Rs | Nu | - | - | Wk | - |
| Lucifer | Rs | - | - | - | - | Wk | Rp |
| Kudlak | - | Rs | - | - | - | Wk | Nu |
| Battle Speed | 18266 | ||||||
Auto-Battle Party
| Ailment Cleanse | 5Elements | Light Damage | Light Damage |
|---|---|---|---|
| 50px [[]] |  Huang Long Huang Long
|
 Mastema Mastema
|
 Metatron Metatron
|
| Hamaon L | Endure | ||
| Prayer | Samrecarm | Light Boost | Light Boost |
Explanation
- As the enemies use Auto Ailment Skills and Auto-Barrier Break, an Ailment cleanse is needed.
- Daisoujou is the best ailment cleanser, but Kinmamon with Prayer and Divine brands can work too. Silent Prayer can work for manual play, but the AI can use up its MP and not be able to cast it when needed.
- Huang Long is needed to Repel incoming Spells, should you not kill each wave Turn 1. Recommended Speedster to hit speed needed to go first.
- If you have a lot of damage, you can substitute HL with another Light Attacker to kill everything Turn 1.
- The last two slots are Light Attackers. Mastema and Red Metatron are the most used, though other such as Lailah or Uriel can work.
- Mastema can use Spell Brands if maxed Trial of Hate
- Metatron can use Spell Brands due to Infinite Chakra
Example Party
Nirvash
| Ailment Cleanse | 5Elements | Damage | Damage |
|---|---|---|---|
 Kinmamon Kinmamon
|
 Huang Long Huang Long
|
 Mastema Mastema
|
 Metatron Metatron
|
| Hama | Endure | Mana Aid | Back Attack |
| Prayer | Samrecarm | Light Boost | Light Boost |
- Mastema unmaxed ToH, Divine Brands, 1700Matk
- HL Speed & Divine Brands, 1.8k HP
- Kinmamon Divine Brands, 1.9k HP
- Meta Divine Brands 1.5k Matk
Urabe
| Ailment Cleanse | 5Elements | Damage | Damage |
|---|---|---|---|
 Daisoujou Daisoujou
|
 Huang Long Huang Long
|
 Mastema Mastema
|
 Metatron Metatron
|
| Auto-Tarunda | Speedster | Mana Aid | Back Attack |
| Hama | Tarunda | Resist Fire | Light Boost |
Party Explanation
- Daisoujou
- He can be Teal Or Purple
- Divine brand and Lead Brand
- Cleansing Shout MUST BE level 4, you can use it always
- Why Auto-Tarunda? He borns as Red but I change it because the AI only used Mahamadyne
- Huang Long
- Teal to focuse it on cast Five Elements
- Why Tarunda? He is reused from Deceit 10
- Divine brand
- Mastema
- He must have Resist fire because Lucifer have Trisagion
- Spell brand
- Mana Aid for Trial of Hate spam
- Trial of Hate MUST BE level 6, two uses per wave
- Panel 1 unlocked for extra damage
- 1.7k Matk
- Metatron
- Divine brand, extra uses of Mahamadyne
- 1.4k Matk
Fight Explanation
Daisoujou attack first (lead brand) using Hama giving you an extra turn, this is essential for a constant use of Five Elements because Huang Long going to have 2 turn, Mastema and Metatron kill everyting on turn 1 on first wave. In the second wave Beiji-Weng survive but he is not a real problem. Metatron need Divine brand to spamming Mahamadyne 2 waves and sometimes in the last wave. This alignment have a really hight percent of success.
- Extra tips
- No select a support demon
- Use Kangaroo Boxer or Chalk Eater as Dx2 for extra damage
- On Auto Quest Settings check *Auto select Cheer in Battle Assists
- On Auto Quest Settings uncheck *Auto Select an available Support Demon
Lucifer (Stage 12)
Wave 1
| Rangda | Loki | Rakshasa
|
|---|---|---|

|

|

|
| Resistances | |||||||
|---|---|---|---|---|---|---|---|
| Rangda | Rp | - | - | Wk | - | - | - |
| Loki | - | - | Nu | - | Rs | Wk | Rs |
| Rakshasa | Rs | - | - | Wk | - | Wk | - |
| Battle Speed | 18300 | ||||||
Wave 2
| Rakshasa | Loki | Beiji-Weng
|
|---|---|---|

|

|

|
| Resistances | |||||||
|---|---|---|---|---|---|---|---|
| Rakshasa | Rs | - | - | Wk | - | Wk | - |
| Loki | - | - | Nu | - | Rs | Wk | Rs |
| Beiji-Weng | - | Wk | Nu | - | - | Rs | - |
| Battle Speed | 18766 | ||||||
Wave 3
| Succubus | Lucifer | Kudlak
|
|---|---|---|

|

|

|
| Resistances | |||||||
|---|---|---|---|---|---|---|---|
| Succubus | - | Rs | Nu | - | - | Wk | - |
| Lucifer | Rs | - | - | - | - | Wk | Rp |
| Kudlak | - | Rs | - | - | - | Wk | Nu |
| Battle Speed | 18533 | ||||||
Explanation
- Same as S11, but with beefier demons
Example Party
The Parties to use are the same as Sloth 11, but perhaps you may need more Accuracies (or ACC buffs/debuffs) on your demons because of Lucifer high evasion rate.