Aura Gate SP
Contents
Overview
Special Aura Gate, or Aura Gate SP, or simply AG SP, is an event exclusive Aura Gate with just one floor, randomly chosen from a selection of maps that depend on the chosen difficulty (higher difficulties have bigger maps). The objective is to get the highest score possible in every run.
As in the original Aura Gate and AG2, AG SP is a good place to collect Demons, items and currencies, but unlike in those, the fact that it only depends on Stamina to start a run and that each run takes a considerable time to be completed, mainly on the highest difficulty, means that it can be explored almost continuously for the duration of the event, being a much better/faster way to gain EXP, currency, items and Demons than any other area, quest or mission alone.
Mechanics
Running the AG SP yields, besides the regular AG rewards, SP Points, which yield event currency (e.g., Blood Karma, Vengeful Ethereal Body), which can be exchanged for Event Cubes (e.g., Asura Cube, Vengeance Cube), which can be opened to get random gifts, which range from items, to currencies and even some Demons.
Entering an Aura Gate SP requires spending Stamina. Every run is given a limited amount of SP Action Points, depending on the selected difficulty, which are independent and unrelated to the global Action Points used in Aura Gate and Aura Gate 2.0. Unlike global Action Points, AG SP's do not refill over time and, if they are all spent, the run is over. Because the boss fight usually yields the most points alone, be careful to not go too far from the boss room, otherwise, there won't be enough SP Action Points to get there.
AG SP don't have Dark Zones, but they have Damage Panels, so having a healer or a Demon with Damage Panel reduction or immunity helps, mainly if not all Demons used have high Vitality.
Check news for specifics on each event AG SP.
Difficulties
There're currently 3 difficulties: Novice, Expert, and Master.
Each successful run increases the boss Lv. and also gives extra 1% to next run of the same difficulty, until reaching Lv. 65. Repeated completion bonus does not stack to other difficulties, so, try to run the highest difficulty possible with your available demons.
Novice runs get 200 SP Action Points, Expert, 250, and Master, 300. Unused SP Action Points are also counted for final score, but battles usually yield more SP Points than the average SP Action Points required to get an encounter, mainly if using Demons with SP Bonus (see below).
Daily Tickets
During the event period, an SP Ticket will be automatically received at the beginning of the day, i.e., midnight JST (it doesn't require picking it from the Gifts inbox or going to the Home screen). SP Ticket gives a 500% boost on the final results and is automatically consumed at the first run of the day.
Challenges
Challenges are side goals, renewed randomly at the beginning of the day during the whole event period and must be fulfilled every run to get a 10% bonus per challenge completed, up to a total of 30%.
Because Challenges affect a rate modifier (%) of the final score, they are more important than most factors considered for calculating the result, so they are worth fulfilling on every run.
The Challenges are basically of three types:
- use a kind of Skill a number of times (e.g., Ice, Almighty, Magical, Physical);
- attack (any) weaknesses a number of times;
- defeat a specific class of Demons a number of times (e.g., Haunt, Fairy).
- befriending Demons are also scored as "defeating" them for Challenge purposes, so Talking is completely fine in AG SP.
Completing the Challenges:
- Transfer appropriate Skills to least important Demons to fulfil Challenges, in case none of the chosen Demons are suitable for specific Challenges.
- Beware that not all Panel Effects count for fulfilling Challenges, so don't rely on them, unless properly tested before (e.g., Guts' Panel 1 Fire (Physical) strike doesn't count as a Fire attack).
- Using Auto Battle Mode is fine enough for most of the run, but disable it and have some manual fighting if the Challenges are not being fulfilled (that usually happens when the Challenges require casting spells that are available on secondary Demons, and the main sweepers are clearing the enemy Waves too fast, so they never get a chance to act, or the AI is always choosing some other Skills, instead of those required to reach the side goals.)
Team Building
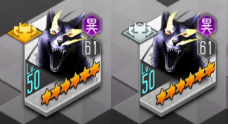
Usually, Demons related to the current Event get Special Effect Bonuses (SP Effect), denoted by a golden or silver demon icon on the top left of the Demon's avatar or in the top middle of its profile screen (golden SP Effect Bonuses are, usually, 4 times that of silver ones, e.g., if a silver Demon gives 25% more EXP, a golden Demon will give 100% more EXP). Usually, SP Effect gives three bonuses, more Points, more Macca, and more EXP gained from battles. Have as many of them as possible in your Teams to get the most bonus per battle.
New players can have two parties to enter the AG SP at the same time. Getting Demons with Special Effects on both parties increase the bonus obtained, independent of which team is being used in battle, as the effects of the Demons on the second party also sum up.
Note: to find the Demons with SP Effect, click on the filter button on the lower left of the Demon selection screen, then click on the "SP Effect" button to order them by their SP Effect icon.
Building a Team:
- Use as many golden Demons as possible.
- Complete the Team with as many silver Demons as possible.
- If all available Demons with SP Effects are too weak, build a Team using strong Demon(s) without SP Effect, just enough to win the battles, then fill the remaining slots with golden, then silver Demons. After running the AG SP for a while, those SP Effect Demons may be enhanced and evolved enough to not need the aid of the stronger Demons, allowing for building a Team composed only of SP Effect Demons.
- Transfer support Skills to the least important/weakest Demons, like healing (e.g., Mediarama), buffs (e.g., Tarukaja), debuffs (e.g., Rakunda), and Dmg Panel V I, Dmg Panel V II or Dmg Panel Immunity, to make a better use of them. The strongest Demons should be built for winning the battles.
- Get better Brands for all Demons.
Note: not all SP Effect Demons are good Demons for use in Dx2, so don't waste resources to level up their Skills or to Panel them only for running the AG SP, unless they are worth it. Even evolving them beyond 4★ or 5★ must be well pondered.
| Icon | Bonus |
|---|---|
| |
|
Scoring
In AG SP events, player receive SP Points from a variety of sources and accomplishments. Along with Macca and Magnetite, SP Points can be found lying around in AG SP, which varies from 7-128 points so far, as well as from treasure chests, ranging from 200 up to 2500 points (highest that have been observed thus far, October/2021), and also from defeating regular enemies and bosses. In general, bosses give the most points and different bosses give different amounts. The rarer the boss, the more SP Points it yields.
On your first run of the day, you will have an SP ticket. This item gives you 500% bonus on the final score of your next run. So, if you want to maximize the amount of rewards you get in a run, you should try to maximize the points of the first run of the day to use that boost.
You will receive rewards based on the number of points you earn on a run. Specifically, you will get 1 event currency (e.g., Blood Karma) for every 10 points you earn on a run.
The following table (accurate as of July/2020, Undead Alice event) shows the flat number of points available in bonus factors that go into your final score:
| Bonus\Difficulty | Novice | Expert | Master |
|---|---|---|---|
| Difficulty Bonus | 170 | 250 | 380 |
| Boss Defeated: Turn 1• | 150 | 240 | 360 |
| Boss Defeated: Turn 2• | 100 | 120 | 240 |
| Boss Defeated: Turn 3• | 50 | 60 | 120 |
| AP Left Upon Completion | AP Remaining X 2 | AP Remaining X 2 | AP Remaining X 3 |
| Maximum Damage Dealt in One Turn | Total Damage Dealt / 10 | Total Damage Dealt / 14.25 | Total Damage Dealt / 20 |
•Only one of these bonuses applies, based on how long it took to kill the boss.
The total number of points, as calculated using the bonuses above, combined with the total number of points acquired through pickups, defeating enemies and killing the boss are then increased by a percentage based on the number of challenges you completed (10% per challenge completed, 3 challenges maximum) as well as the number of runs you have made on the same difficulty (1% per run, capped at 30% per difficulty), to a maximum bonus of 60%. After reaching 30 runs, the difficulty is levelled for all subsequent runs.
Notes:
- There is no point penalty for using a gem revive, however, previous turns used to fight the boss are counted. For example, you have taken 2 turns and, on the second turn, the boss wipes out your party. If you use a gem revive and kill the boss on the revive turn, you will receive bonus for killing the boss on the Turn 3.
- The boss Turn count is reset if Death is accepted, in case of being defeated by the boss, that is, instead of spending gems to revive the Team to continue fighting the boss, it's better to accept defeat and go to the boss room again (if there are enough Action Points to do that). Accepting defeat will take the Team back to the floor's starting point.
Strategy
General tips:
- Keep in mind that the main factor in AG SP is time: it only lasts till the event is over, so try running it as many times as possible. Usually, SEGA/Atlus are generous enough to give away free Time Limited Monster Dew, which restores Stamina during the event period, so there is plenty to run AG SP as many times one can stay awaken playing.
- Always start from the highest difficulty and try to defeat the bosses. If the Demons are not strong enough, try leveling them up, upgrading Skills, enhancing Stats and wearing better Brands. If still not enough, then try an easier difficulty, but keep upgrading and leveling up Demons, Brands, Skills and so on, until it gets too easy, then try a higher difficulty again.
- Some times, the chosen Demons are strong enough to win the battles, but they may be having issues like Battle Speed (
- Run only the highest difficulty possible, because they grant more SP Action Points, yield more SP Points from battles, and uses better modifiers for summing the final results up.
Running the floor maze:
- On the first runs, it's not so important to clear the whole floor, just go as fast as possible to the boss room, as the main goal is to level up the boss till Lv. 65 in Master Difficulty, to get the 30% modifier. The only exception is the very first run, which will get an SP Ticket, so try to sweep the most of the floor, just be careful to save enough SP Action Points to go to the boss room.
- After reaching boss Lv. 65 (30 rus), it's important to unveil all the maps, to be able to plan the best runs.
- Always go for the treasure chest.
- Always save enough SP Action Points to get to the boss room (and, obviously, always fight the boss!)
- The floors are reset on every run, so item spots will always have items to be collected.
- Using Auto Move is usually good enough, as each difficulty gives enough SP Action Points to run the whole floor, with a few to spare, so it's generally granted to reach the boss room auto-moving.
- On average, Auto Move results less SP Points than could be gathered running the dungeon manually, because the movements are random, instead of aiming at the treasure chest and farming items from the floor.
- Auto Move will try to unveil unvisited squares first, so it may be used to unveil all the maps in the beginning of the event.
- After passing over the last hidden square, Auto Move will start sweeping the floor as if it had just started the floor run, so it will waste Action Points repassing on already visited squares, therefore, there may not be enough left to reach the boss room. It's usually better to disable Auto Move at that point and manually go to the boss room, instead of leaving it running unattended.
- On already completely unveiled maps, a better way of using Auto Move is taking enough steps away from the path that leads to the boss room, then activating Auto Move to let it sweep, which will assure it will only go toward the boss room after completely clearing the rest of the floor (usually, it still won't do a perfect run, but those few initial manual movements will enhances a lot the collected items, without taking too much of the player's time turning and returning manually).
- If the boss room is reached before the treasure chest is open, retreat, open the Auto Move options, check the option to stop when finding a Chest, then turn Auto Move on again. When the Chest if found, open it, then manually go back to the boss room to finish the run. On the next run, don't forget to check off the option to stop when finding a Chest.
Fighting the boss:
- Usually, the boss is the strongest enemy that you'll find in a run, so that's the best opportunity to deal the most damage in a single turn and get a better score.
- In some events, the boss may have sidekicks, what enhances the chances of dealing a lot more damage, using
 All Targets Skill attacks.
 - Never Auto Battle a boss, prefer manual fighting (to avoid AI using useless Skills, like healing, because that's going to be the last fight, anyway). It's not necessary to disable Auto Battle Mode before entering the boss room, as the boss room uses an independent Auto Battle Mode setting and it'll be disabled by default upon entering it.
- Usually, it's better to let the strongest Demons attack the boss.
- Try to deal damage not enough to kill it in a single blow, passing the turn of weaker Demons (to save half Press Turns and accumulate MP) to have the strongest Demon deliver a second and killing blow (of course, if it's strong enough to finish the boss, otherwise, use the other demons to soften it or do the job).
- Be careful not to let the boss fight last more than one turn, as it reduces the overall score.
Rewards
Rewards are obtained exchanging Event Currency (resulting from SP Points gathered on the floor runs) for Event Cubes, which contain random items, and even Demons (usually, class Mitama), inside. Other rewards are obtained as drops from battles (e.g., Aether, Life Stone).
AG SP, usually, also rewards purchases of Cubes, so it's better to spend the Event Currency regularly on them.
Maps
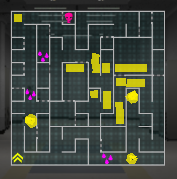
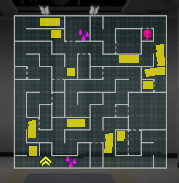
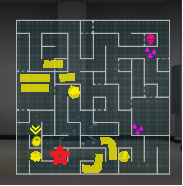
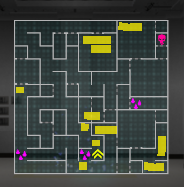
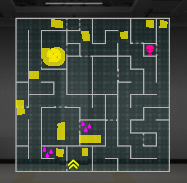
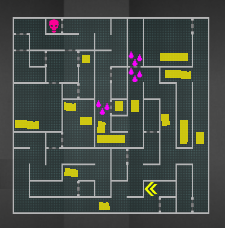
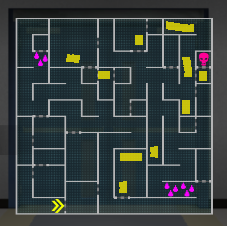
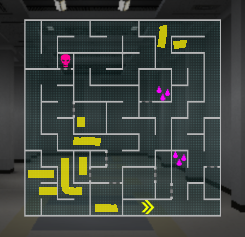
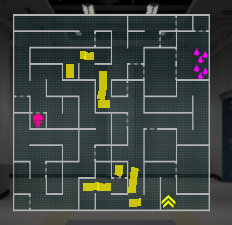
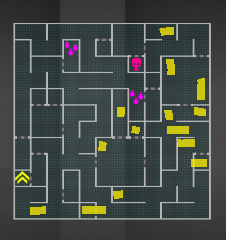
The game selects a random floor map configuration for each run. The floor maps are different for every AG SP, but they don't change for the duration of the Event, making it possible to map them all, aiming to optimize every run, although that's usually too time consuming to be practical.
Below are the maps of a past Event. Yellow highlight represents the area where the pickups are. Unless marked, the starting point is the same as the starting cursor shown on the map.
Cubes
Cubes are obtained by exchanging 500 event currency for each, or from AG SP battle drops, or from completing the missions in AG SP.
These Cubes gives 1 of the following, at random:
| Item | Quantity |
|---|---|
| 1 | |
| 1 | |
| 1 | |
| 1 | |
| 1 | |
| 1 | |
| 1 | |
| 1 | |
| 1 | |
| 1 | |
| 1 | |
| 1 | |
| 1 | |
| 1 | |
| 1 | |
| 100,000 | |
| 100,000 |
| Quest Areas | |
|---|---|
| Permanent Content | Story • Dx2 Quests • Alter-World • Aura Gate (1, 2, SP) |
| Farming Quests | Strange Signal • Brands of Sin • Wanted |
| Recurring Events | Eclipse • Hell's Park • Advent • Kiwami • Tokyo Abyss • Take Back Tokyo • Demon Alliance Invasion |
| Competitive | Democalypse • D2 Duel • Battle Tower |
